How to Fix Windows 7 Blue Screen after SSD Install
Have you encountered Windows 7 blue screen after SSD install? Don’t worry! Get quick fixes to the problem in this article.
By Dervish / Updated on May 12, 2023
The problem: Windows 7 blue screen after SSD install
SSD, with the advanced reading and writing performance as well as the low latency property, has become the first choice for computer users to install operating systems. But some users suffer blue screen after they install or clone Windows on a new SSD. How does this happen?
Possible causes for Windows 7 blue screen after SSD install
There are two things that may account for SSD blue screen in Windows 7: bad sectors on SSD or disabled AHCI mode. To figure out the exact cause, you can look over the blue screen error log in following steps:
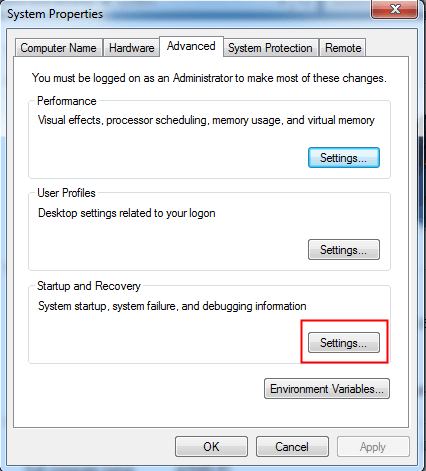
1. Right click the “Computer” icon on the desktop and select “Properties”.
2. In the pop-up window, select “Advanced system settings”.
3. In the next window, click “Settings” in Startup and Recovery column.
4. Check “Write an event to the system log” and uncheck “Automatically restart”. Click “OK” to save the changes.
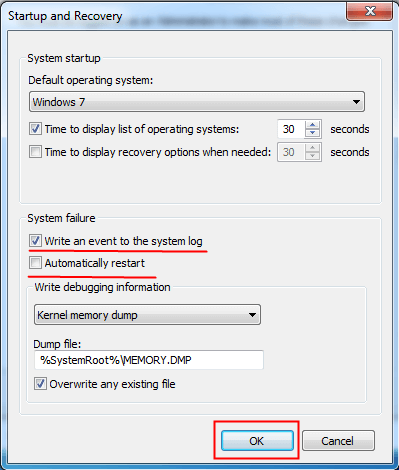
5. Navigate to C:\Windows\Minidump and view dump files in Minidump folder.
After checking out the exact cause, you can proceed to fix the error of SSD blue screen in Windows 7.
How to fix Windows 7 blue screen after SSD install efficiently
I’ll show you quick fixes to SSD blue screen in Windows 7 caused by bad sectors on SSD and disabled AHCI mode separately.
▶ Check and recover bad sectors
To check bad sectors on SSD, I strongly recommend you to use AOMEI Partition Assistant Professional. The graphical user interface of this partition magic is very clear, allowing users to see at a glance. Because its operation is very simple, not as complicated as other third-party products. In addition to checking for bad sectors, you can also rebuild MBR to solve problems such as "system missing" or "operating system not found".
If you can’t boot your computer from SSD anymore, you should create bootable media with AOMEI Partition Assistant first. Follow the instructions below:
1. Connect a USB drive to a computer in good condition. Install and launch AOMEI Partition Assistant. Click “Tools” in the top toolbar, and choose “Make Bootable Media” and follow the wizard to complete the process.

2. Insert the bootable USB into the computer which has a boot problem. Boot from the USB by changing boot order in BIOS.
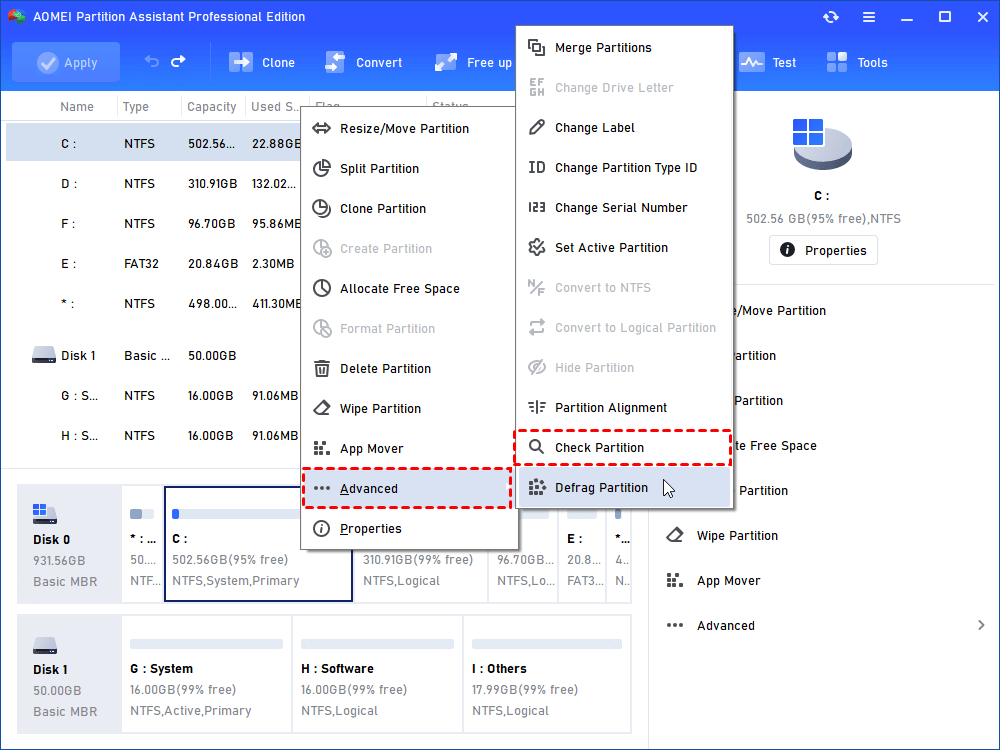
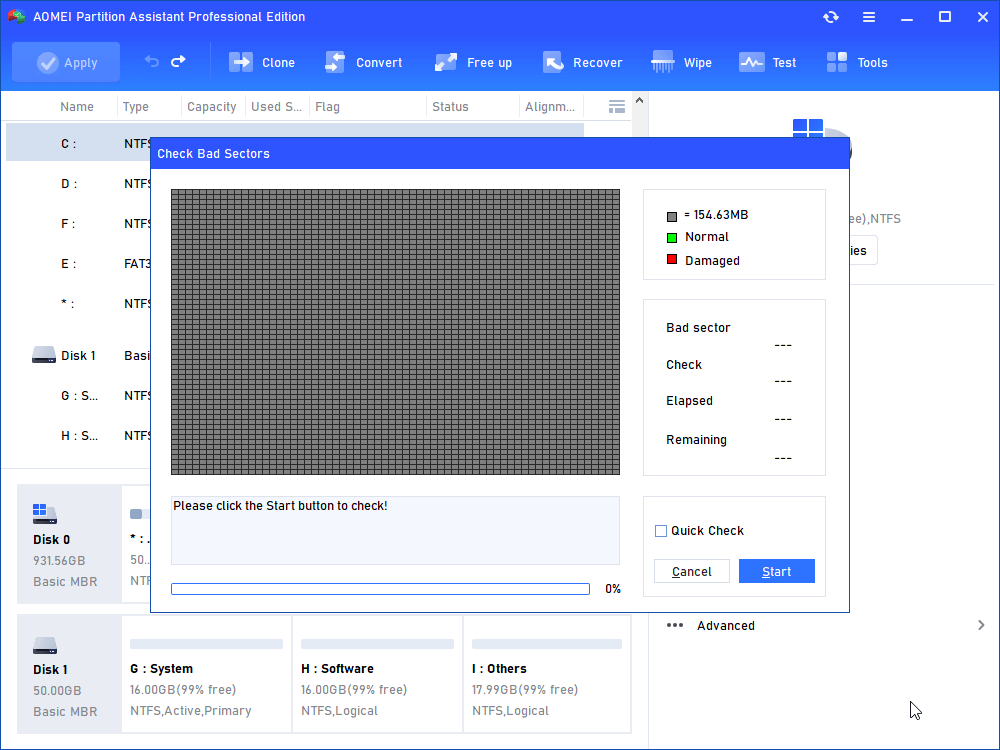
3. You’ll see loaded AOMEI Partition Assistant once login. Right-click the system partition, select “Advanced” and then “Check Partition”.
4. Select the way of checking errors to perform. In the pop-up window, choose “Check whether there is a bad sector on the partition” and click “OK”.
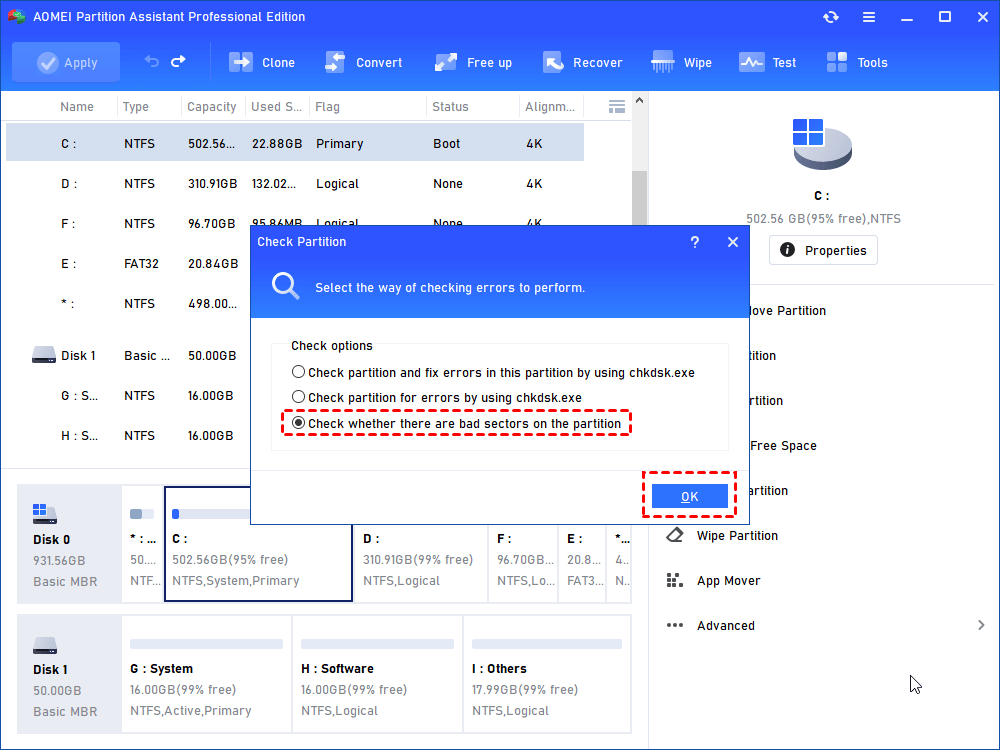
5. Click “Start” to perform checking.
✐ Notes:
● If there are bad sectors detected, back up Windows 7 system partition first. Send the disk to professional data recovery center if there are important data on bad sectors. Don’t recover the data by yourself with recovery tools because it’s a destruction of data rather than a recovery of data.
● Not all bad sectors can be recovered, so it’s necessary for you to build schedule backups.
● If you buy the SSD newly and find bad sectors on it that can’t be recovered, please contact the manufacturer’s customer support for a new SSD or repair service.
▶ Enable AHCI mode
If you enable AHCI mode after Windows installation, you will face a BSOD error, INACCESSABLE_BOOT_DEVICE or your system will refuse to boot. If you switch from IDE to AHCI and reinstall Windows, the process seems to be complicated and error-prone. I’d like to recommend an efficient method of enabling SSD AHCI in Windows 7 without reinstalling Windows:
1. Restart computer and tap Del to enter BIOS interface.
2. In the BIOS Utility dialog, select Integrated Peripherals > SATA RAID/AHCI Mode > IDE. (The option names differ in different BIOS Utility.) Press F10 to save changes and restart computer.
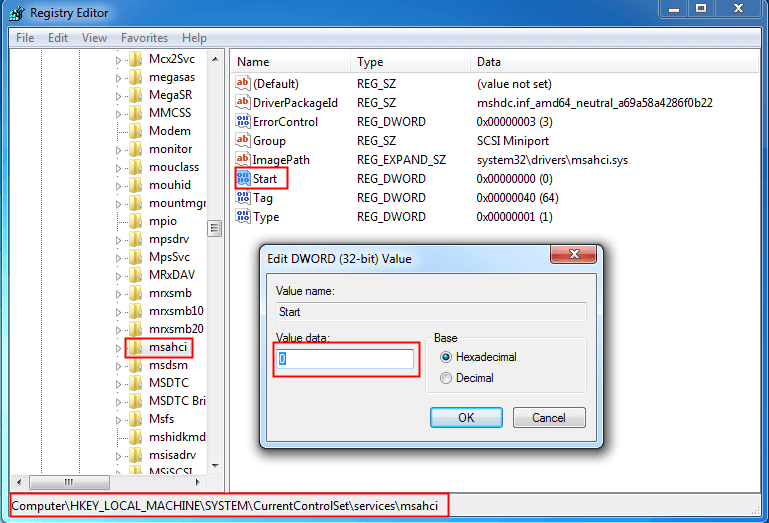
3. When you enter computer desktop, press Windows Key + R to open the Run dialogue. Type regedit and press Enter or click “OK” to open the Registry Editor.
4. Expand the entries on the left-hand pane to navigate to the following path:
HKEY_LOCAL_MACHINE\SYSTEM\CurrentControlSet\services\msahci
5. Double-click the Start DWORD and change its value from 3 to 0. Click “OK” to apply the change.
6. Reboot your computer and set the SATA mode to AHCI. Press F10 to save changes and restart computer.
Conclusion
Now you see how to fix Windows 7 blue screen after SSD install, first you have to find out the cause of this problem, and then choose the corresponding solution from above. These solutions apply to fixing Windows 10 blue screen after installing SSD as well. AOMEI Partition Assistant Professional has enough features to help you solve daily disk partition problems. If you haven't tried it yet, please don't miss it.