How to Copy Windows 7 to USB Drive and Make It Bootable?
Sometimes, you might want to copy Windows 7 to USB, here we introduce how to copy Windows OS to USB drive using Command Prompt and a versatile partition manager. So you can easily clone Windows to USB and make the USB drive bootable.
By Emily / Updated on May 12, 2023
2 Situations where you need to copy Windows 7 to USB
Copying Windows 7 operating system onto USB flash drive can be useful in many cases, and below are two most common situations.
1. Install Windows conveniently
With each new release of Windows, the installation time gets shorter and shorter. However, Windows is still released in DVD or ISO form, and installing Windows OS from optical media is also still too slow. So, many users choose to install OS from USB drive, which is much faster and more convenient. To make a bootable USB as a Windows installer, you have to know how to copy Windows 7 to USB from ISO or DVD.
2. Create a portable Windows drive
Secondly, lots of computer users want to clone or copy Windows 7/8/10 to USB drive to make a portable Windows USB so that they can keep their customized OS environment in their pocket, carry around and boot familiar OS on other computers, even the brand-new one. Besides, when the computer crashes suddenly, they can also rescue it with the portable Windows USB drive.
Tutorial: copy Windows 7 to USB in different cases
Since we have listed the two most common situations where you might want to clone Windows operating system onto a USB flash drive, now we will introduce how to do it in detail respectively.
Case 1. Copy Windows 7 to USB using CMD for installing OS
First of all, we would like to tell how to clone Windows 7 onto a USB flash drive using CMD (Command Line) with the purpose of installing OS conveniently.
Notes:
①Prepare a flash drive with at least 8 GB of space for Windows 10 and 8.1, or at least 4 GB of space for Windows 7.
②The process described below will delete everything currently on your flash drive. Make sure to back up your flash drive to another storage location before proceeding.
1. Connect your USB drive to the computer and make sure it is recognized.
2. Open a command prompt as Administrator: press “Win+R” combination to open Run dialogue, input “cmd” in the box and press on “Enter”.
3. Run the following commands to partition and format the USB drive.
● diskpart
● list disk
● select disk 1: modify disk number as needed
● clean
● create partition primary
● select partition 1
● active
● format fs=ntfs
● assign
● exit: exit DISKPART, but leave the command prompt window open
4. Mount the Windows installation media: put the Windows installation disc in the optical drive, mount the ISO, or extract its contents to a folder.

The ISO file will now be extracted to a sub-folder with the same name as the ISO file. This can take a few minutes to complete.
5. Use BOOTSECT command to make the USB drive bootable
After the media mounted to extracted, run the commands below to update the filesystem on the flash drive to make it bootable.
● E:
● cd boot
● bootsect.exe /nt60 F:”
Be aware: Replace E with your install media drive letter, and F with your USB flash drive letter.
6. Use ROBOCOPY command “robocopy E:F: /s /v /mt: 16”to copy the contents of the Windows installation media to the USB drive
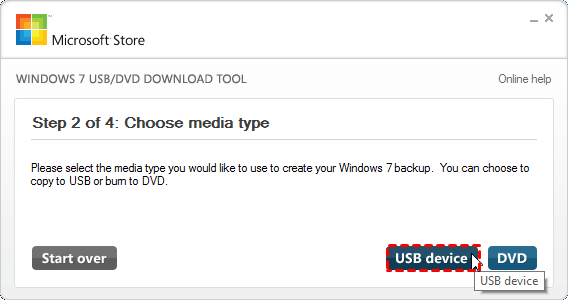
When it completes, type “Exit” to leave the command prompt. Then you can boot your computer from the bootable USB drive and install Windows. Besides copying Windows 7 onto USB drive from DVD/CD using Command Prompt, you can also use Windows 7 USB/DVD Download Tool, a free utility that will automatically make a bootable USB flash drive using a Windows 7/8/10/11 ISO image file.
Simply download the tool, choose the ISO file and USB drive, then the Wizard will do everything for you.
Case 2. Copy Windows 7 to USB for portable Windows 7 device
This section is about how to copy Windows 7 to USB flash drive to make a portable Windows operating system. For this task, Windows released a new feature named “Windows To Go” for Windows 8/8.1 Enterprise and Windows 10 Education/Enterprise/Pro. With that, users can burn Windows ISO files to USB, boot and run Windows from USB devices.
But it cannot work on Windows 7 and Windows 8/8.1 Home/ Pro/Education as well as Windows 10 Home. Thus, you can use AOMEI Partition Assistant Professional instead. It developed a more powerful and versatile “Windows To Go Creator”. Compared with Microsoft “Windows To Go”, it is a better choice for the below advantages:
❤ It is more compatible and allows you to copy all versions of Windows 10, 8.1/8 or 7 onto a removable USB flash drive to boot it from any computer as you need.
❤ It only requires a 13GB USB and a non-certified USB drive is also OK, while the "Windows To Go” needs a USB drive of 32GB at least and the USB must be certified by Microsoft at the same time, otherwise you cannot convert ISO to USB successfully.
❤ It permits you to create Windows to go USB with either Windows disc/ISO or current system.
❤ It allows you to make a bootable USB for mac and run Windows from USB on Mac.
Now, you can download the demo version and learn how to clone Windows 7 to USB drive step by step.
1. Install and run AOMEI Partition Assistant Pro on your Windows 7 computer. Connect the USB drive to the computer and make sure it is detected successfully.
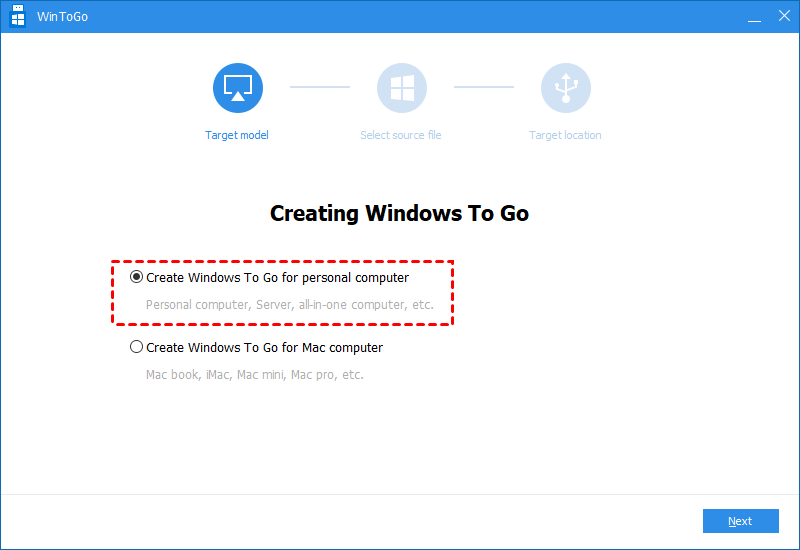
2. Click “Tools” in the top toolbar, and choose “Windows To Go Creator”.

3. Choose "Create Windows ToGo for personal computer" and click "Next".
4. Select the first method "Create Windows To Go with system disc/ISO" and choose the prepared ISO file. Click "Next".

PS.: If the Windows 7 ISO files are not available or you don’t want to download or extract the ISO file, you can choose "Create Windows To Go with current system".
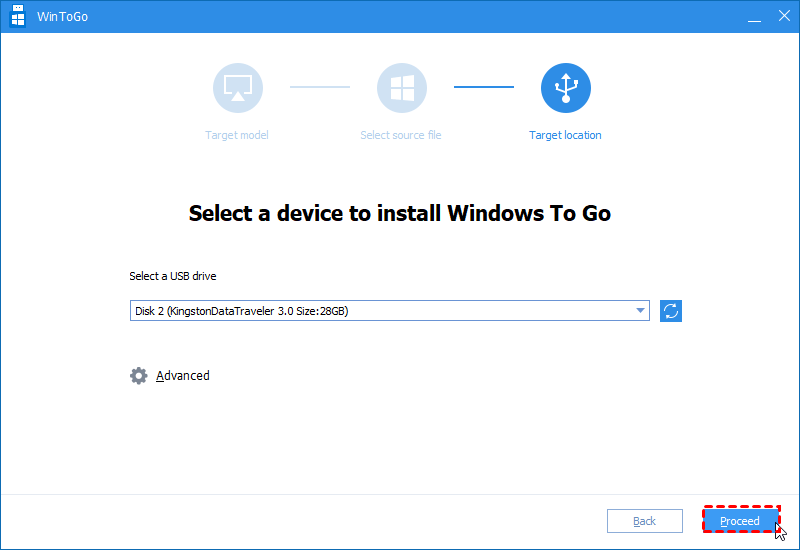
5. Then choose the USB drive and click "Proceed" to start cloning Windows 7 to USB drive.
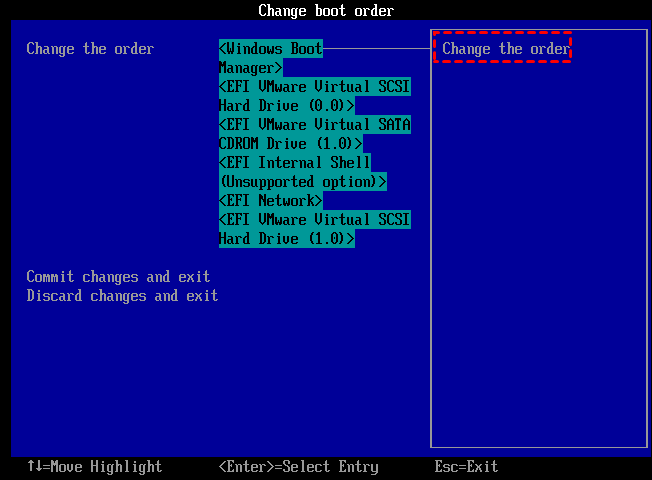
After cloning Windows OS to USB via the above methods, you can plug the USB drive into any computer at any place, enter BIOS, and change the boot order to USB first and save. Then you can successfully boot computer into your familiar Windows 11/10/8/7 environment.
Sum Up
Now, I am sure you have a clear idea of how to copy Windows 7 to a USB drive from DVD using CMD or clone Windows operating system to USB drive for a portable Windows. By the way, AOMEI Partition Assistant Pro also has many other fantastic features, such as migrating only OS drive to SSD/HDD, quick partitioning a large hard disk within two clicks, recovering lost partition, and more. To move Windows Server to USB drive, you can try AOMEI Partition Assistant Server.

