How to Delete Hibernation Partition in Windows 7 Easily?
Curious about the Healthy Hibernation Partition on your HP/Lenovo/Dell/Toshiba laptop? Learn what the Hibernation Partition is and how to delete it easily in Windows 7/8/10.
By Lucas / Updated on May 12, 2023
About Hibernation Partition
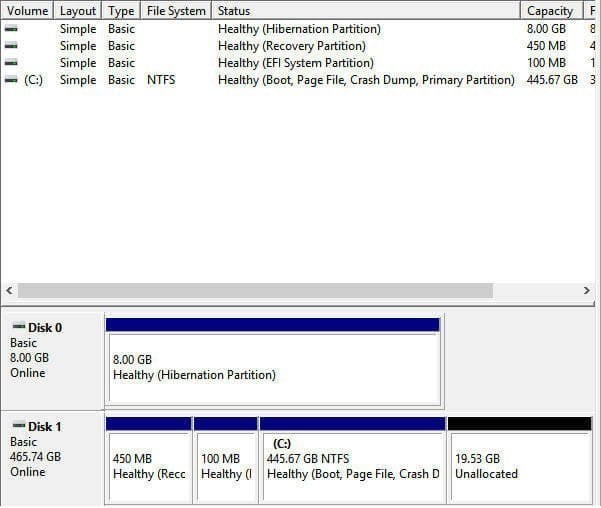
A Hibernation Partition can be seen in Windows File Explorer and Disk Management in some laptops. Usually, the partition size varies from 4GB to 8GB as a separated partition on a hard disk especially SSD, marked as Healthy. Hibernation is a power-saving state which saves the snap shot data in Windows. Then, what a Hibernation Partition is and what the difference between hibernation files and this partition is.
What is Hibernation Partition?
The Hibernation Partition is a separate partition that contains hibernation file used by Intel Rapid Start Technology (IRST). It is a special partition that is used exclusively by IRST, depending on the PC’s BIOS or UEFI, so not all laptops have Hibernation Partition. You can find this partition on HP, Dell, Toshiba, Lenovo, etc. PCs.
The Hibernation Partition is always the same size as the installed memory because it writes the contents of memory to the disk partition to hibernate. It puts your work and settings in memory and draws a small amount of power while sleep. That method uses the least amount of power among all power-saving states in Windows.
Differences between Hibernation Partition and Windows hiberfil.sys
Generally speaking, the Hibernation Partition and the single hibernation file are created by different enterprises. The former is created by Intel and the later is Windows. In addition, Hibernation Partition exists on some certain laptops that used by IRST particularly. However, Windows hiberfil.sys can be found on almost all kinds of laptops.
The biggest differences between them are the location and mobility. As mentioned, the Hibernation Partition is a separated partition that locates on SSD and can be located anywhere on any SSD in the system. However, the Windows hibernation file (c:\hiberfil.sys) must be readable by the bootloader, and be stored in the root of the primary system partition where it can be read by the miniature file system driver built into the critical boot files. And it cannot be relocated.
Although they have such differences, the intention of them is the same: save PC state so that you can back to work quickly.
Why Need to Delete Hibernation Partition in Windows 7?
What is the necessary of removing hibernation partition in Windows 7? After all, it is an effective way of saving power. In fact, there are two main reasons account for deleting hibernation files.
-
Full use disk space. In some cases, the laptop system disk has a small disk like 128GB capacity. Even if the Hibernation Partition takes up only 4GB or 8GB, it is a big amount of space for that small disk. Therefore, some users want to delete Hibernation Partition on SSD to utilize that space. Also, if a user has no need for computer hibernation, he would delete that partition regardless of the disk capacity.
-
Change Hibernation Partition size. The original Hibernation Partition size is decided by then installed RAM. However, if you add an extra RAM stick, the partition size needs to be extended. Under that circumstance, delete the old Hibernation Partition and then create a new one with new size is the most acceptable solution.
You may have other reasons when talking about removing Hibernation Partition. However, it is more important to learn how to delete the partition with ease.
How to Delete Hibernation Partition in Windows 7 in Simple Steps?
Even though you can see Hibernation Partition in Disk Management, you are unable to delete it there. Right click the partition and you’ll find there is no Delete option available. You may have to remove it with other utilities.
Important: it is suggested to backup boot drive in Windows 7 because data loss may be caused by inappropriate operations.
Delete Hibernation Partition via Diskpart
1. Press Windows key and R key simultaneously to open Run. Type diskpart and press Enter. Run as administrator.
2. In Diskpart, type these commands in turn and each command has an Enter followed by.
-
select disk system
-
list partition
-
select partition n (where n is the partition number of the Hibernation Partition)
-
delete partition override
-
exit
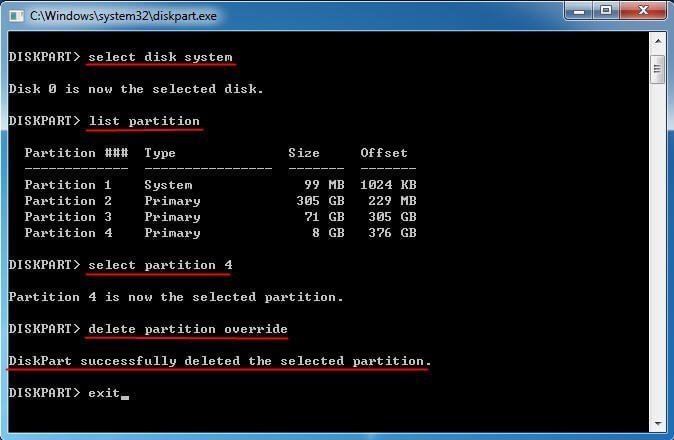
You should see “Diskpart successfully deleted the selected partition”. If not, please refer to delete partition override not working. Also, when you cannot delete hibernation partition with Diskpart, it is a wise move to turn to powerful third-party software.
Remove Hibernation Partition Using CMD via Powerful Software
AOMEI Partition Assistant Professional is all-around partition manager that allows you to delete a partition thoroughly in simple steps. It is a tiny program with no bundled software. Command line operations supported as well. It works on Windows 7, 8, 10, XP, Vista. Let’s take a closer look.
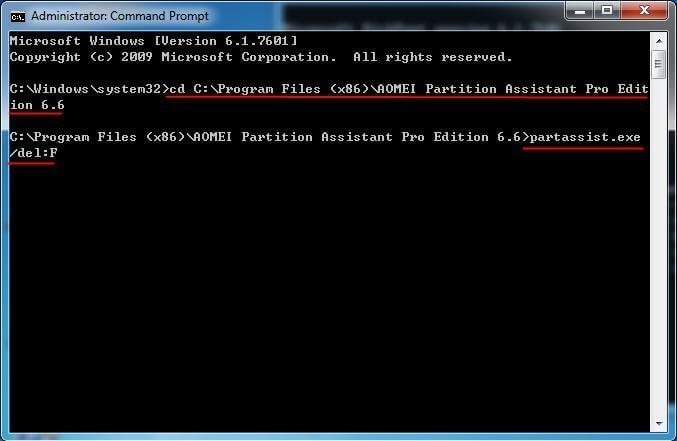
1. Install and run AOMEI Partition Assistant on your Windows 7. Open Command Prompt and type: cd + installation directory of AOMEI Partition Assistant to get started. For example, type: cd C:\Program Files (x86)\AOMEI Partition Assistant Pro Edition 6.6 and hit Enter.
To learn the installation path, right click the desktop shortcut of AOMEI Partition Assistant and select Properties. In the pop-up window, you can find the installation path next to Start in, and then paste the path to CMD.
2. Type: partassist.exe /del:F and press Enter. That means deleting F drive. Alternatively, you can type: partassist.exe /hd:0 /del:0 to delete partition 0 on disk 0.
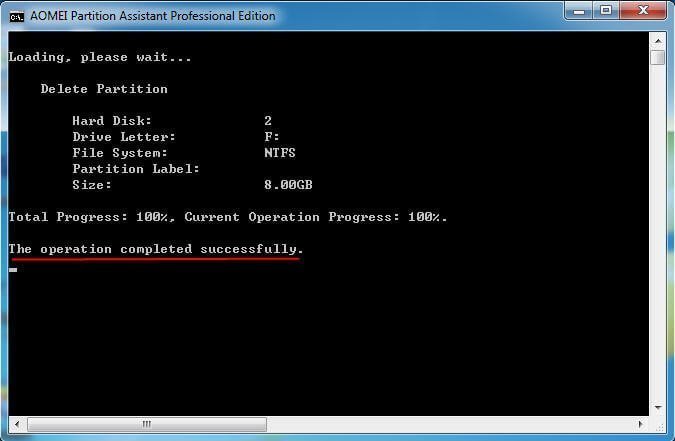
3. Click Yes at the User Account Control pop-up dialogue. And the deletion will be completed in a shot while. Type exit and leave the command prompt.
Tips: You can type partassist.exe /hd:0 /del:all to delete all partitions on disk 0.
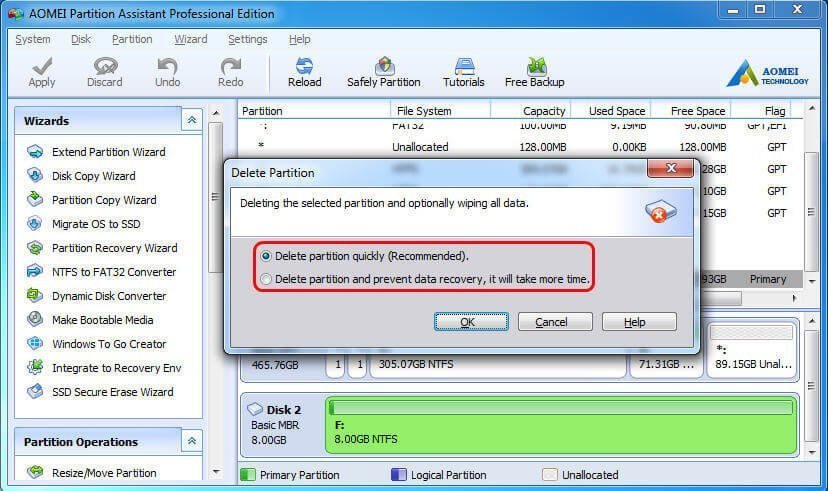
Except for command line operations, AOMEI Partition Assistant also allows you to delete partition using GUI. In the GUI, right click the Hibernation Partition and select Delete Partition. In the pop-out window, choose the type of deleting based on your own situation. Finally, click Apply to execute the pending operation.
Tips: covered methods also apply to delete Hibernation Partition in Windows 10 and Windows 8.
Steps to Disable Windows Hibernation File
Since the Windows hibernation file has the same effect of the hibernation partition, in case you need to delete the hiberfil.sys, we’ll show you how to disable this kind of hibernation.
1. Open Command Prompt and run as administrator.
2. Type powercfg –h off and press Enter. This command will disable hibernation first and then remove the hiberfil.sys file. If not removed, you can delete it manually.
Summary
This post discusses what the Hibernation Partition is and the differences between it and Windows hiberfil.sys. It also offers three effective methods for you to delete Hibernation Partition in Windows 7 as well as the way to disable Windows hibernation file.
AOMEI Partition Assistant Professional is capable of many things. For instance, you can resize C drive without formatting, so there is no need to delete hibernation after adding a RAM stick. Besides, you can shrink C drive with the software even if the hibernation file is at the end of the partition, which cannot be completed by Windows built-in tools.

