How to Change a Partition Size in Windows 7 without Data Loss
To change a partition size is to extend or shrink a partition. This article shows how to resize a partition without data loss easily and quickly in Windows 7/8/8.1/10.
Need to change partition size in Windows 7
The capacity of partition(s) on a hard disk drive is not always allocated reasonably at the beginning, thus it’s necessary to adjust a partition size in Windows 7 in many occasions. For an example, after a period of time, you may find that certain partition, like partition C has been full and keep receiving the warning, “Low Disk Space". To take another example, your hard disk originally has one partition: Partition C. To manage files and data conveniently, you need to get more partitions on the disk.
In the first condition, you can extend partition C; in the second situation, you to shrink the partition to get unallocated space and you can create new partition on it. In a nutshell, resizing partition is important during disk usage.
How do I extend or shrink partition size in Windows 7?
Having realized the necessity of changing partition size in Windows, it’s time to learn how to change partition size in Windows 7 effectively and easily. Here are offered two useful utilities that can help you resize partition size: Windows built-in tool: Disk Management and third party free partition manager, AOMEI Partition Assistant Standard.
✍ Tip: How to choose between the two utilities:
► If there is contiguous unallocated space behind the partition that you want to extend, choose Disk Management. If the unallocated space is not contiguously behind the partition, employ AOMEI Partition Assistant Standard.
► If the partition that you want to shrink is NTFS file system, you can use Disk Management. If you want to shrink FAT/FAT32 file system or want shrink partition without the limitation of unmovable files, turn to AOMEI Partition Assistant Standard.
│Resize partition in Windows 7 Disk Management
Firstly, you need to access Disk Management interface by pressing Windows + R simultaneously, inputting diskmgmt.msc, and hitting Enter.
Then, refer to the tutorials about how to increase partition size or decrease partition size.
◆ Extend partition in Windows 7 with Disk Management
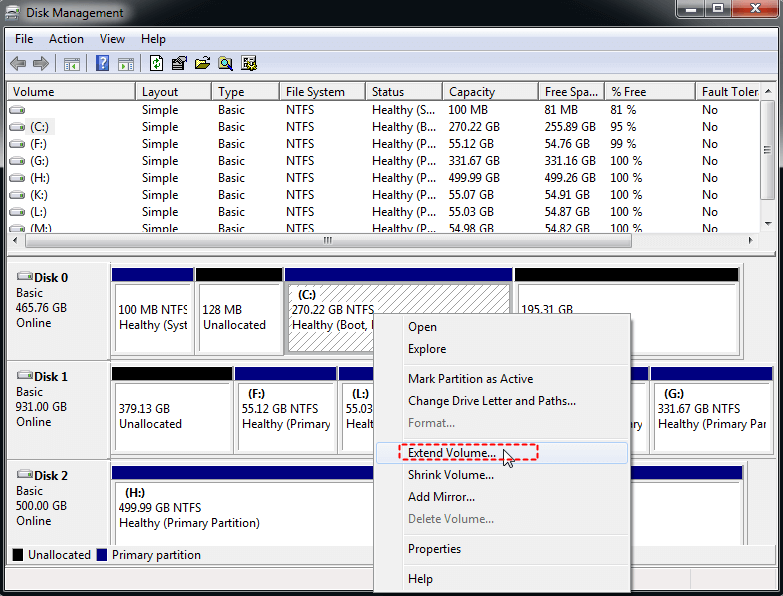
1. Right-click the partition going to be extended (here is system partition: C drive), and choose Extend Volume.
2. You’ll be in Extend Volume Wizard interface, click Next.
3. Specify how much free space you want to add into C drive and then click Next.
4. Click Finish and wait a few seconds for the operation to complete.
Notes:
If there is no adjacent unallocated space behind the partition that’ll be enlarged, the option Extend Volume will be greyed out.
To get contiguous space behind the partition that you plan to extend, you can delete the contiguous partition behind it to get qualified unallocated space. However, this will cause data loss.
◆ Shrink partition in Windows 7 via Disk Management
1. Right-click the partition that you intend to shrink, select Shrink Volume.
2. In the small pop-up window, type the amount of space to shrink in MB and then click Shrink.
3. After the partition is shrunk, you’ll find there is a new unallocated space behind the partition. You can create new partition with the unallocated space.
│Change partition size in Windows 7 with 3rd party free partition manager
AOMEI Partition Assistant Standard, a free and great partition manager, enables you to change the capacity of a partition flexibly and quickly.
It is featured with Move Partition function, allowing you to change the location of partition and make the unallocated space behind the partition that would be enlarged. Then, you can increase a partition size without deleting partition. It can shrink a partition without the restriction of unmovable files, which is fairly helpful if you encounter the situation that Disk Management is unable to shrink partition even when the partition has free space. If you have a BitLocker partition, you can also resize that BitLocker partition and use it to extend another partition.
Now, free download this great partition manager and check out the following steps about how to increase or decrease a partition size in Windows 7 without losing data.
◆ Enlarge partition size in Windows 7 without data loss
Step 1. Install and run the software. In the main interface, confirm the partition that you need to move, right-click it and choose Resize/Move Partition.
(Here we need to extend C drive and the partition that’ll be moved is Partition D, which is located between Partition C and the unallocated space.)
Step 2. Drag the selected partition to the very right end and click OK.
Step 3. You can preview that the unallocated space is adjacent to C drive. You can right-click C drive and choose Resize/Move Partition.
Step 4. Drag C drive rightward to enlarge it with the unallocated space and click OK.
Step 5. Returning to the home interface automatically. You can preview that C drive would be extended. Click Apply to commit the pending operations.
◆ Reduce partition size in Windows 7 beyond limit
Step 1. Install and launch AOMEI Partition Assistant. Right-click the partition that you need to shrink and choose Resize Partition.
Step 2. Drag the double-headed arrow leftward to shrink it.
Step 3. Click Apply to execute operation.
Tips:
☞ This software is compatible with Windows 7/8/8.1/10. Apart from changing partition in Windows 7 without losing data, you can use it to resize partition in Windows 8/8.1/10.
☞ It’s available to enjoy more advanced functions, like quick partition, migrating OS to GPT SSD, etc, if you upgrade it to Professional edition.

