[4 Ways] How to Make Windows 11 Fast Boot
You can use 4 different methods to make Windows 11 fast boot. Read this passage and use them to let the Windows 11 boot faster.
By Irene / Updated on August 24, 2023
Why does Windows 11 boot slowly?
As the newest version of Windows, Windows 11 was expected to offer an excellent user experience. However, there has been feedback about a problem related to a slow boot. Some users are facing a situation where their computers take several minutes to start up, even though they used to start up within seconds. What's more, there are cases of occasional boot issues like Windows 11 stuck on boot screen. These issues tend to become noticeable right after upgrading to Windows 11.
Why does Windows 11 suffer from slow boot issues? Here are several common causes:
Comparison
✍ Insufficient hardware resources: If your computer doesn't meet the minimum hardware requirements or lacks sufficient RAM, processing power, or storage space, it can result in slow boot times.
✍ Startup programs: When you have a lot of applications set to start automatically with Windows 11, it can slow down the boot process.
✍ Outdated or failing SSD: Regular SSD wear and outdated firmware or drivers can slow down startup due to communication problems between the drive and the operating system.
✍ Insufficient space on your C drive: For the startup process, Windows 11 requires space on your hard drive. It creates temporary files, caches data, and allocates memory for system processes. When there's insufficient free space on your C drive, these tasks take more time, leading to slower boot times.
3 ways to make Windows 11 fast boot
After learning the possible reasons for Windows 11 slow boot, we can easily find that, except for the first cause has a higher requirement. We mean, maybe you need to update them or change a new part. The other 3 causes are simple to fix. Now, in this part, we will offer the targeted solutions to speed up boot time Windows 11.
Way 1. Enable Fast Startup in Control Panel to fast boot Windows 11
The Fast Startup function can save the current system state to a hibernation file when you shut down the computer. When you power on the device again, this feature will use the saved system state instead of performing a full boot process, thus achieving a fast boot in Windows 11.
However, it's worth noting that this feature may not always work as intended. The frequent incomplete boot process probably causes system crashes, or driver updates problems.
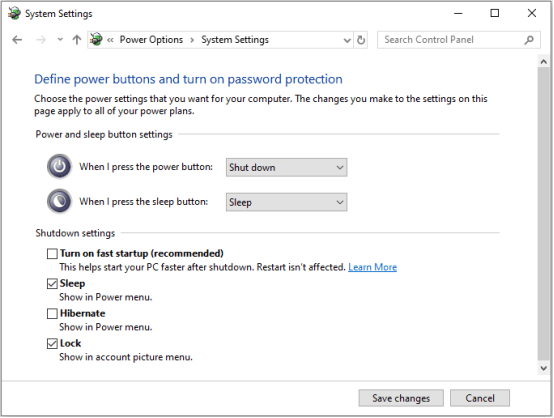
Step 1. Simultaneously hit “Win+X” and then select “Power Options”. Then choose “Additional Power settings”.
Step 2. In the left pane, click “Choose what the power buttons do”.

Step 3. In the new window, click “Change settings that are currently unavailable” and ensure the option of “turn on fast startup (recommended)” is checked. Then select “Save changes”.
Way 2. Disable automatically running apps
The automatically running programs will take up a significant amount of system resources such as CPU and RAM. Or in some cases, certain applications may even conflict with each other, causing stability issues or crashes during the startup process, thus slowing down the boot time.
To improve the boot time of your Windows 11 computer, it is recommended that you review the list of programs set to automatically start when you turn on your computer and disable any that are not essential.
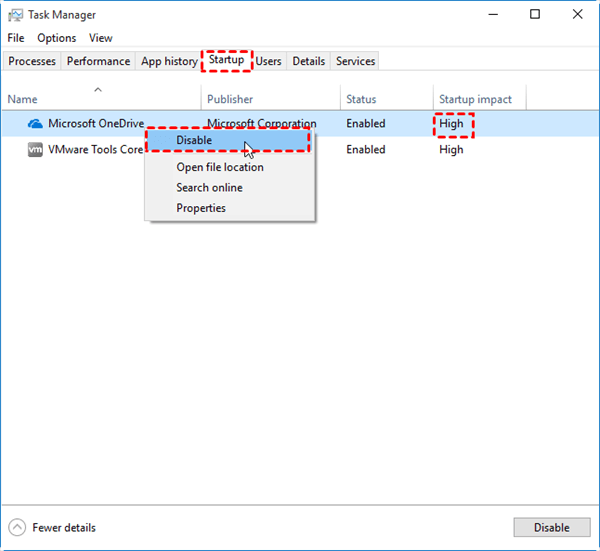
Step 1. Hit the "Ctrl + Shift + Del" keys simultaneously to run the Task Manager.
Step 2. Then choose the "Startup" button and find out the unnecessary process with high startup impact and then hit the "Disable" button.
Way 3. Free up the system space to fast boot in Windows 11
System drive, usually C drive, significantly impacts computer performance, especially during Windows 11 boot. Inadequate space on this drive slows processes and boot times. If you want to speed up boot time for Windows 11, regular cleaning of the C drive space is highly effective.
AOMEI Partition Assistant Professional can make the process effective and easy. It offers different solutions for various needs. With it, you don't have to uninstall important programs or keep clearing cache and junk files repeatedly. For example, functions like “Allocate Free Space”, “APP Mover”, “Merge Partitions”, and “Delete Large Files” can all be helpful.
Here we take “Allocate Free Space” and “APP Mover” as examples to present how to increase C drive space to make Windows 11 fast boot.
▌Option 1. Allocate free space from another drive
Step 1. Install and open AOMEI Partition Assistant Professional. The condition of the disk will be displayed on the interface. Right-click the drive D or other partitions you want to allocate and choose "Allocate Free Space".

Step 2. You can specify the free space to allocate and choose the target partition you want to extend.

Step 3. Back to the main interface and click “Apply” to execute the operation.

▌Option 2. Move apps to another drive
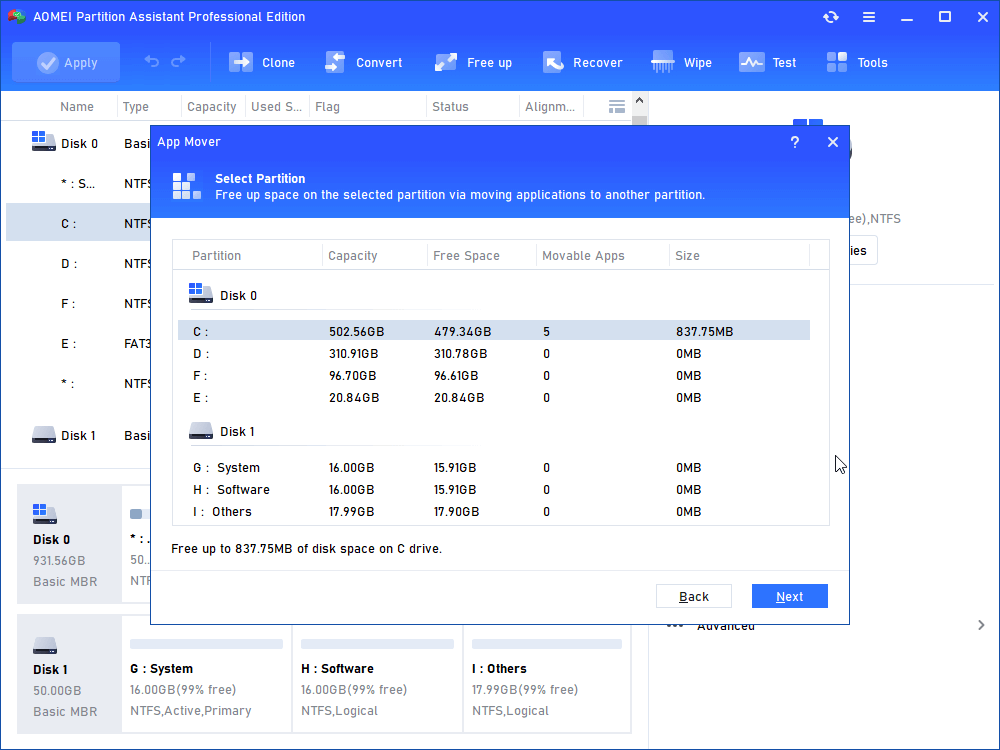
Step 1. Run the AOMEI Partition Assistant Professional. Click the “Free up” button on the top pane, and choose “App Mover”.

Step 2. In this window, select the target drive that the applications are. Then select “Next”.
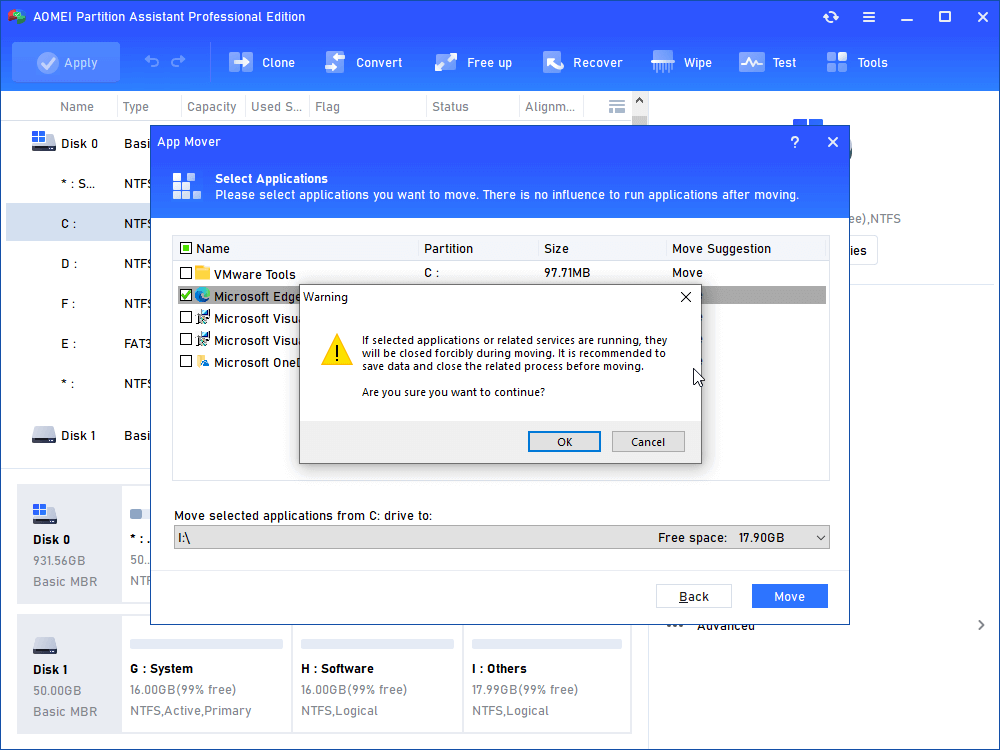
Step 3. Check the applications you want to move and choose them. Select “Move” to go on.
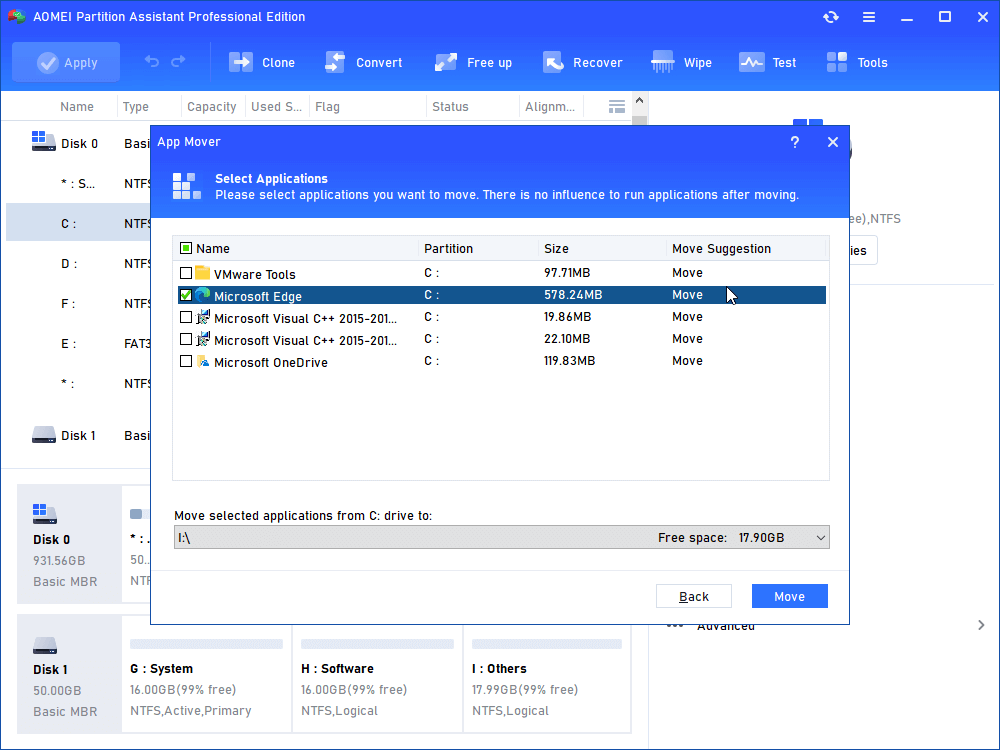
Step 4. Read the notice and then choose “OK” and “Move” in turn.
Step 5. Wait patiently until the process is completed.
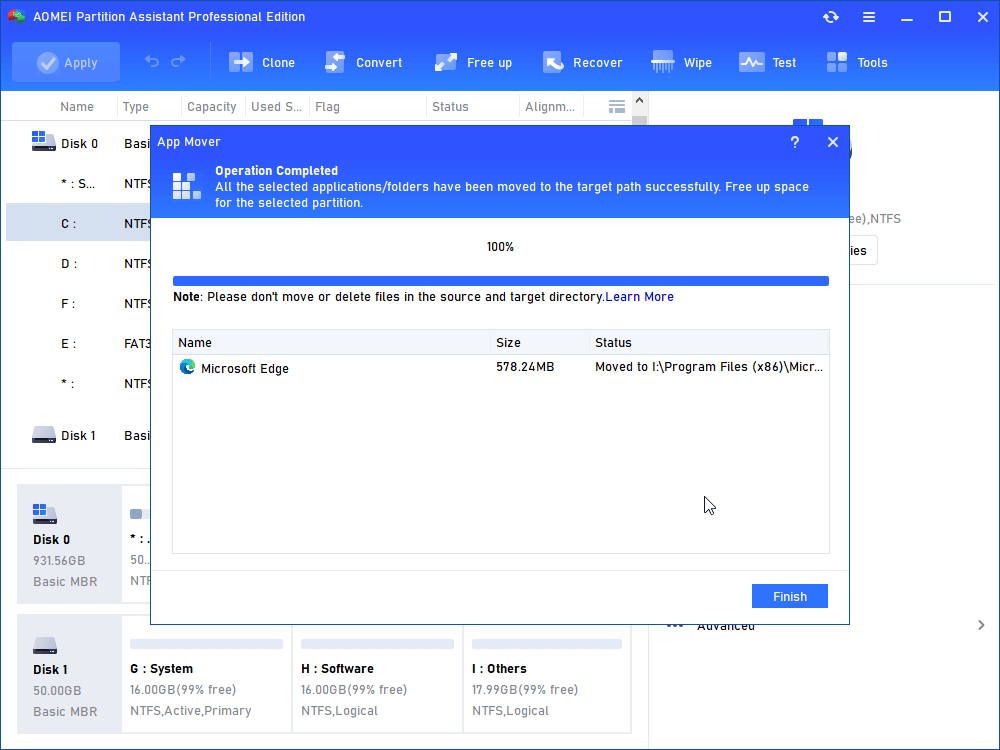
Now, after the operations, your C drive space will be increased much than before.
Way 4. Upgrade to a better SSD to make Windows 11 boot faster
An advanced SSD, such as an M.2 NVMe SSD, offers faster read-write speeds. This speeds up moving operating system files to RAM from the main storage like the C drive, thus fast booting Windows 11.
If you plan to upgrade to a better SSD to speed up boot time Windows 11 but are afraid of extra energy-and-time-consuming troubles, you can still rely on AOMEI Partition Assistant Professional to migrate OS to the new SSD. Or clone the disk to transfer all the original data.
Step 1. Connect the SSD to your computer and ensure it is detected successfully.
Step 2. Run the software and click “Clone” > “Migrate OS” as the picture shows.

Step 3. Select the new hard drive as the destination disk. If there are partitions on the SSD you need to check "I want to delete all partitions on disk 2 to migrate the system to the disk". Once checked, the "Next" button will activate. You should now click on it.

Step 4. Here you can resize the system partition and change the drive letter according to your needs. After configuration, you can click “Next” to move on.

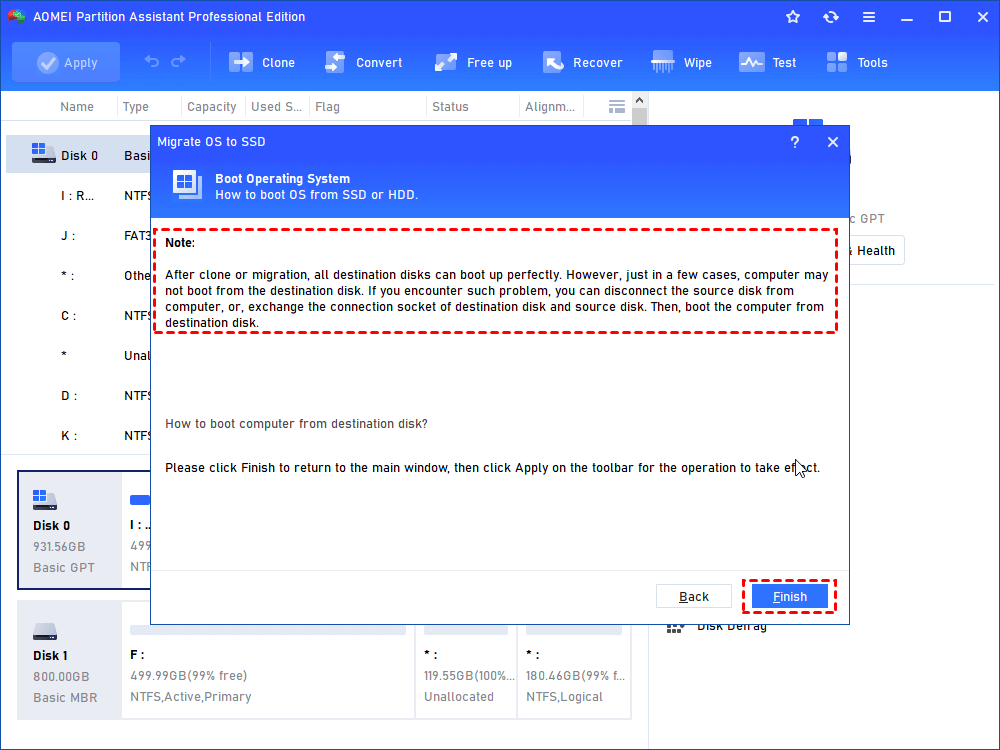
Step 5. Read the troubleshooting guide and click "Finish" to go on.
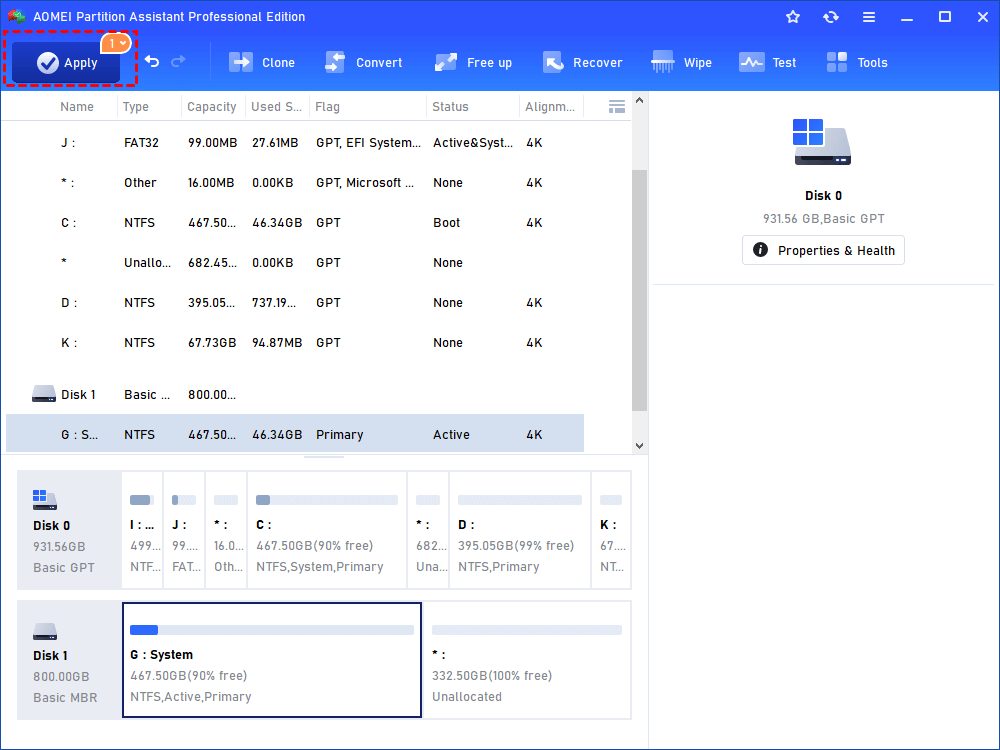
Step 6. Click "Apply" and then "Proceed" to transfer OS to the new hard drive.
Then, you can change Windows 11 boot drive to SSD and enjoy the fast speed when booting.
Verdict
To make Windows 11 fast boot, finding the causes and adopting targeted solutions is advisable, thus effectively solving your problem.
As we can see, AOMEI Partition Assistant is a versatile tool that can be used for many cases. Except for the aforementioned functions, the features of converting between MBR/GPT without data loss, converting file systems between NTFS and FAT32 without formatting, securely erasing SSD to protect your data, etc., also gained wide popularity among people. For Windows Server users, there is also the Server Edition that can be chosen to manage their devices effectively.

