6 Ways to Fix Windows 11 Disk Management the Format Did Not Complete Successfully
If you have received “Windows 11 Disk Management the format did not complete successfully” when formatting your internal or external hard drive like USB flash drive or SD card, this post will help you solve this problem in six practical ways.
By Hedy / Updated on May 12, 2023
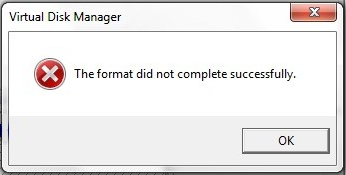
Windows 11 Disk Management the format did not complete successfully
"I am setting up an older hard drive that I had left out but when I install it into my PC it does not format. At first, the hard drive is recognized and it appears normally in disk management as well. But when I try to format it, I get a message saying 'windows was unable to complete format', then I get 'The format did not complete successfully' error. Is there a way to fix this? I'm really stuck with this one. So any help is appreciated."
As is known to all, Windows Disk Management is a built-in tool used to free manage your disks and partitions on your computer. However, not all disk problems can be solved by this disk manager, that's why you meet "The device is not ready", "Fail to convert to MBR/GPT disk" or "Shrink/Extend Volume is grayed out" problems.
Therefore, it's not strange to run into Windows 11 Disk Management the format did not complete successfully. The problem usually occurs when you attempt to format a partition of removable drives like SD cards, USB flash drives, memory cards, SSD, or other external hard drive storage devices.
Why Windows 11 Disk Management the format did not complete successfully?
If you suffer from this issue, you may be curious why it happens to you. Generally speaking, there are several factors that lead to not completing successfully in Windows 11 Disk Management. Here we list the most possible causes:
✘ Virus infection and malware.
✘ Corrupted or incompatible system files.
✘ Bad sectors.
✘ Write-protected disk.
✘ Physical damaged.
✘ Outdated BIOS or Windows Service Pack
After knowing the reasons behind the problem, you can fix it better with the following specific solutions.
How to fix Windows 11 Disk Management the format did not complete successfully
In this part, we will mainly talk about how to fix the virtual disk manager the format did not complete successfully in Windows 11 or Windows 10/8/7. Whether you receive this error when formatting a USB flash drive, SD card, or other storage devices, the following six practical ways may help a lot.
Solution 1. Run virus scan
Virus infection is an annoying factor that may cause the majority of computer problems including the failure of formatting in Disk Management. So you can run a virus scan to remove it by using built-in Windows Security first.
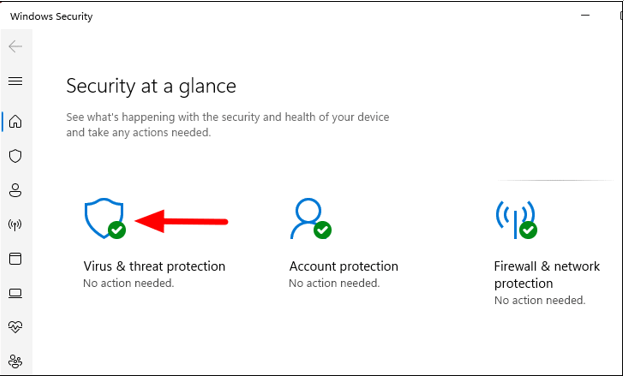
Step 1. Search for "Windows Security" in the search bar and then select it to run the app.

Step 2. In the window of "Windows Security", select "Virus & threat protection".
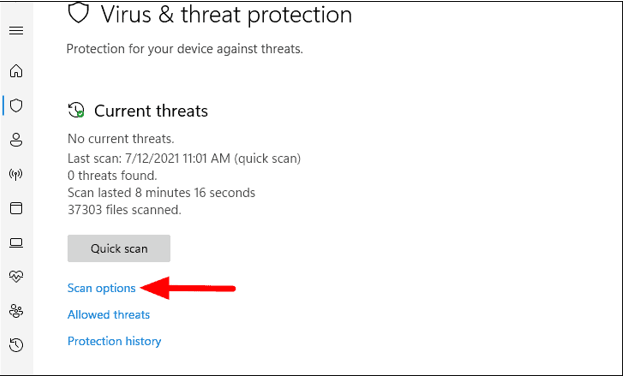
Step 3. Then, click on "Scan options" to see all types of scans available on the system.
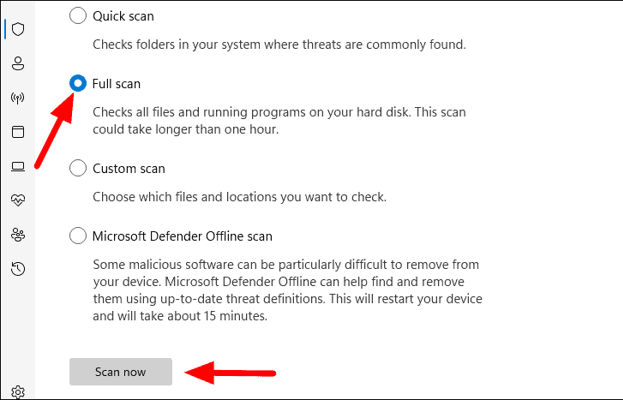
Step 4. Select "Full scan" and then, hit "Scan now". It will start immediately and it may take several minutes to finish.
After the scanning completes, you'll be informed whether there's any virus detected and what you should do to kill the virus.
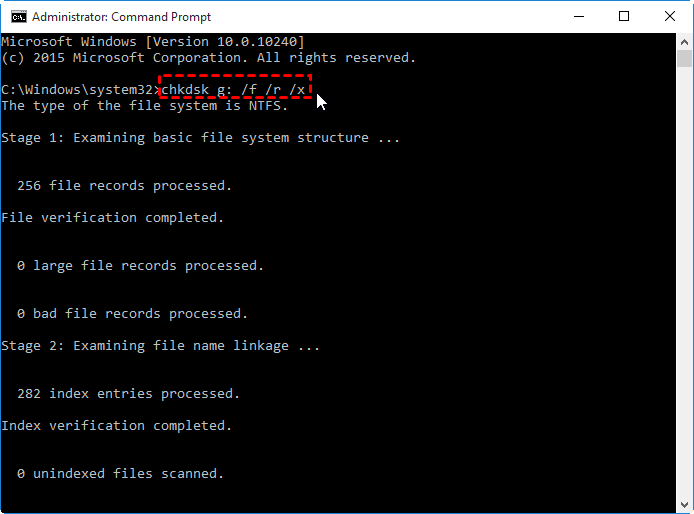
Solution 2. Check bad sectors
If there are some bad sectors on your to-be-formatted partition, Windows the format did not complete successfully problem appears. To check and fix bad sectors on the hard drive, you can try the CHKDSK command as follows:
Step 1. Press the Windows key+ R key to open the "Run" dialogue. Type in "cmd" and press "Enter".
Step 2. Type chkdsk g: /f /r /x and hit "Enter". (Replace g with the drive letter of your hard drive.)
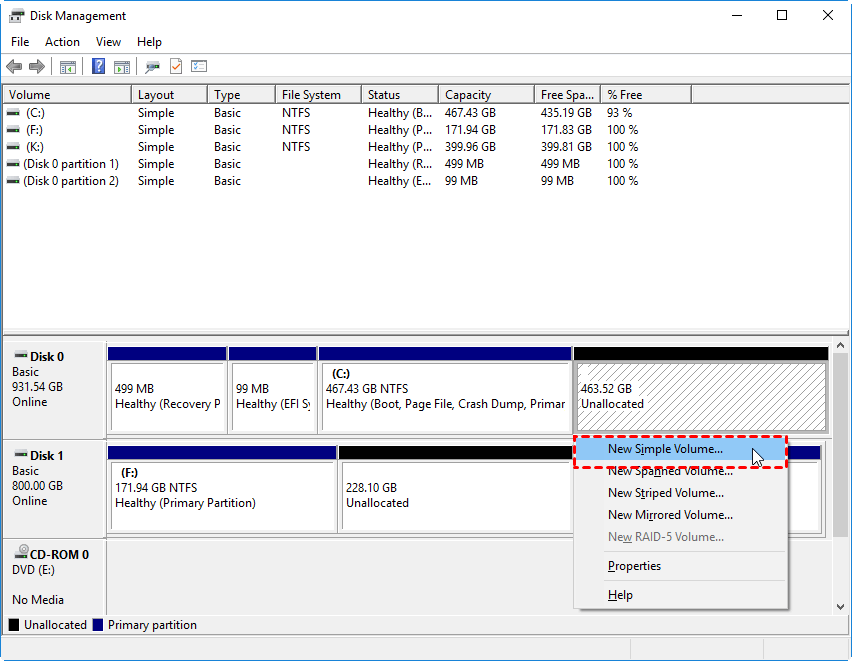
Solution 3. Delete and recreate the partition
If the above two methods don't solve the Disk management not formatting successfully error, you can instead try deleting the partition and recreating a new one. Make sure there are no valuable data or back up them in advance before following the steps below:
Step 1. Press "Win + R" and type "diskmgmt.msc" at the Run box to open disk management.
Step 2. Right-click the partition that you want to delete and then click "Delete Volume". This operation will delete the partition you choose.
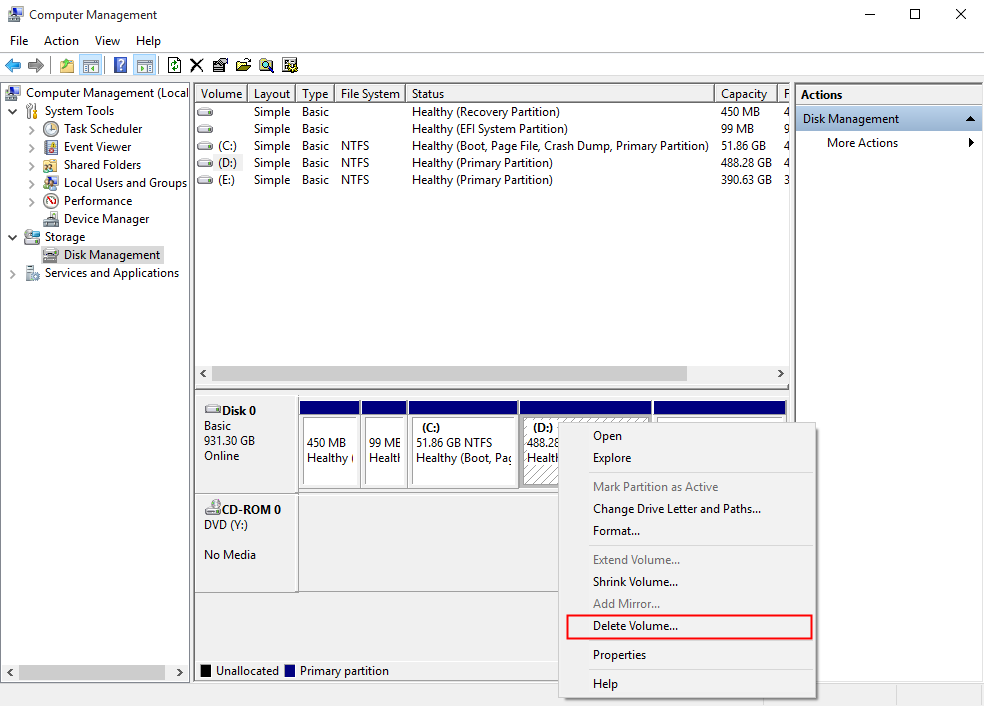
Step 3. Right-click the unallocated space, select "New Simple Volume" and follow the prompts to finish the next steps.
In addition to using Disk Management, it's available to delete and create a partition with DiskPart.
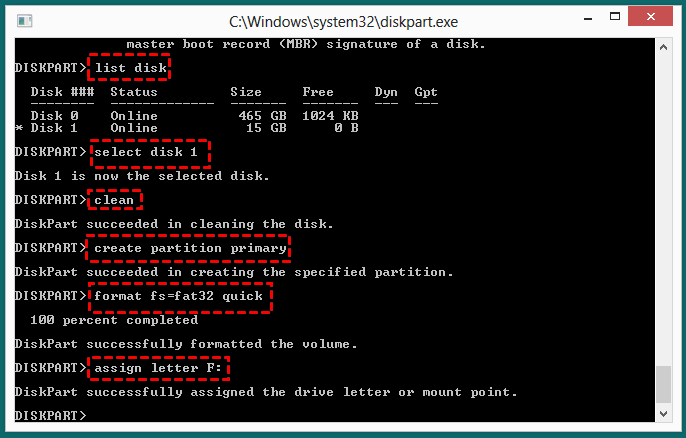
Solution 4. Format via DiskPart
If you fail to delete the partition with Disk Management or DiskPart, which is rarely seen, you can fix the "Windows 11 Disk Management the format did not complete successfully" issue via DiskPart by formatting the disk.
Step 1. Type "diskpart.exe" in the Run box to open DiskPart.
Step 2. Format a drive with the following commands:
list disk
select disk n (n represents the disk number you want to format)
clean (this command will delete all the data on the selected disk)
create partition primary
format fs=fat32 quick (If you want an NTFS file system, you can change and use the command: "format fs=ntfs")
assign letter F: (F: means the drive letter for the drive, you can change it based on your needs)
Solution 5. Force format with a free partition manager
If you are still unable to format the partition, you can try AOMEI Partition Assistant Standard, a free partition manager. It's designed for Windows 11/10/8/7 users to manage disks and partitions. It works similarly to Windows Disk Management but can do much more than DM, for example, merge partition, clone partition, check partition, resize/move partition, convert disks between MBR and GPT without deleting partitions, and more.
If the "Windows Disk Management the format did not complete successfully" error happens to you and you can't fix it with the above methods, AOMEI software should be the best choice for you. It breaks the limitations of Disk Management in formatting and embraces many promising merits:
◉ Format internal or external hard drive to exFAT file system with ease.
◉ Format hard drive that is larger than 32GB to FAT32 file system.
◉ Format both data and system disk effortlessly.
◉ Force format a disk that is RAW, encrypted, corrupted, or write-protected successfully.
◉ Format partition to almost all kinds of file systems: FAT32, NTFS, exFAT, Ext4, Ext3, Ext2.
Now, free download this powerful software and see how to format a partition within three steps:
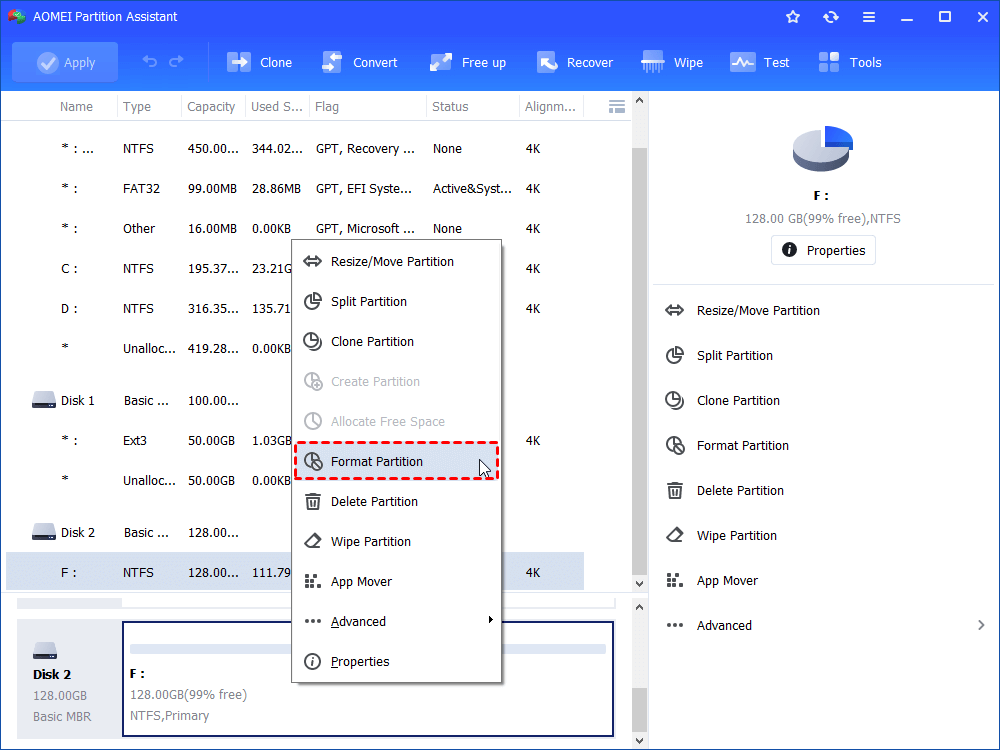
Step 1. Install and launch AOMEI Partition Assistant Standard. Right-click the partition you want to format and select "Format Partition".
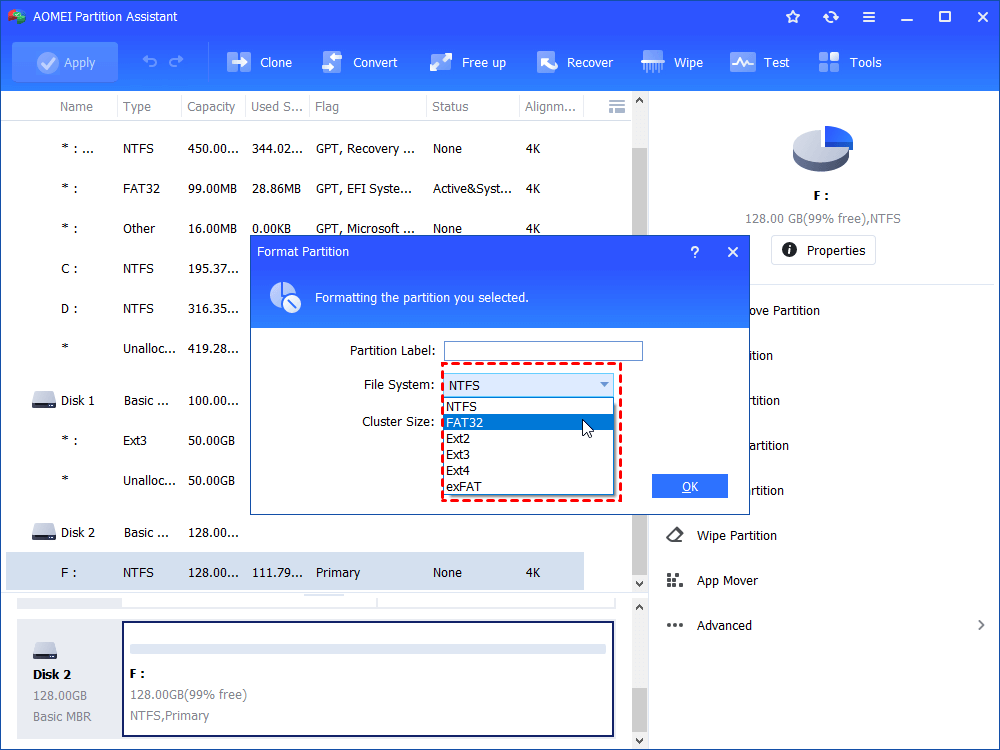
Step 2. Select a file system as you need. Then, hit "OK".
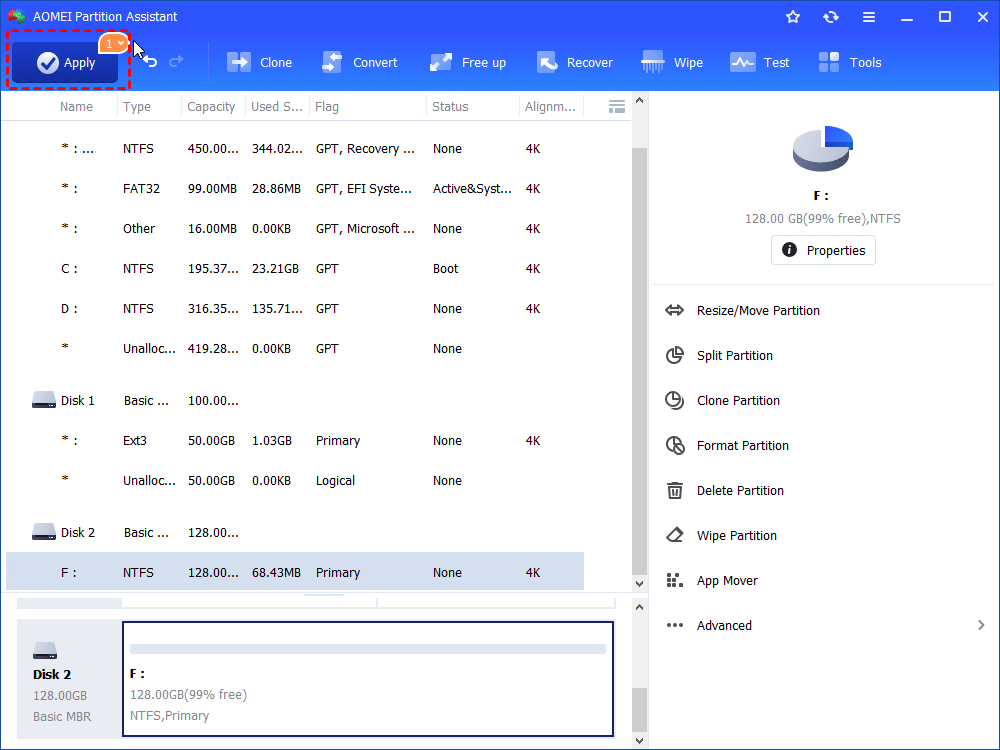
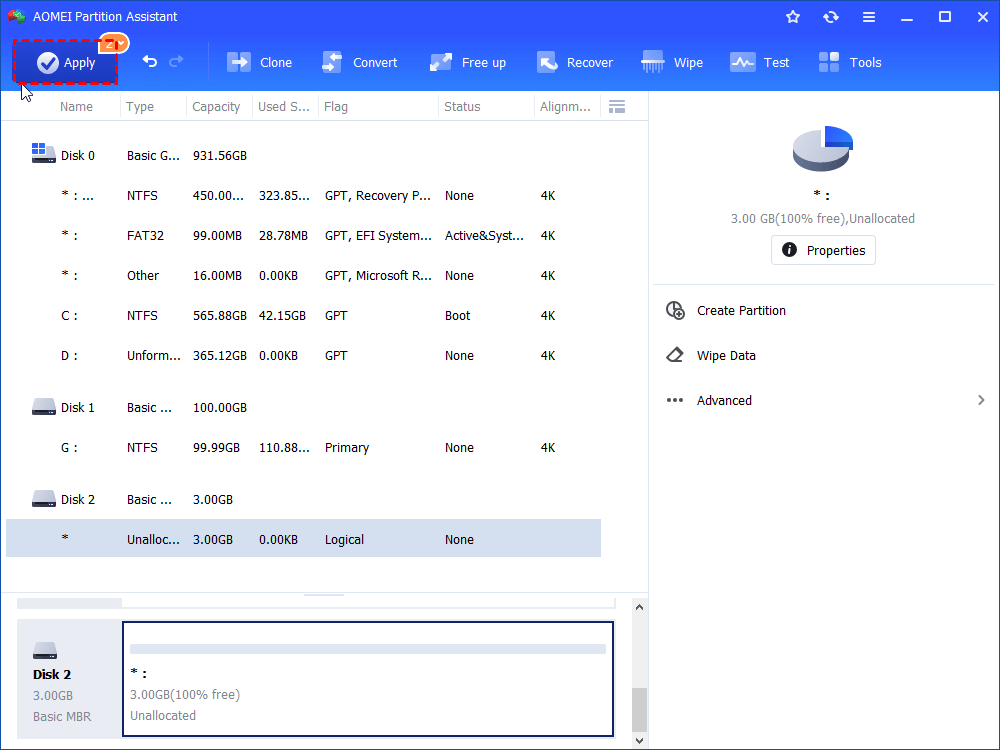
Step 3. Hit "Apply" on the upper left of the main interface to start the disk formatting process.
Solution 6. Wipe the entire hard drive
Apart from force formatting the partition, AOMEI Partition Assistant Standard has a feature called "Wipe Hard Drive" which can also help you solve the "Windows Disk Management the format did not complete successfully" problem. This method will clean up the disk completely, so it's a useful way to fix some unknown disk errors.
Note: All the data on the hard drive will be erased permanently and can't be restored even by professional recovery software, so please back up what you don't want to lose before operation.
Step 1. Open AOMEI Partition Assistant Standard, right-click the hard drive you want to wipe, and select "Wipe Hard Drive" in the pop-up menu.
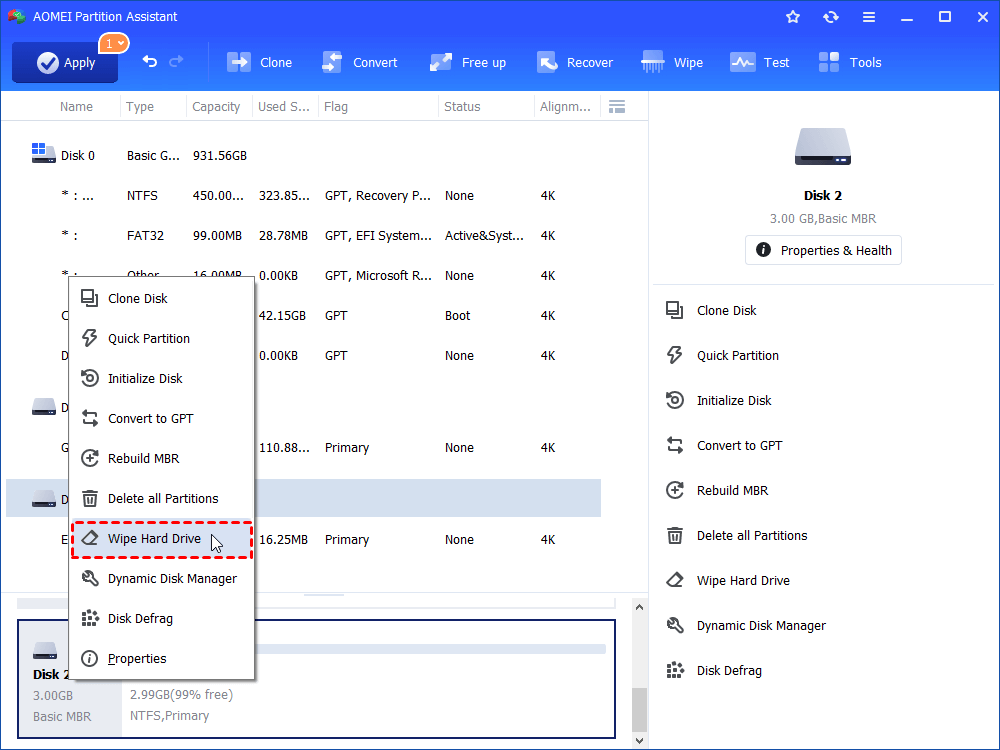
Step 2. Then choose "Fill sectors with Zero" and click "OK". Other wiping methods are available when you upgrade to the Professional version.
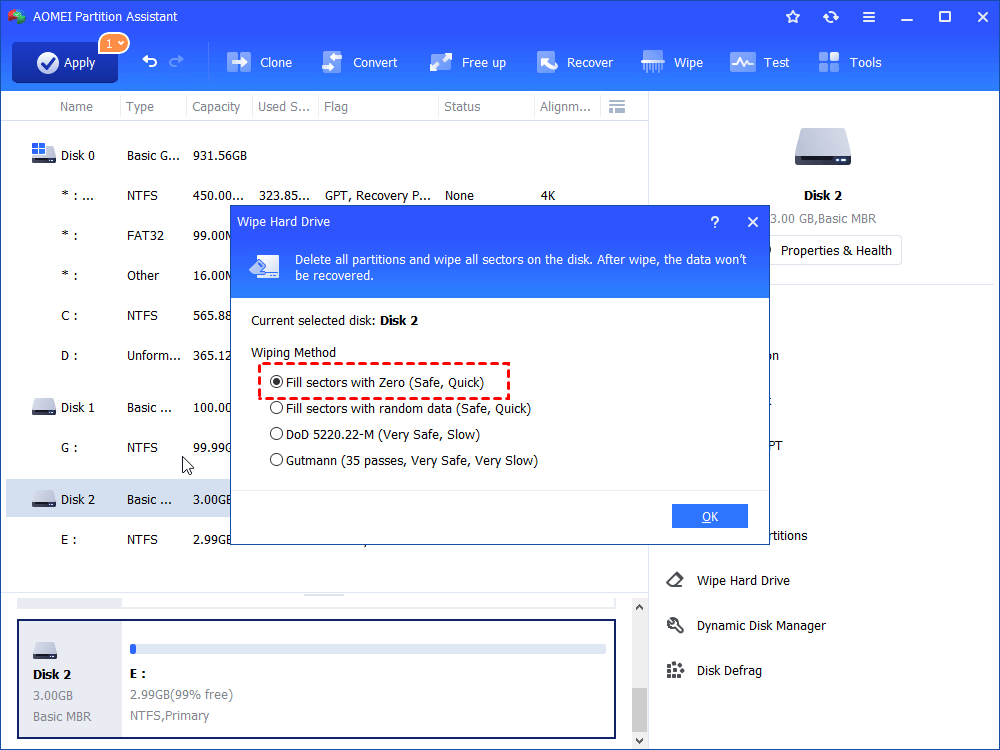
Step 3. Finally, click "Apply" to execute the operations.
Conclusion
Despite the "Windows 11 Disk Management the format did not complete successfully" error being a headache for many computer users, this passage still provides six practical ways to help you fix it. As we can see, AOMEI Partition Assistant is such a powerful disk formatting utility that it can solve this annoying problem effortlessly.
In addition, it's outstanding in many other cases, such as recovering lost and deleted partitions, removing junk files to free up space, cloning HDD to SSD for faster computer speed, etc.