[9 Fixes] My USB Ports Not Working Windows 11! Try These Methods
This post will share 4 fixes for USB issues including USB ports not working Windows 11 or USB flash drive not showing up Windows 11. Follow the guidance to easily troubleshoot that.
By Irene / Updated on June 12, 2024
USB ports are essential components of computers. Users can connect various devices easily, such as printers, cameras, keyboards, and smartphones, transfer data quickly, and charge them conveniently through USB ports.
But sometimes, when you connect a USB flash drive or pen drive to your computer, you may encounter USB ports not working Windows 11. This can result in an error message like "USB device not recognized" or a similar notification, rendering the USB drive inaccessible and preventing access to the stored files.
However, there's no need for excessive concern. Multiple solutions are available to address this problem and restore the functionality of your devices.
How to fix USB ports not working Windows 11
Sometimes, the problem USB port not working Windows 11 may not only result from the slots. It is advisable to check the USB flash drive first and then follow the guidance to fix it.
Fix 1. Check whether the USB or USB ports are not working
▌1. Check your USB Flash Drive
By examining the USB drive, individuals can rule out any possible faults with the device before moving on to other troubleshooting steps. This initial check helps ensure that the USB drive is in proper working condition and eliminates it the potential cause of the USB ports malfunctioning. You can follow the steps:
• Ensure that your USB device is powered on: Certain USB drives feature an external power button that, if deactivated, it will prevent the drive from appearing in Windows.
• Verify the availability of the USB connection: The USB drive might be damaged without your awareness. Try connecting it to another computer and observe if it is recognized.
• Reboot your computer: In many cases, the absence of the USB drive may be attributed to a temporary glitch or minor software bug. Restarting the computer can potentially resolve such issues. And then check if the USB drive becomes visible.
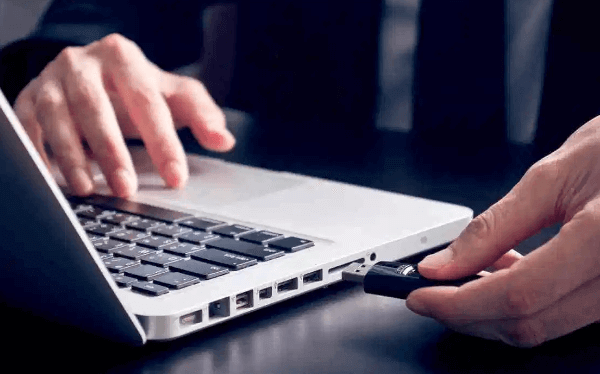
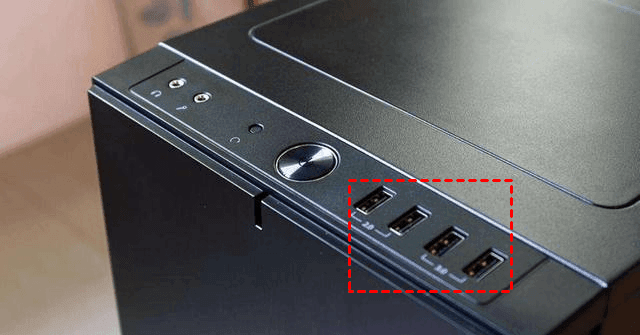
▌2. Change USB ports and reconnect the USB
To address the issue of USB ports not working in Windows 11, follow these steps to switch the USB port, which may help resolve the problem:
Step 1: Disconnect the USB device from the current USB port.
Step 2: Insert the USB device into another available USB port.
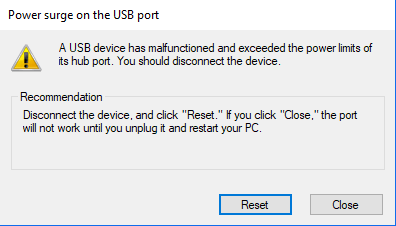
▌3. Verify if the computer displays an error message
If a message appears on your computer after connecting the USB drive, stating "Power surge on the USB port", then it is likely that the issue lies with the USB port.
Fix 2: Clear viruses and malware
You can resolve the USB port issue in Windows 11 by clearing viruses and malware. Follow these steps using the built-in Virus & threat protection feature:
Step 1: Type "Virus & threat protection" in the search box on the taskbar.
Step 2: Click on "Virus & threat protection" and select "Quick scan." Wait for the scan to complete.

Fix 3: Remove encryption or write-protection on a USB drive
If your USB ports are not working, it's possible that your USB drive is locked or write-protected. Follow these steps to unlock it using DiskPart:
Step 1: Press Windows + R to open the "Run" box, then type "diskpart" and press Enter. If prompted, click "Yes" to allow changes.
Step 2: Type "list disk" and press Enter to see the list of disks. Then identify your USB drive based on its size, such as Disk 1 for a 14 GB drive.
Step 3: Type "select disk 1" (replace 1 with the appropriate disk number) and press Enter.
Step 4: Use the command "attributes disk" to view the disk's attributes. Type "attributes disk clear read-only" and press Enter to remove the write-protection.

Step 5: Finally, type "exit" to close DiskPart.
Fix 4. Check for Windows Updates
It is crucial to regularly update your Windows 11 PC as it plays a vital role in addressing issues related to malfunctioning devices, faulty USB ports, and overall usability enhancements. New Windows updates often include fixes for such issues along with general improvements.
Step 1. To begin, access the Start menu and choose Settings or use the shortcut "Win+I".

Step 2. Within the Settings menu, locate and navigate to Windows Update. Then, click on the "Check for updates" button.
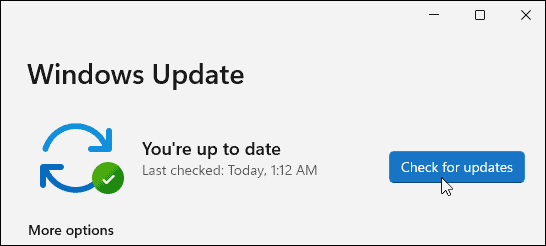
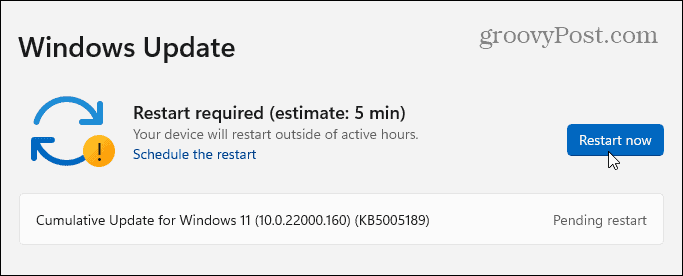
Step 3. Windows 11 will proceed to check for available updates and download them. If there are updates ready to be installed, you can either click on "Restart now" or set Active Hours to allow Windows to restart at a time when you are not using the computer.
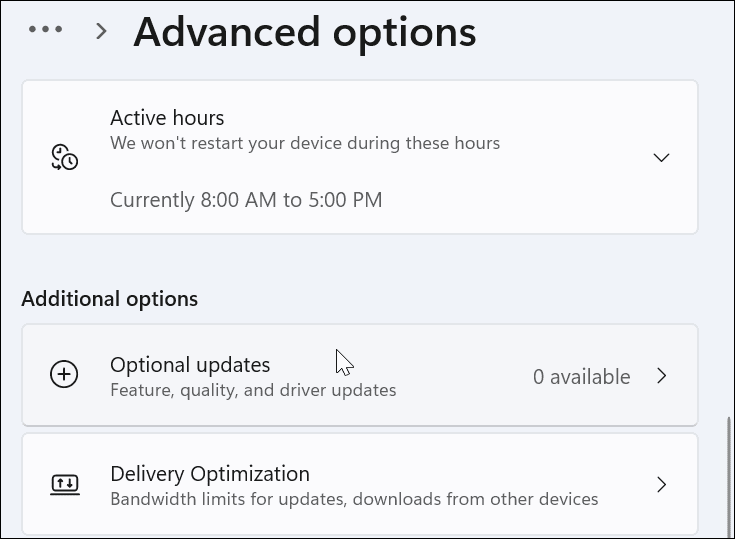
Step 4. It is also advisable to check for optional updates, which often include non-critical device drivers. To do this, go to the Advanced options section in Windows Update, select Optional Updates, and proceed to install any available updates listed.
Fix 5. Reinstall USB Drivers
An additional action you can take is to verify that your USB drivers are current. You can easily update or reinstall your USB drivers by following these instructions:
Step 1. Access the Start menu by clicking on the Start button or pressing the Windows key on your keyboard.
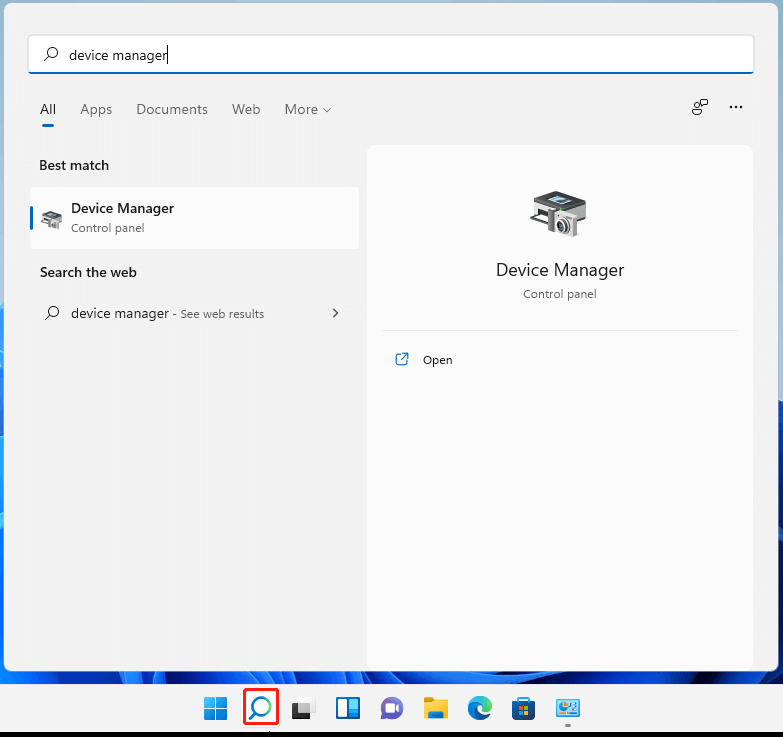
Step 2. Enter "device manager" into the search bar and choose the top result from the displayed options.
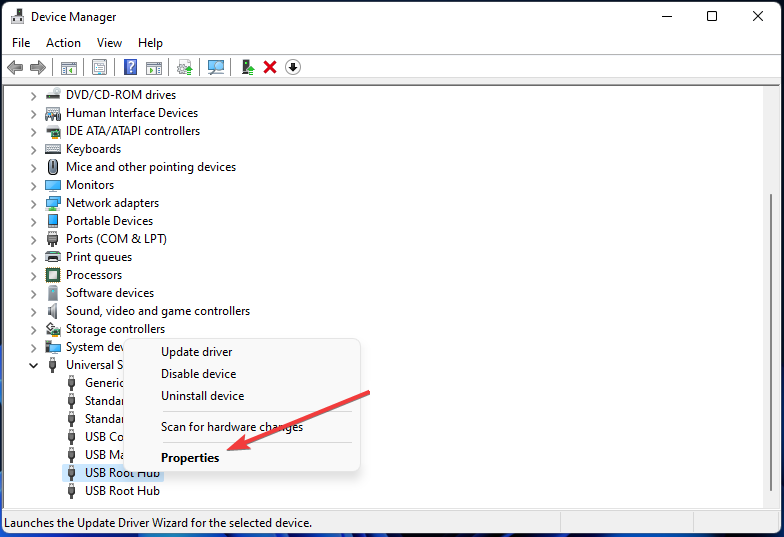
Step 3. Navigate through the Device Manager tree menu and expand the section labeled "Universal Serial Bus controllers."
Step 4. Right-click on each entry within the Universal Serial Bus controllers section and select the option to "Uninstall device."

Step 5. Restart your PC, and Windows will automatically reinstall the most up-to-date drivers for the respective devices during the reboot process.
Fix 6. Modify Power Management Settings
USB devices require a sufficient power supply, but when operating on battery power, this power supply may not always be readily available. For instance, power management settings may limit the power allocated to a USB drive when your laptop is running on battery. As a result, the USB drive may not receive an adequate amount of power.
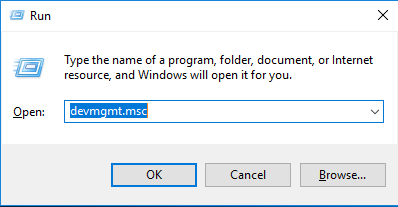
Step 1. Press the Win+R key combination to open the Run dialog box. Type "devmgmt.msc" and click on the OK button.
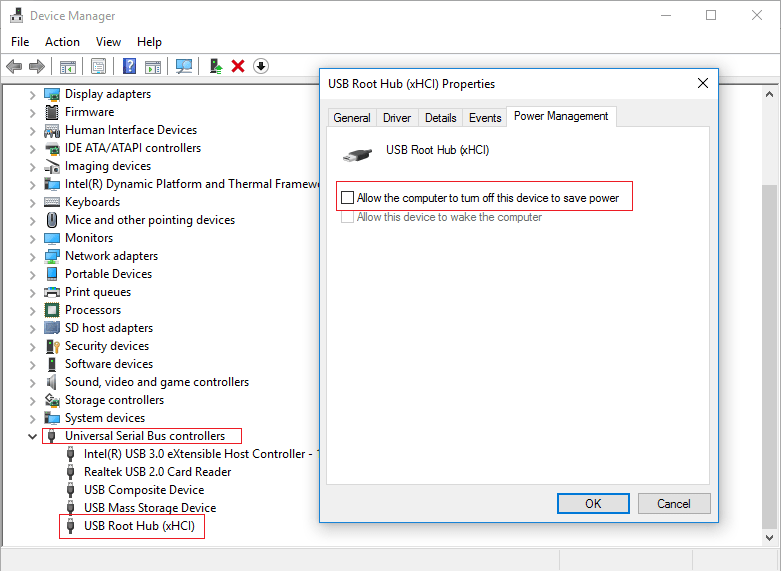
Step 2. In the Device Manager window, scroll down and expand the section labeled "Universal Serial Bus controllers." Right-click on the USB Root Hub and choose the Properties option.
Step 3. Within the USB Root Hub Properties window, navigate to the Power Management tab. Uncheck the option that says "Allow the computer to turn off this device to save power" and click on OK.
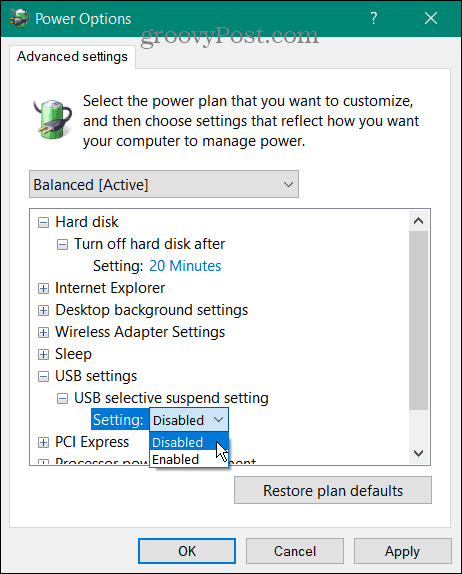
Fix 7. Turn off the USB Selective Suspend Power Option
The USB selective suspend power feature can pose as another potential issue for USB devices. Its purpose is to conserve battery power on laptops by suspending devices that are not frequently used.
However, this feature can occasionally cause interference with the USB devices you are actively using. If Windows determines that a device is not in use, it may cut power to it, resulting in the device ceasing to function.
Step 1. Access the Start menu by clicking on the Start button or pressing the Windows key on your keyboard.
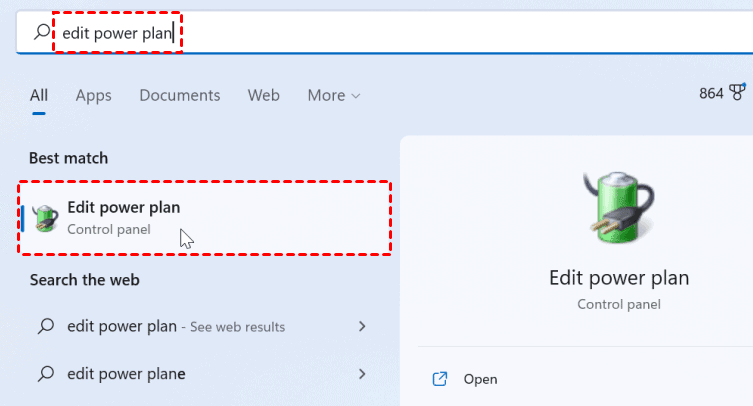
Step 2. Enter "edit power plan" into the search bar and choose the top result from the displayed options.
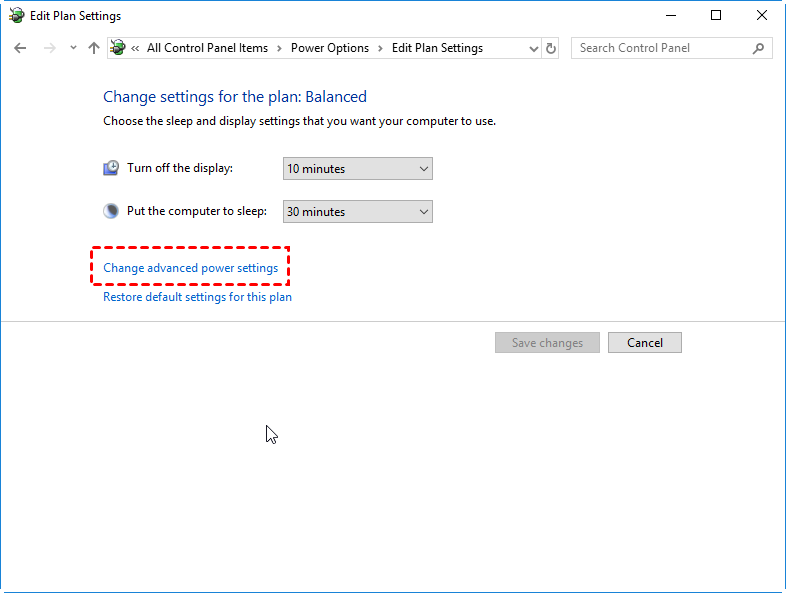
Step 3. Click on the option to "Change advanced power settings".
Step 4. Within the Power Options window, expand the USB settings section and modify the setting for USB selective suspend to "Disabled." Finally, click on OK to save the changes.
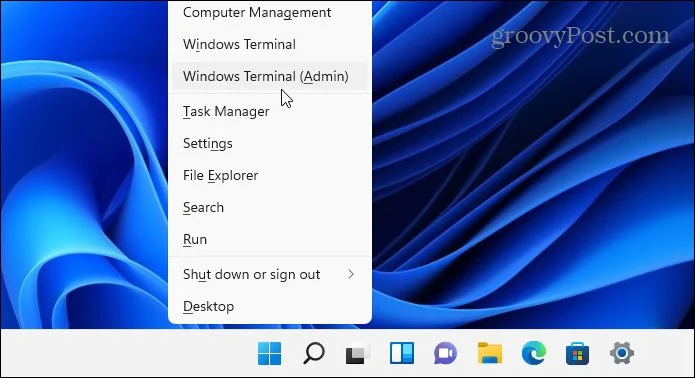
Fix 8. Perform SFC and DISM Scan
If the aforementioned solutions do not resolve the issue, it is advisable to verify that your Windows 11 installation is not corrupted. You can utilize the SFC Scannow (System File Checker) and DISM (Deployment Image Servicing and Management) tools, which will examine your local drive for any corrupted system files and replace them if necessary.
Step 1. To begin, right-click on the Start button and choose "Windows Terminal (Admin)" from the menu.
Step 2. In the Terminal window, type the command "DISM /Online /Cleanup-Image /RestoreHealth" and press Enter.

Step 3. Once the DISM scan is finished, initiate an SFC scan by entering the command "sfc /scannow".
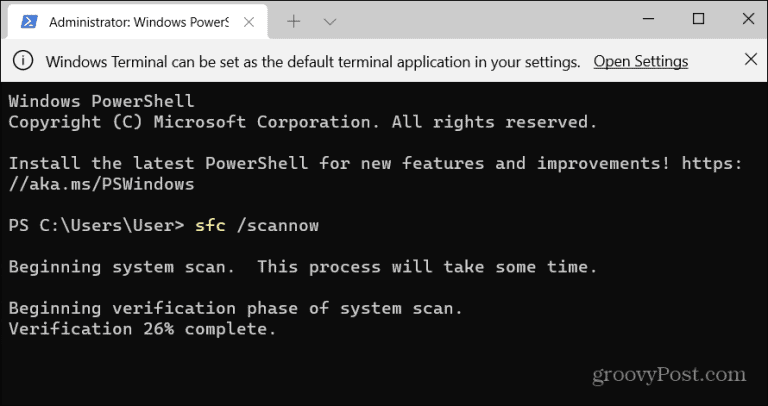
Please note that these scans may take some time to complete. After the scans are done, restart your PC and check if the USB device is functioning properly again. If these tools are unable to resolve the issue, you might consider factory resetting Windows 11.
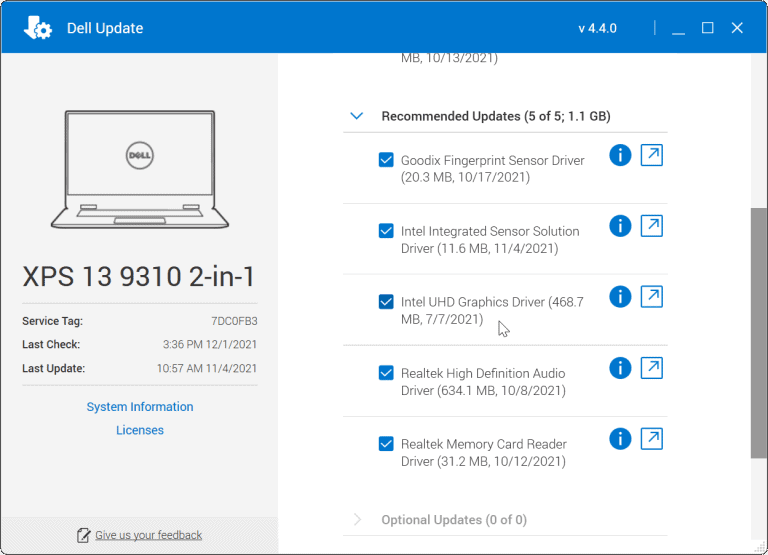
Fix 9. Check for OEM software updates
While Windows Update is a valuable resource, it may not encompass every available update for your hardware. Nevertheless, you have the option to manually check for software updates using a dedicated OEM update application developed by your device manufacturer.
Step 1. Open the Start menu and search for the first letter of your computer's manufacturer. For instance, search for "D" for Dell or "L" for Lenovo.

Step 2. Locate and open the update tool provided by the manufacturer, and proceed to install any hardware updates that it identifies.
Now, let's explore some additional solutions to help you restore the functionality of your USB ports in Windows 11. By following these steps, you'll be able to resolve the problem with ease!
Further reading: Clone your disk for data protection
Given the compact size and convenience, USB flash drives are widely popular as portable storage devices. However, users often encounter various issues during their usage. No matter the problem is the USB ports not working Windows 11 or the device not showing up Windows 11, you are inaccessible to your data. Once the USB encounter damaged, you will suffer data loss.
Therefore, you can also choose another method to store the data for further backup. AOMEI Partition Assistant Professional is a versatile and powerful tool for computer management. It offers the feature Disk Clone that can provide comprehensive data protection by creating an exact copy of the entire disk, even including the operating system and files. Most importantly, it can even clone the drive with bad sectors.
Insert a new hard drive into your computer as a backup device. Open the installed AOMEI Partition Assistant Professional software
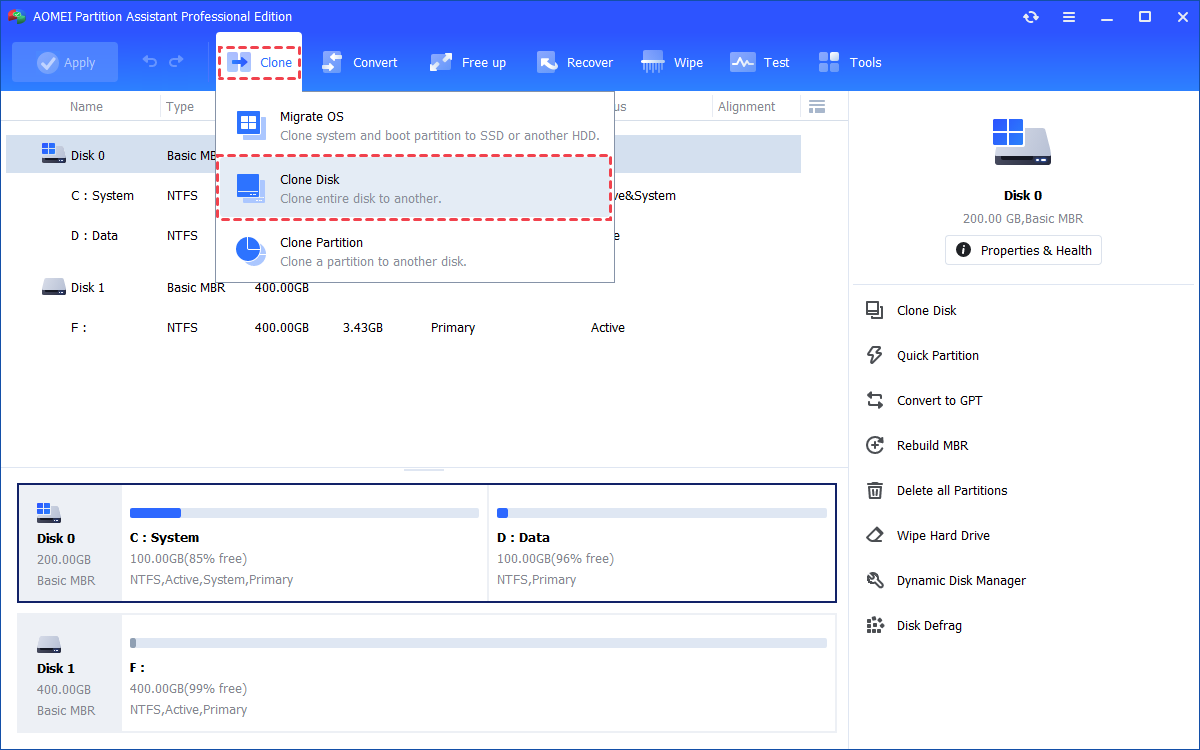
Step 1.Install and launch AOMEI Partition Assistant, click the "Clone" main tab and select "Clone Disk". (You can also right-click the Disk you want to clone and select the "Clone Disk" tool to run disk clone.)
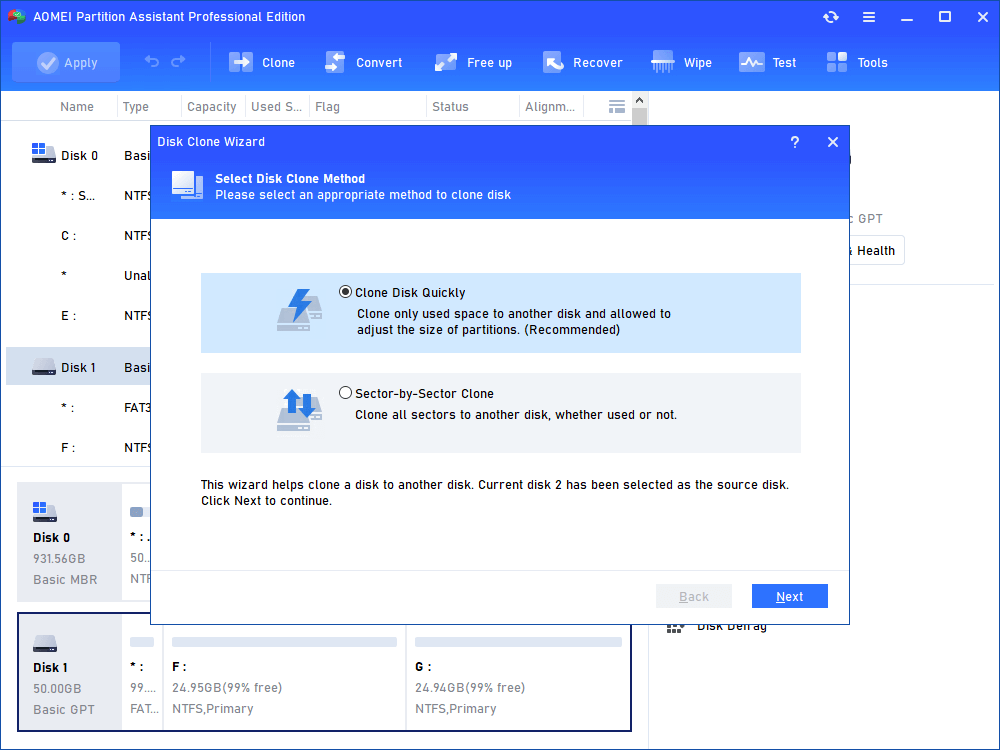
Step 2. Choose the hard disk that you need to clone as the source disk and click "Next".
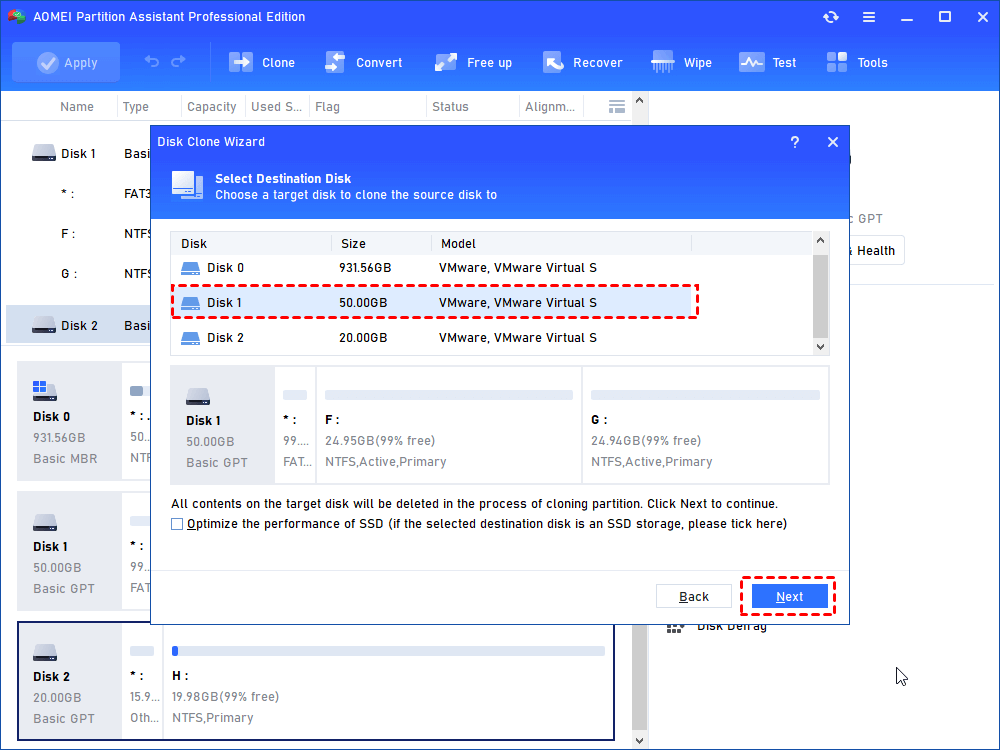
Step 3. Select the destination disk to put the data of the source disk on, and then click "Next".
Step 4. Then, you will enter the Confirm interface where you can check the source and destination disk. After all is set, you can click the "Confirm" button to continue.
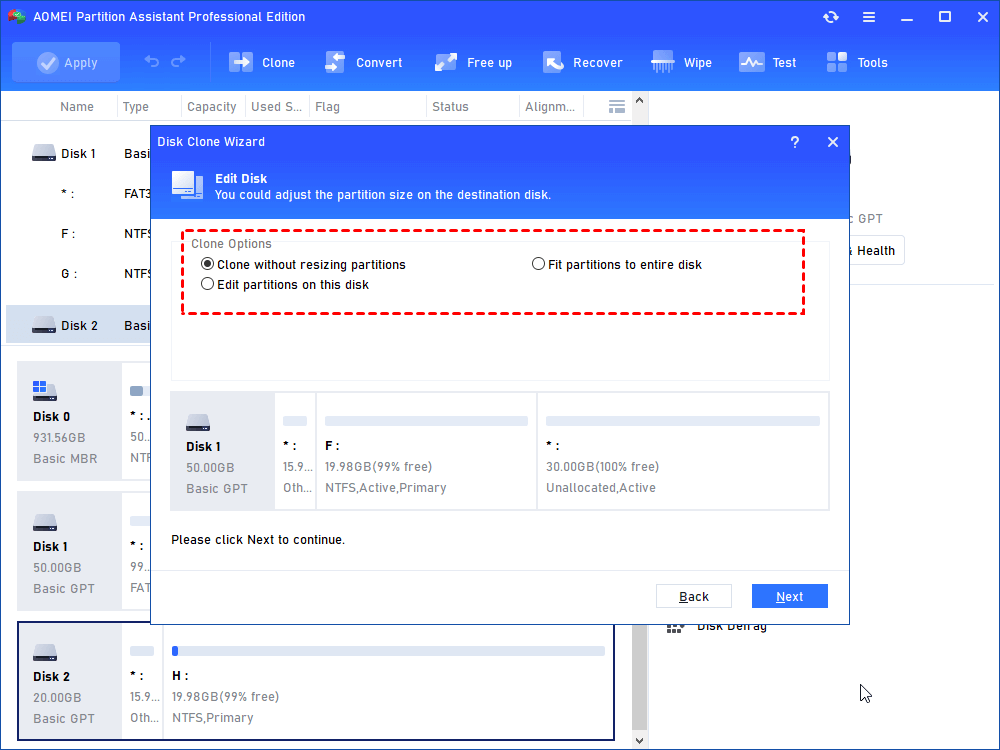
In lower left corner of the window, you can click the "Settings" button to adjust the partition size on the destination disk. There are three options for you:
- Clone without resizing partitions: all partitions will be cloned to the target disk as the original partition size. It is available when the target disk is larger than the source disk. If it is smaller, this option will be grayed out.
- Fit partitions to entire disk: all partitions will be cloned to the target disk and take up its full capacity according to the original partition size proportion.
- Edit partitions on this disk: you can change every partition size on the target disk as you need.
After finishing the adjustment, please click "Save".

Notes:
- You can tick "4k alignment" to improve the reading and writing speed of SSD if the selected destination disk is an SSD storage.
- All data on this selected destination disk will be wiped out after you save the operation to physical disk. If there is important data on the destination drive, please make a backup in advance.
- If you clone to a smaller SSD, the first option is grayed out. If you select Sector-by-Sector Clone, it is unable to adjust the size on the destination disk.
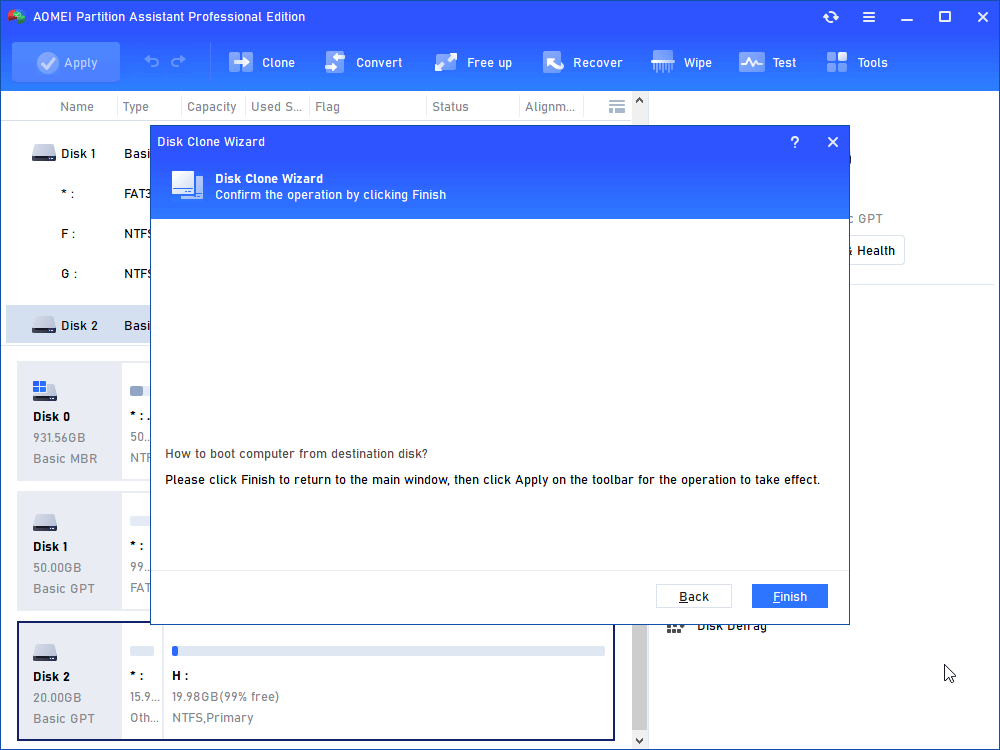
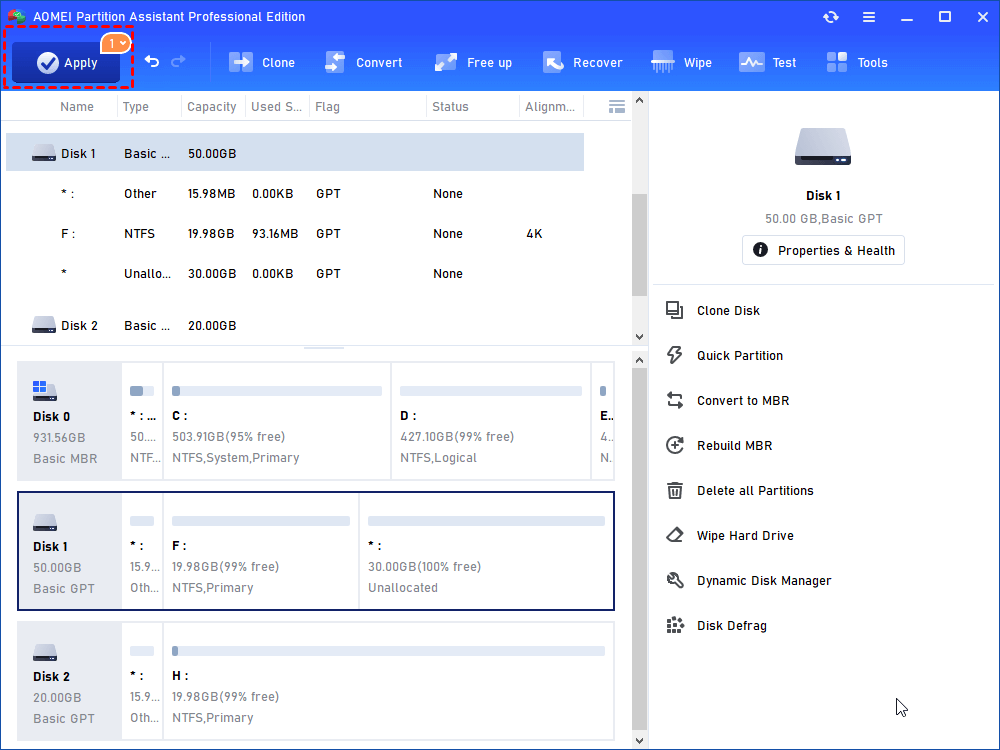
Step 5. You can preview the disk cloning operating by viewing the "Pending Operations". To commit the "Pending Operations", please click "Apply" and "Proceed".
Step 6. The cloning process will start and you can check the cloning process.
Summary
When you encounter USB ports not working Windows 11, you can first check the USB or ports and then follow the aforementioned guidance to troubleshoot that. However, as a storage device, when USB encounters problems like USB flash drive not showing up Windows 11 or not recognized, the data on it may be inaccessible.
For backup purposes, it is advisable to use AOMEI Partition Assistant. It also offers other functions like migrating OS to SSD, converting between MBR/GPT, and moving installed programs to another drive. If you are Windows Server 2003, 2008 (R2), 2012 (R2), 2016, 2019, 2022 and SBS 2003, 2008, 2011 user, there is also the Server Edition that can be chosen for computer management.

