5 Free Ways to Remove Disk Partitions on Windows 11
What are the free ways to remove disk partitions on Windows 11? From this post, you can learn not only the reasons for deleting partitions, but also how to use free tools to realize it.
By Tina / Updated on May 12, 2023
Why need to remove disk partitions on Windows 11?
Windows 11 is a new Windows system launched by Microsoft in 2021. It brings a brand-new UI interface to users and is committed to improving users’ work efficiency with a flexible experience. But many users may encounter the following problems after upgrading from Windows 10 to Windows 11:
• Sometimes you may run out of space on a particular partition because it has filled up with a lot of data, slowing down your computer.
• Managing disk space becomes more difficult when there are too many partitions on the hard disk. Therefore, many people choose to delete free space partitions to generate unallocated space and allocate them to other partitions.
In order to free up disk space and reallocate the free space on the disk, you can continue reading below to learn four free ways to remove disk partition on Windows 11.
How to remove disk partitions on Windows 11
There're three tools on Windows 11 that can help you to remove disk partitions including Diskpart, Disk Management and Windows PowerShell.
Method 1. Using Diskaprt to remove partitions
DiskPart is a command line utility, users can enter commands to manage hard drives in Windows system. In general, you can use the Diskpart.exe service to delete any known data partition. Here are the detailed steps to delete partitions on Windows 11 with Diskpart:
Step 1. Press "Windows+ R", then type "diskpart" and click "OK" to open the Diskpart.
Step 2. Run the following commands:
۰ list disk (all the disks on the computer will be displayed.)
۰ select disk 1 ("1" refers to the disk number of disk you want to remove)
۰ list partition (all the partitions on the selected disk will be listed)
۰ select partition 1 ("1" is the number of the partition you want to delete)
۰ delete partition override
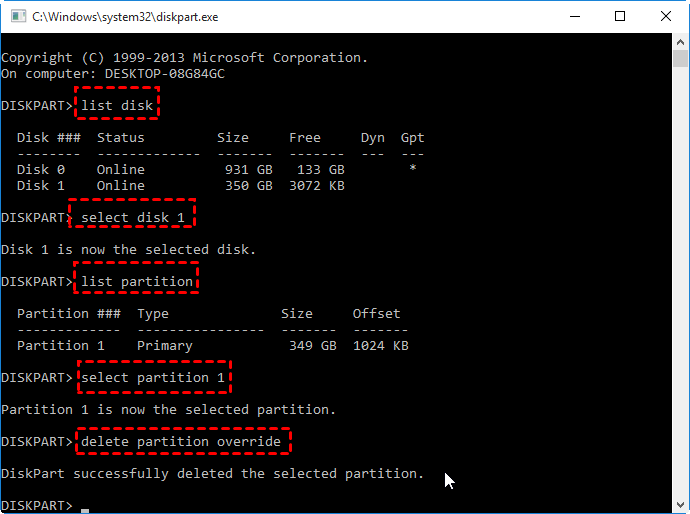
Note: Using the "Delete Partition Override" command can forcibly delete hidden partitions or protected partitions.
Method 2. Using Disk Management to remove partitions
Disk Management is a Windows built-in tool that enables you to manage hard disks installed in your computer and associated partitions. You can also use this tool to initialize disks, extend/shrink volumes and delete volumes. Please follow the steps below to remove disk partitions in Windows 11.
Before you do:
✍ Disk management can only delete data storage partitions, Delete Volume is grayed out if you want to delete system partitions.
✍ If the partition to be removed is an extended partition with logical partitions on it, you need to delete all the logical partitions, or you cannot remove this partition.
✍ If there's a page file or boot file on the target partition, you also cannot remove it.
Step 1. Press "Windows+ R" and type "diskmgmt.msc" to open the Disk Management.
Step 2. Right-click the partition you want to remove, and click "Delete Volume".
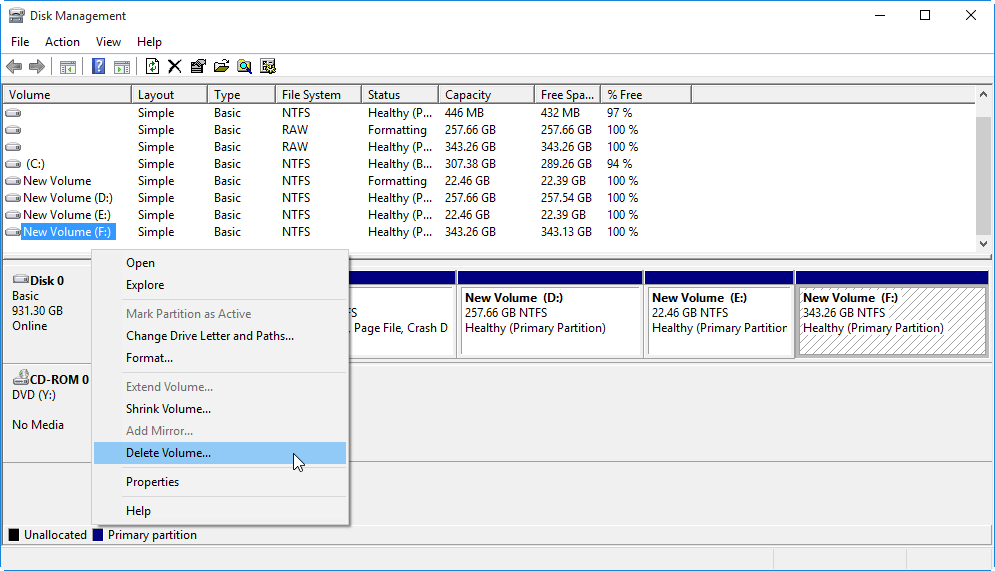
Step 3. Click "Yes" to execute this process.
Method 3. Using Windows PowerShell to remove partitions
PowerShell is a cross-platform task automation solution consisting of a command-line shell, scripting language and configuration management framework. It runs on Windows, Linux, and macOS. With the help of PowerShell, you can also solve the problem on how to remove partitions on SSD/HDD Windows 11.
Step 1. Press "Windows+X" and click "Windows PowerShell (Admin)" to open it.
Step 2. Input "Get-Volume" to get a list of all the partitions on your computer.
Step 3. Select the drive letter that you want to delete, and enter "Remove-Partition -DriveLetter" to remove it. (Please replace with the letter of the target partition.)
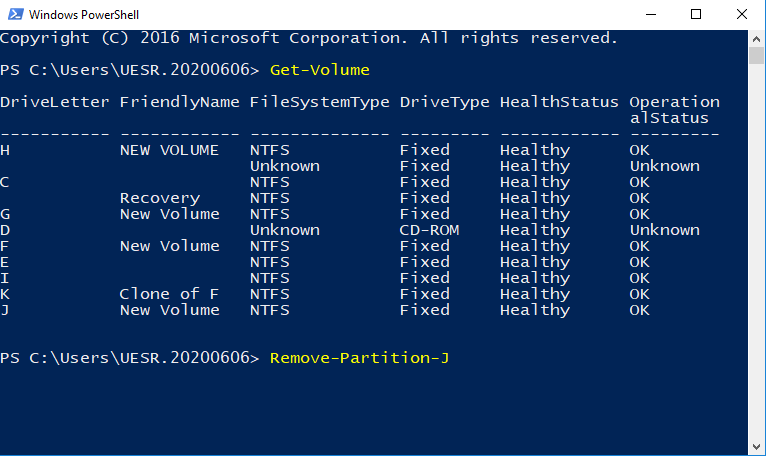
Step 4. Hit "Y" (Yes) or "A" (Yes to All) to confirm the operation.
Alternative way to remove disk partitions on Windows 11 easily
When you want to use Disk Management to delete a partition on Windows 11 but the “Delete Volume” is grayed out, or you are worried about unexpected data loss due to unfamiliar commands in Diskpart and Windows Powershell, you can use another powerful all-in-one partition management tool - AOMEI Partition Assistant Standard.
With it, even if you don’t have enough knowledge of computers, you can easily delete data partition, recovery partitions, system partition and delete partitions on USB drives through a user-friendly interface. Besides, this freeware also can resize partitions, format partitions, and merge partitions.
You can download this freeware to see how to remove one partition of hard disk.
Note: The function we will share to remove disk partitions on Windows 11 can only delete the data partition, if you want to remove a system partition, you can read the further tip.
Step 1. Install and open AOMEI Partition Assistant Standard.You can see all disks and partitions on your computer,right-click the target partition and click “Delete Partition”.

Step 2. Choose "Delete partition quickly (delete partition without wiping data)" and click "OK" in the popped window.
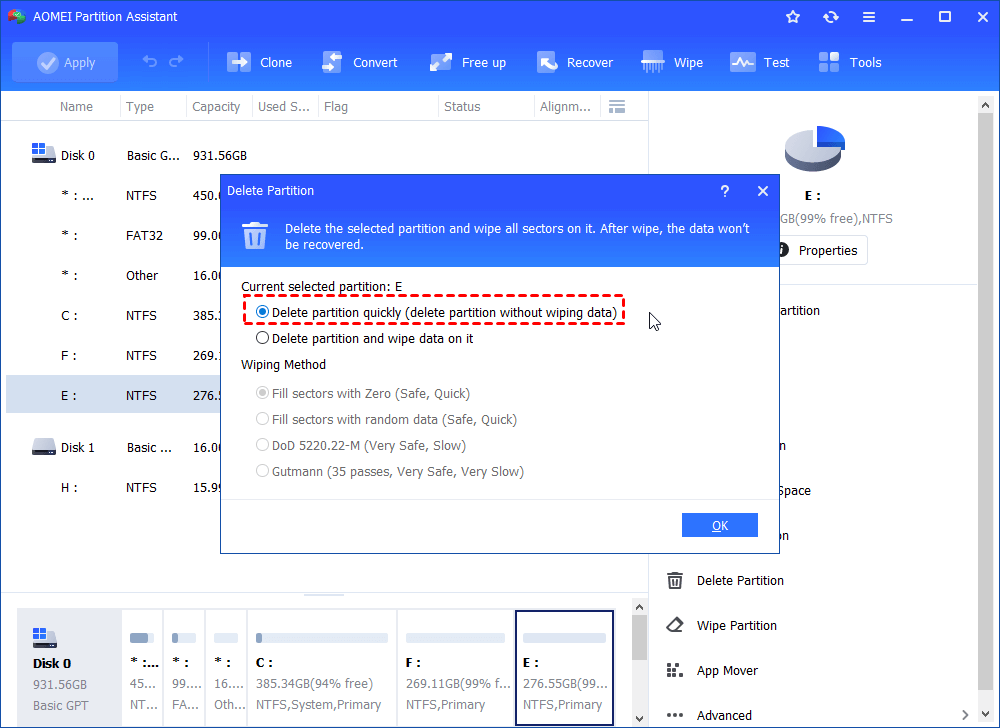
Step 3. Click “Apply” and “Proceed” to confirm the whole operation.
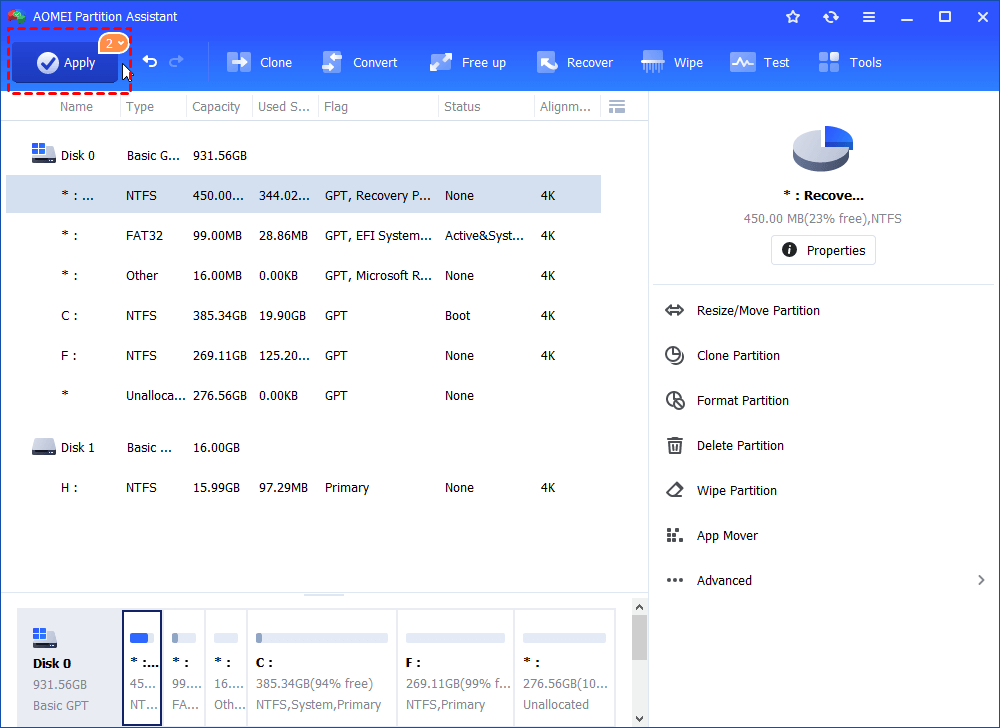
Tip: After removing the disk partition on Windows 11, you can allocate free space to extend another partition or create a new partition.
Further tip: Removing the system Partition
Removing the system partition will delete the installed Windows operating system, which will inevitably cause the computer unbootable, so it is not allowed to remove it while Windows is running. If you want to safely remove the system partition on Windows 11, you can also use AOMEI Partition Assistant Standard to achieve the goal. The detailed steps are as follows:
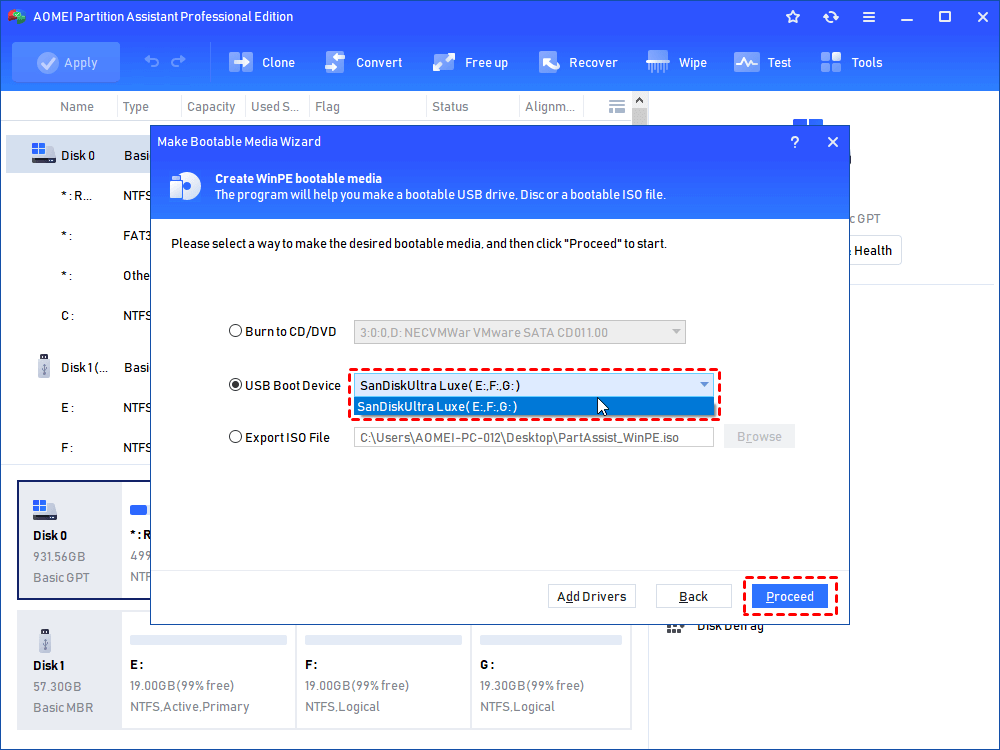
Step 1. Open AOMEI Partition Assistant Standard, then connect the USB drive to a working Windows computer. Click "Tools" and "Make Bootable Media" in turn.

Step 2. Select the right USB drive under "USB Boot Device" and click "Proceed".
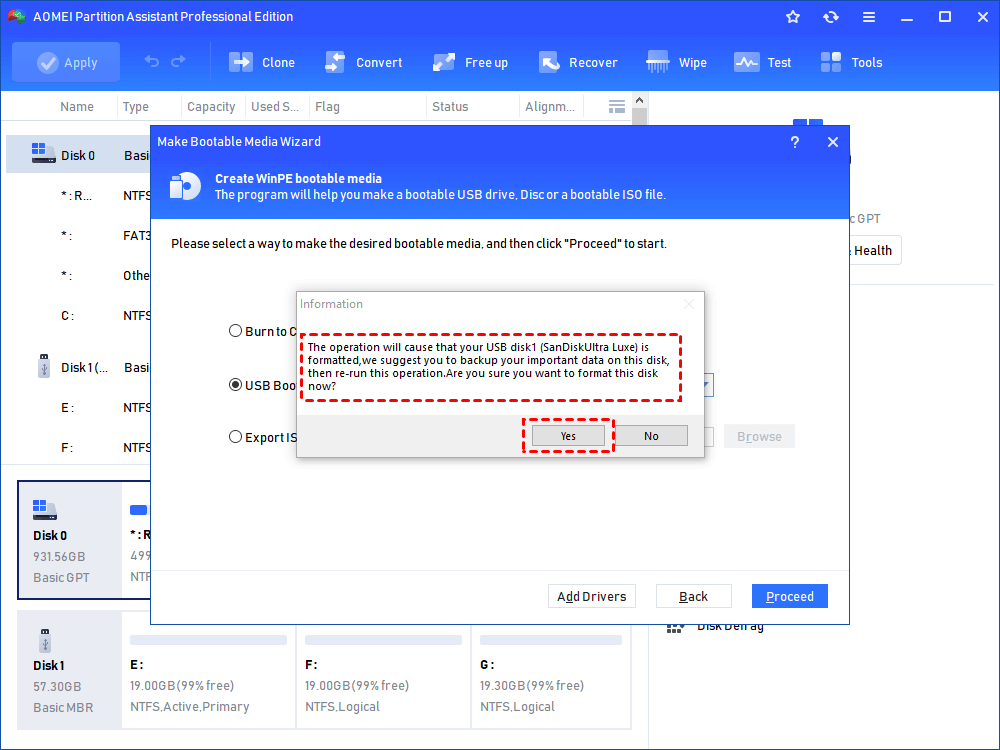
Step 3. Then you will be reminded the USB will be formatted, please back up important data in an ejected window. If you have done that, click "Yes".
Step 4. Wait for the process to be completed and close it after finishing this operation.
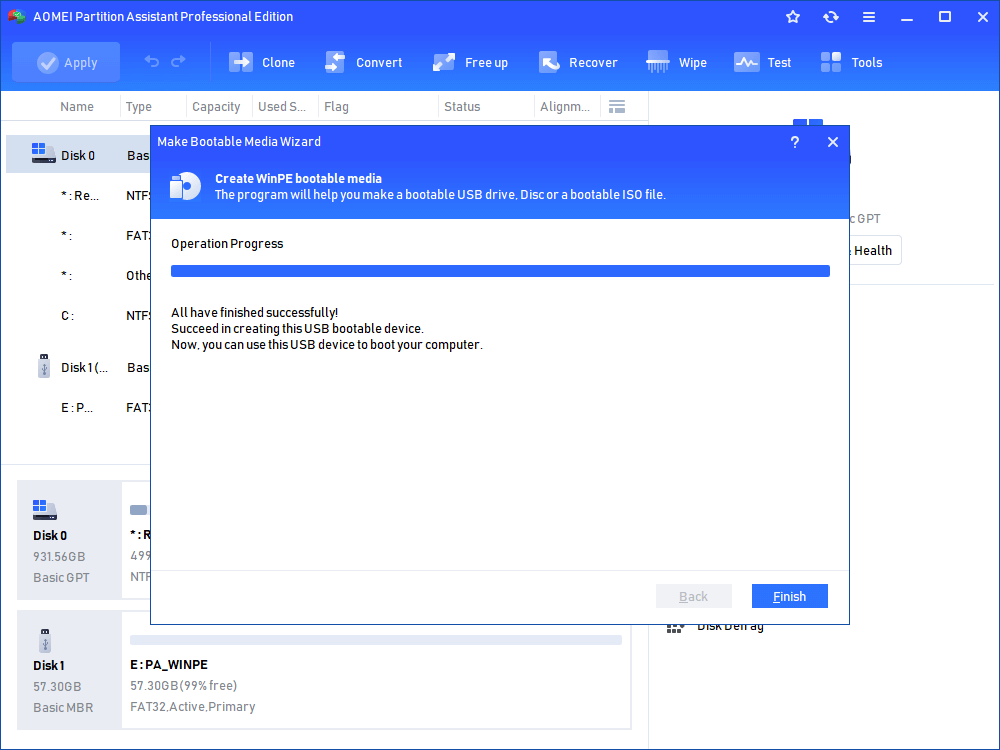
Step 5. Restart the PC and enter the BIOS to boot from USB. After a while, you will be in the main interface of AOMEI Partition Assistant Standard. Then, right-click the system partition to select Delete Partition.

Summary
So, this tutorial share you with 4 effective ways to remove disk partitions on Windows 11, and you can choose one of them to suit your needs. In my opinion, AOMEI Partition Assistant is simpler in comparison, and it has many advanced features. If you use a Windows server, you can turn to Server Version to unlock more surprises.