How to Enable UEFI Secure Boot for Windows 11 Update?
Do you need to enable UEFI secure boot for Windows 11 update? You can follow this guide to check if your device can support it and bypass it for easily upgrading to Windows 11.
By Michael / Updated on April 29, 2025
What is UEFI Secure Boot?
UEFI Secure Boot is a feature that helps keep your computer safe when it starts up. It is part of the UEFI system, which controls how your computer boots. When Secure Boot is turned on, the computer only loads trusted software that has been approved by the computer’s maker or Microsoft. This helps block viruses and other harmful programs from running before Windows starts.
Secure Boot checks digital signatures of key files, like the boot loader and drivers. If anything looks wrong or has been changed, it will stop the system from loading it. This protects your computer from attacks at startup. Most modern computers support Secure Boot. You can check if your PC supports it in several ways, like using System Information, Command Prompt, PowerShell, or Disk Management. If Secure Boot is not turned on, you can enable it through the BIOS settings.
Even if your computer doesn’t support Secure Boot, you can still install Windows 11 by using an installation disk or a powerful tool to bypass the check. Now, please read on and learn how to enable UEFI secure boot on this page.
The Best Windows Disk Partition Manager and PC Optimizer
Part 1. How to check whether the PC supports UEFI secure boot?
If you want to enable UEFI Secure Boot for Windows 11 update, the first step is to check if your PC supports it. For people without technical knowledge, it can still be confusing. In the sections below, we’ll show you 5 easy ways to check whether your PC supports UEFI Secure Boot.
▶ Method 1. Check the system information
First, you can check the secure boot state in the System information.
Step 1. Press “Win+R” simultaneously, type msinfo32 and hit “ENTER”.
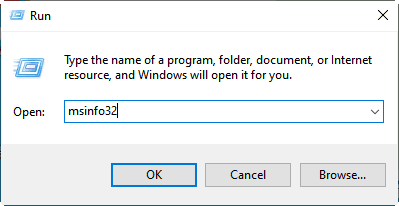
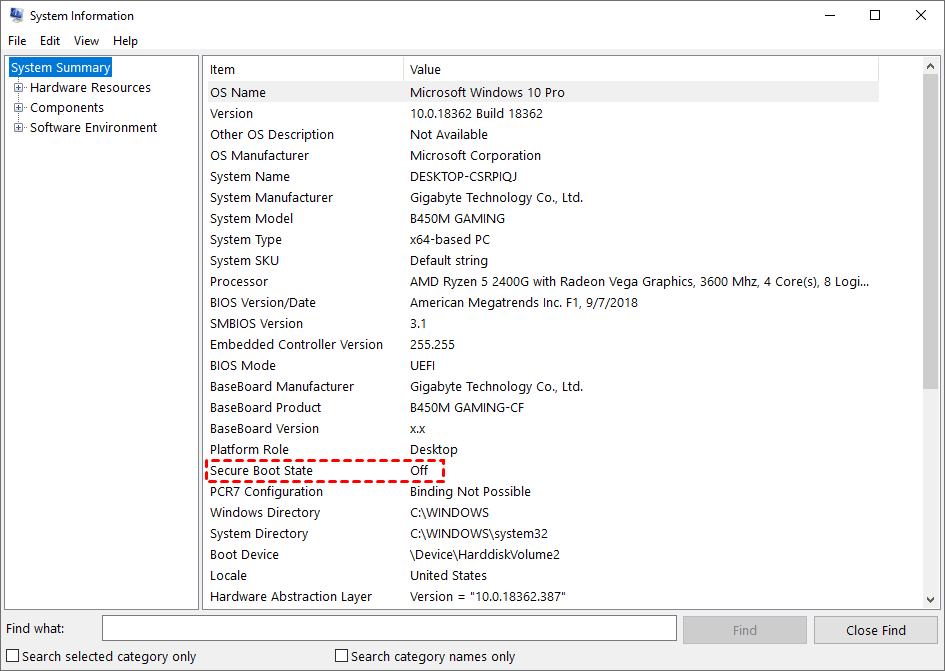
Step 2. In the “System Information” window, select “System Summary” and look for “Secure Boot State” on the right side. If the value is “on”, the secure boot is enabled; if “off”, the secure boot isn’t enabled and you need to enable it for Windows 11.
▶ Method 2. Use the CMD command
The built-in CMD is a basic way to see whether the secure boot is enabled. Let’s see how it works.
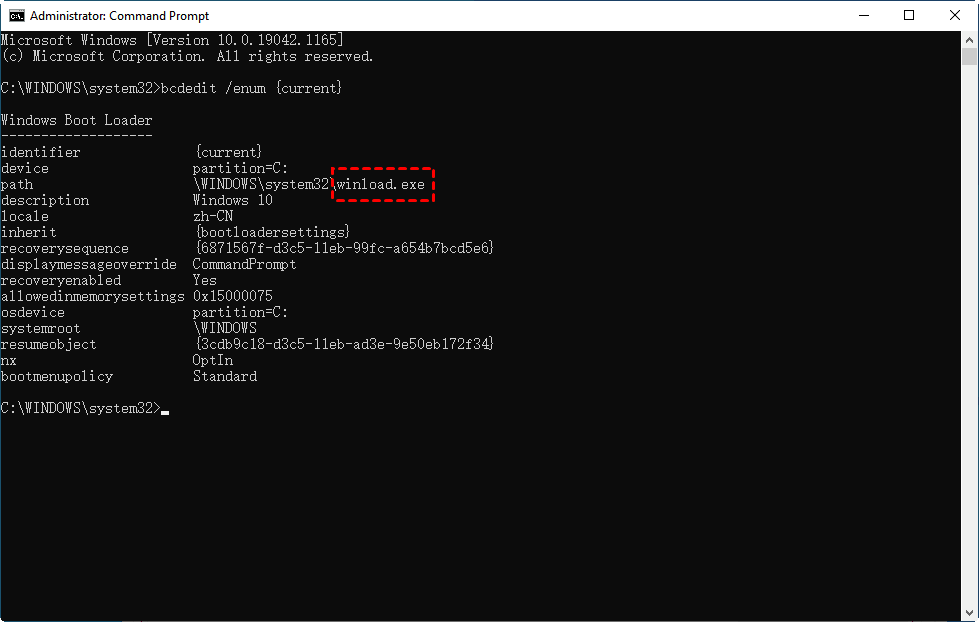
Step 1. Press “Win+R” simultaneously to launch the “Run” window, Then, type “cmd” and hit “ENTER”. Type bcdedit/enum {current} and hit “ENTER” to execute it.
Step 2. Among the listed information, locate “path”. If the path show “winload.efi”, it means Windows has enabled UEFI secure boot; if the path show “winload.exe”, it means Windows has enabled the traditional way to boot.
▶ Method 3. Use PowerShell Cmdlet
The Windows PowerShell would help by checking the “path”.
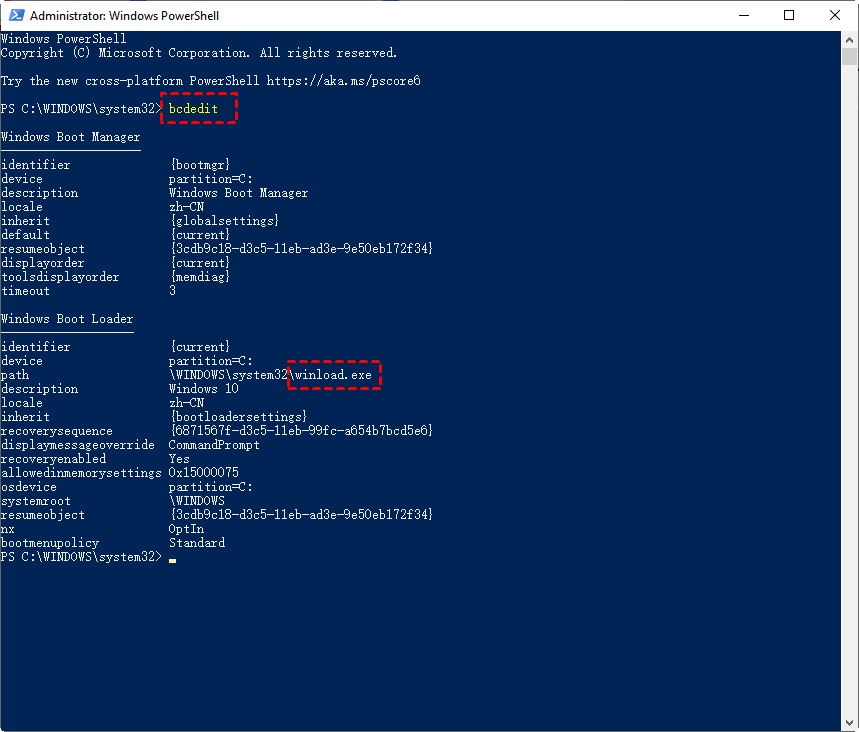
Step 1. In the start menu on the lower left, find “Windows PowerShell”. Then, right-click on it and run it as administrator.
Step 2. Type “bcdedit” and hit “ENTER” to commit it. Now, locate “path” as what you do in Method 2. Then, check what is behind the path, “winload.efi” or “winload.exe”.
▶ Method 4. Check Windows Disk Management
Since the specific relationship of GPT and UEFI, if the “Convert to GPT Disk” button greyed out, the PC is in UEFI secure boot mode, and vice versa.
Step 1. Press “Win + R” to open the “Run” window, then, type “diskmgmt.msc” and hit the “ENTER” key.
Step 2. Right-click on disk 0 and if there is the option of “Convert to GPT Disk”, it means your PC is running in the traditional way; if it shows “Convert to MBR Disk”, it means the PC is in the UEFI secure boot mode.

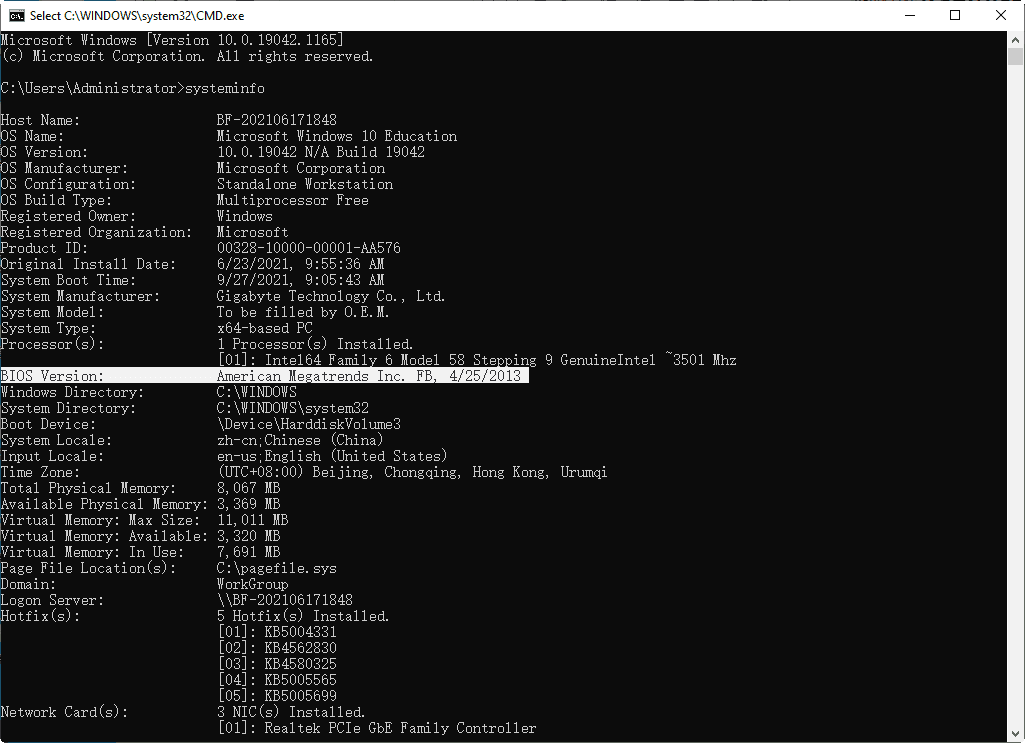
▶ Method 5. Check the motherboard’s production date
Besides, you can also view the production data of the motherboard in “BIOS Versions”, then judge whether the secure mode is enabled.
Step 1. Press “Win + R” simultaneously to open the run window. Then, type “cmd” and hit “ENTER”.
Step 2. In the window, type “systeminfo” and hit the “ENTER” key. Wait a moment before you can check the info of your PC. You can see the production data of the motherboard after the option of “BIOS Versions”.
Attention: When you change the secure boot state, you may encounter some hardware failures. You can easily solve the problem by simply disconnecting the inoperable hardware from the PC after changing the secure boot state, and then reconnecting it.
Part 2. How to enable UEFI secure boot?
If your PC supports Secure Boot but it hasn’t been enabled, the following guide provides detailed steps to turn it on.
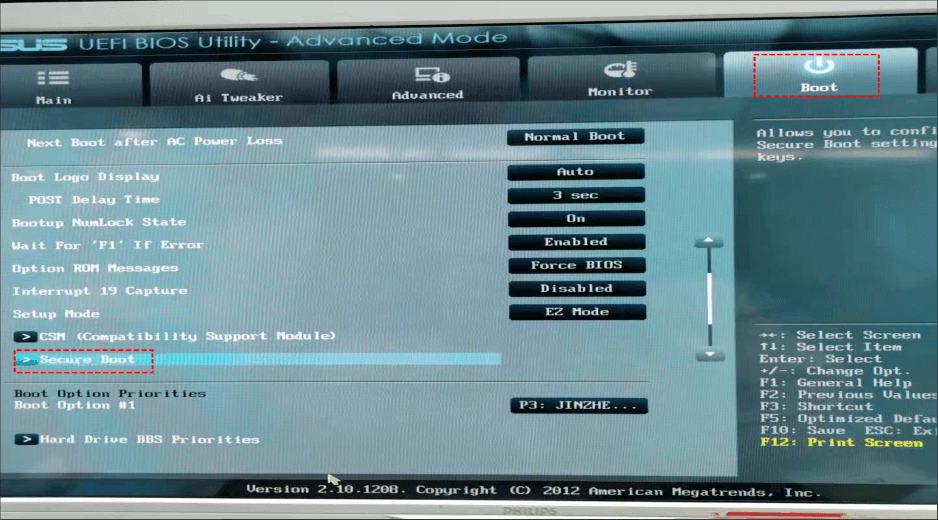
Step 1. Reboot your computer open the BIOS system (the keys are different depending on computer hosts). Then, click on “Boot” and select “Secure Boot”. To easily access to it, you can use a handy tool, which can also help you easily bypass Secure Boot for Windows 11 upgrade.
The Best Windows Disk Partition Manager and PC Optimizer
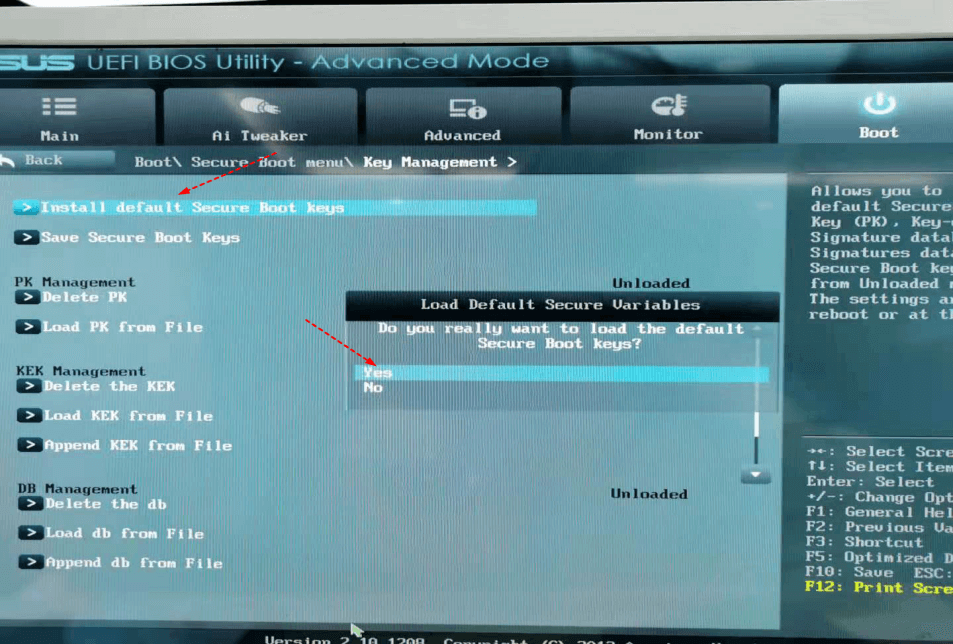
Step 2. Now, you can secure boot is shut down. Click on “Key Management”. Select “Install default Secure Boot Keys” to enable secure boot.
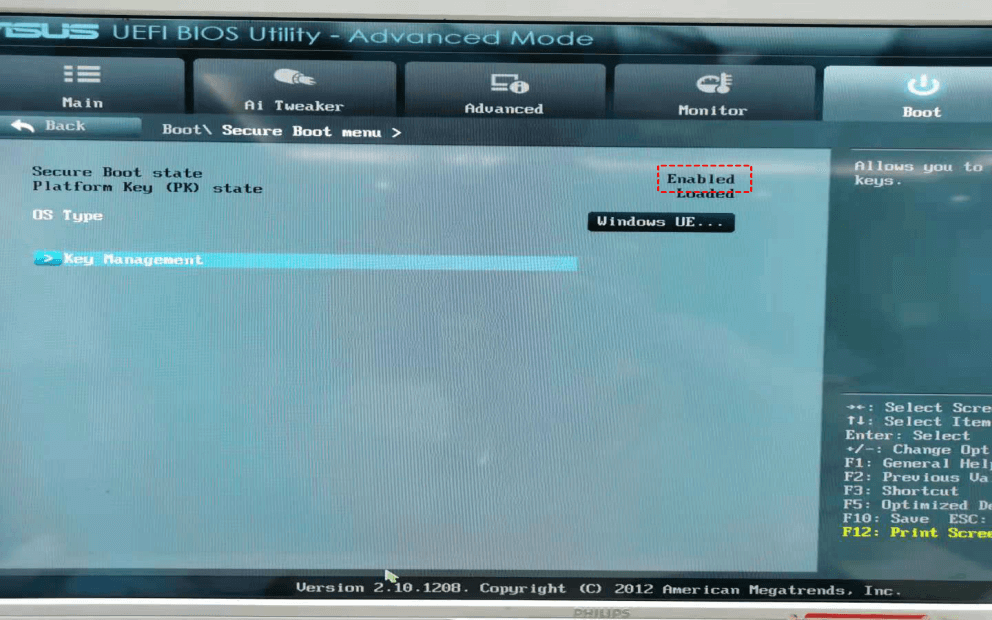
Step 3. Finally, return to the previous column and you can see Secure Boot is enabled.
Part 3. Windows 11 Secure Boot bypass via an installation disk
If your computer doesn’t support Secure Boot, you can use the install disk to boot to bypass UEFI detection. The following guide teaches how to bypass UEFI detection to install Windows 11 in detail.
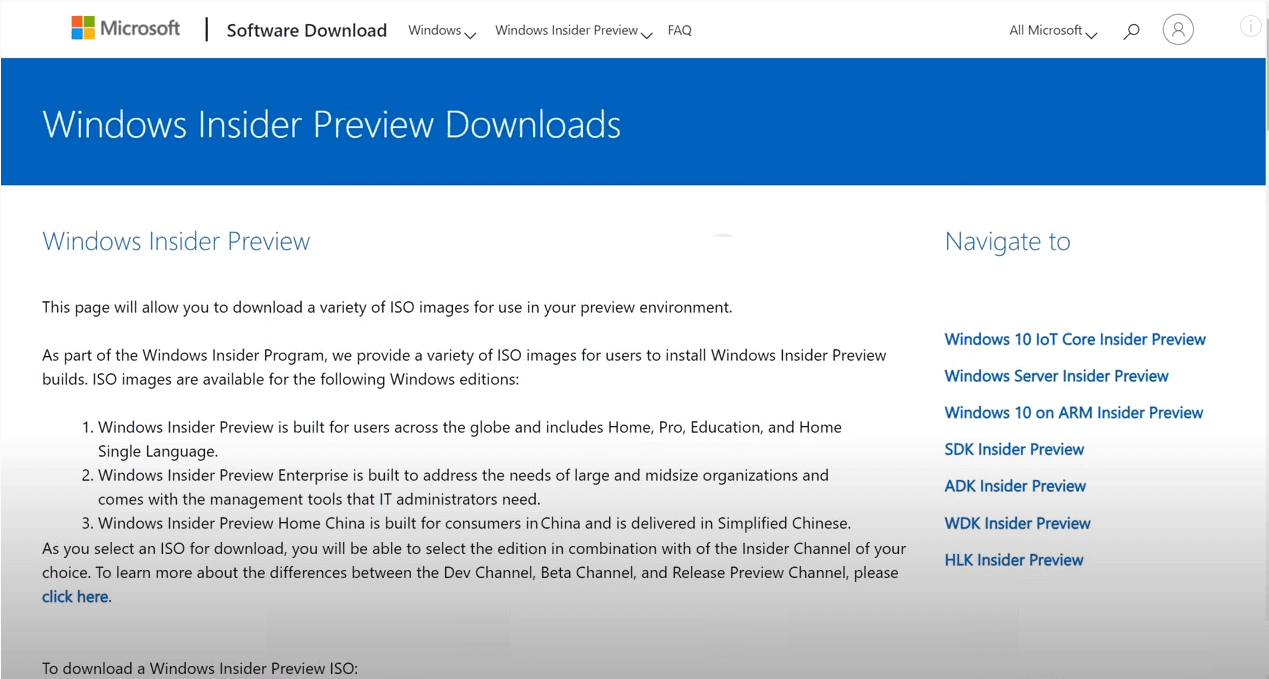
Step 1. First of all, you need to download Windows 11 ISO pack. You’re supposed to directly download the Windows 11 ISO file in the preview version (Windows 11 standard hasn’t been published). Here, the download entry page of the official website is provided and after getting in, you need to click on the profile on the upper right to create an account. It can be a little bit slow. So, be patient.

Step 2. After creating the account and logining in, scroll down the page and select version and language. Then, you can download the ISO file of the Windows 11 preview version.
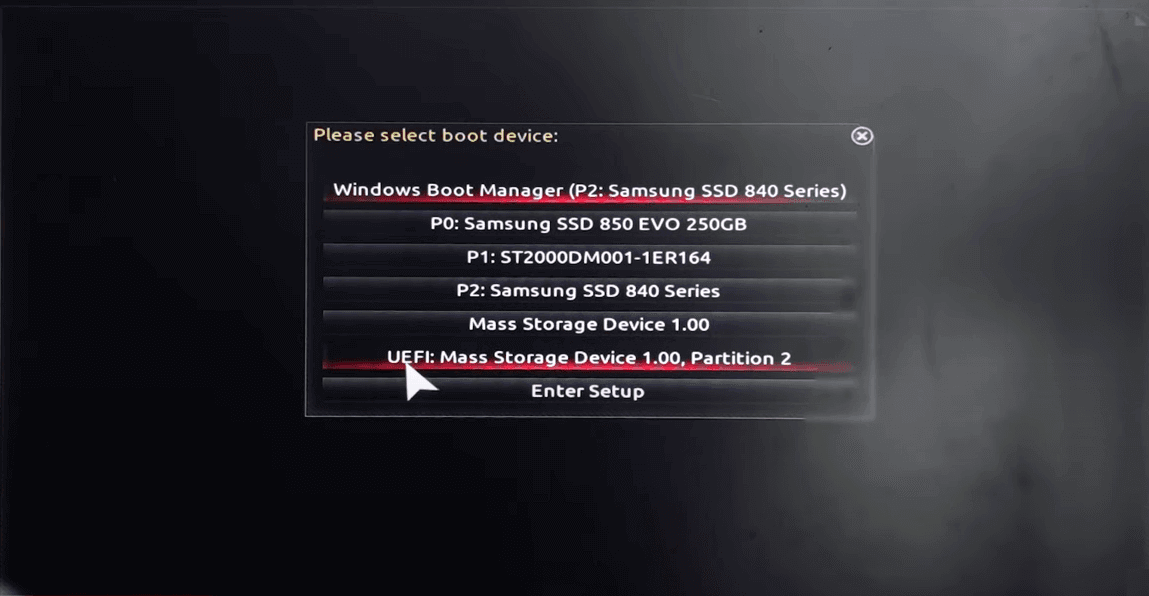
Step 3. After you finish downloading, you need to make an installation disk in order that you can be led by the installation disk to enter the Windows 11 installation process. Insert the prepared installation disk into the USB port of the PC that needs to install Windows 11, and immediately press the shortcut key to enter the boot startup interface (different motherboard shortcut keys are different, usually F8/F11/F12).
Step 4. After booting into the startup window, select the option of installation disk and click on it.
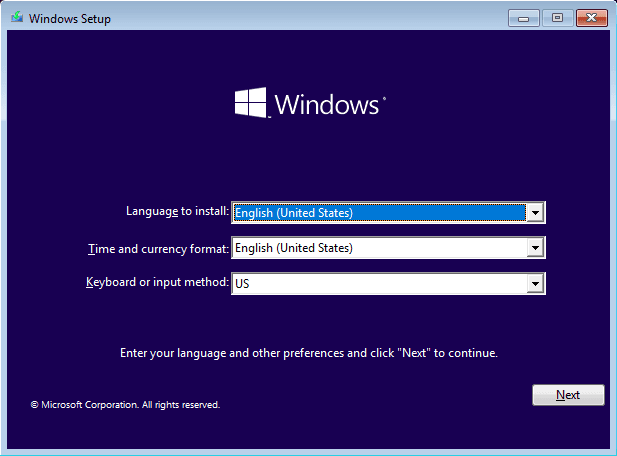
Step 5. Now, you need to wait around 1 minute and then you will enter the interface of Windows installer. At this time, you just need to follow the regular Windows installation onscreen guide to finish the Windows 11 installation,
🔥The best way to bypass Secure Boot for Windows 11 update
If you don't want to use the installation disk for Windows 11 upgrading, there's another easy way to run Windows 11 on a PC that doesn't meet the system requirements. You can create a Windows 11 To Go USB and use it to run the system on any computer—no installation needed.
AOMEI Partition Assistant is a reliable and easy-to-use tool that can help with this. Its "Windows To Go Creator" feature is perfect for people who want to use Windows 11 but don’t have a supported device. It lets you make a portable Windows 11 USB drive that works not only on Windows PCs but also on Mac computers. This software also helps fix Secure Boot is enabled but not activated if you want to install Windows 11 on your own PC.
The Best Windows Disk Partition Manager and PC Optimizer
Step 1. Connect a USB drive larger than 13GB and download Windows 11 ISO file on your current computer.
Step 2. Install and launch AOMEI Partition Assistant. Then click "Tools" > "Windows To Go Creator" on the top interface.

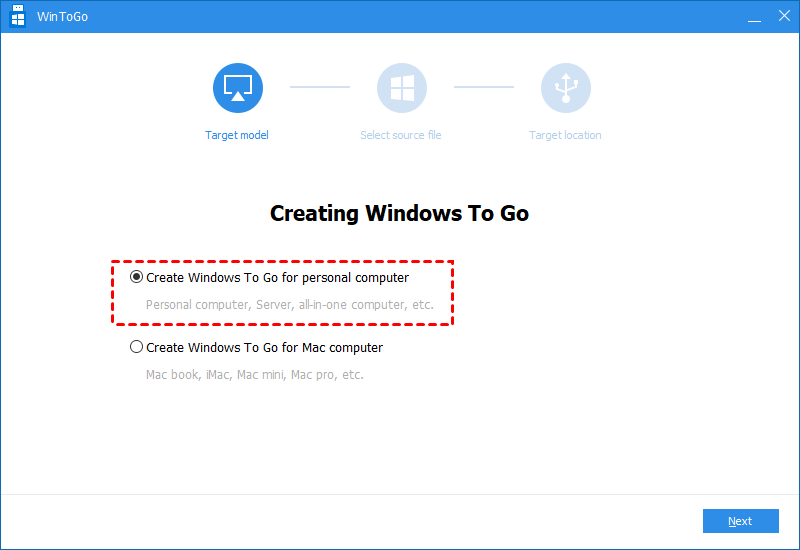
Step 3. Choose "Create Windows To Go for personal computer" and click "Next". If you want to boot Windows from USB on Mac, just tick the second option.
Step 4. Choose the first option and click the folder icon to select Windows 11 ISO file you downloaded before manually. After that, click "Next" to continue.

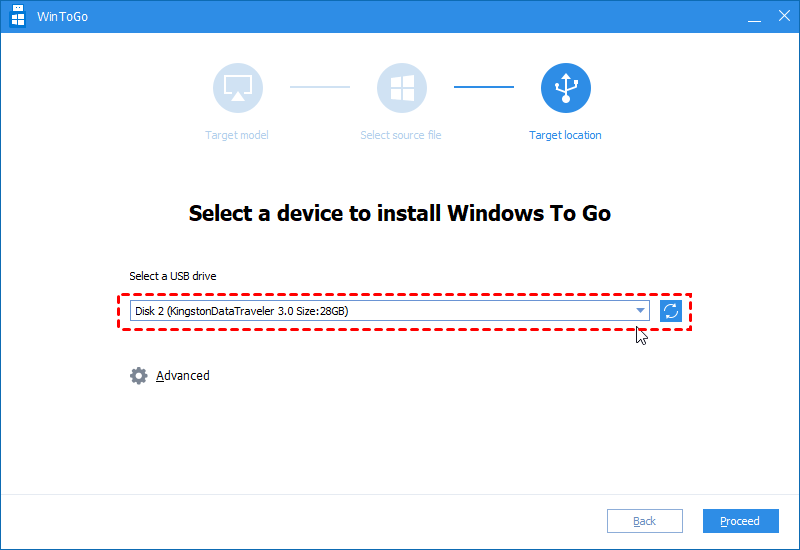
Step 5. Select the prepared USB drive as your target drive and click "Proceed".
Step 6. Read the warning about all data will be erased carefully, and then click "Yes" to start creating.

After that, any time when you need to use Windows 11, you can boot the computer from this Windows 11 To Go device.
Does UEFI secure boot affect the performance of the PC?
After going through the entire post, some people may wonder whether UEFI secure boot affects their PC’s performance. The answer is definitely negative. Enabling UEFI Secure Boot will increase protection and prevent your computer from virus attacks, so it won’t affect performance.
Conclusion
This page focuses on showing you what is UEFI, and how to enable it for Windows 11 updates. There are 5 methods for you to check whether your computer supports UEFI Secure Boot. If your computer doesn’t support it, you can bypass UEFI detection with an installation disk, then execute Windows 11 installation; If you’ve enabled UEFI Secure Boot successfully, congratulations, you can turn to the next operation of Windows 11 upgrade.