Troubleshoot [Can’t Download Windows 11]
If you cant download Windows 11, you can read this elaborate guidance to figure out the reasons with targeted solutions.
By Irene / Updated on May 12, 2023
Why can’t I download Windows 11
As the latest Windows operating system, Windows 11 has attracted many computer users to download it for a fresh experience. But some may receive a message like “This PC doesn’t currently meet Windows 11 system requirements”, which means you can’t upgrade to Windows 11.
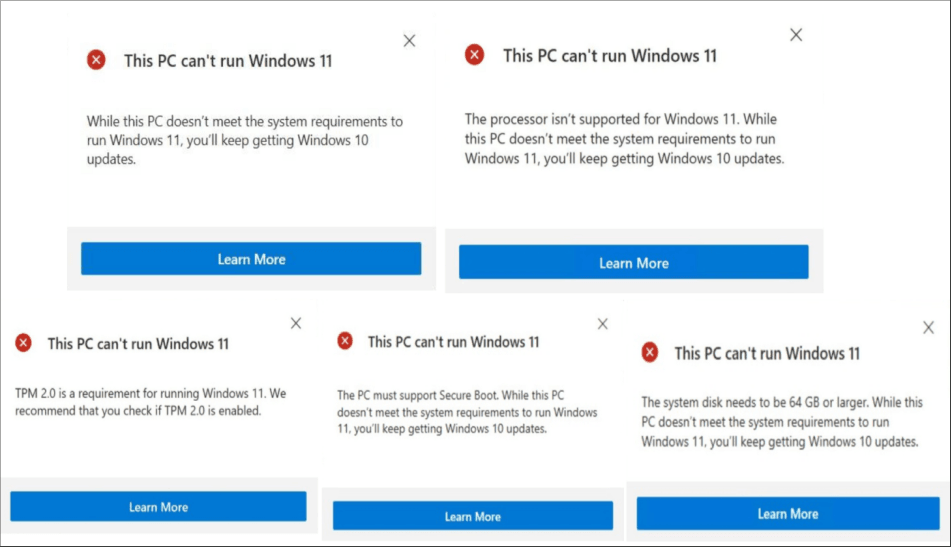
With the minimum system requirements to upgrade to Windows 11 released by Microsoft and many users’ feedback, we have sorted out five common reasons for Windows 11 upgrade failure as below.
1. The PC doesn’t meet the system requirements to run Windows 11
2. The processor should be 1GHz or faster with two or more cores on a compatible 64-bit processor or SoC.
3. The devices are not meet the System firmware requirement—UEFI and Secure Boot Capable.
4. Users do not enable the Trusted Platform Module version 2.0 (TPM 2.0).
5. The storage space is less than 64GB.
After briefly explaining “Why can’t I download Windows 11”, we will offer targeted solutions in the next part to help you troubleshoot it.
How to do if I can’t download Windows 11
From the listed 5 reasons, if the problems happen in hardware, it is necessary to change it for the requirements of Windows 11 updating. But for others, we can fix them with a program or practical software if you can’t download Windows 11. In this part, we will provide relevant tutorials for reference.
▌ Fix 1. Convert MBR to GPT and enable Secure Boot
As mentioned above, the System firmware requirement of UEFI and Secure Boot capable may explain why you can’t install Windows 11. To fix this problem, we will provide three available approaches to convert to GPT and the way to enable Secure Boot.
Part 1. Convert MBR to GPT
It is necessary to check the MBR or GPT disk you’re using on your PC if you can’t download Windows 11. The requirements of Windows 11 updating point out that UEFI is a needed condition.
Why is it needed? As the newest operating system, Windows 11 should be equipped with a more effective and faster way to boot. Generally, the boot mode combinations are Legacy (BIOS+MBR) and UEFI (UEFI+GPT). But by comparison, UEFI + GPT can offer the best compatibility, larger capacity permission, and better boot speed, so it is easy to understand why Windows 11 requires UEFI firmware.
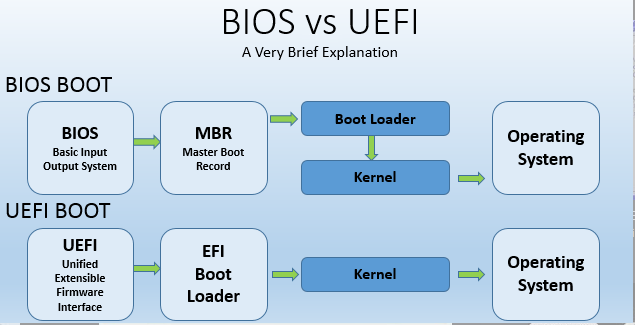
Therefore, if you cannot meet this upgrading requirement, you may probably be noticed with "Windows cannot be installed on the disk. The selected disk has an MBR partition table”, which means you need to convert it to GPT.
Note: Most devices can support both BIOS and UEFI boot mode. But it is still advisable to check whether your motherboard supports UEFI or not. You can press "Win+R" > type "msinfo32" > hit the "Enter" key to open the “System Information”, and then click “System Summary” to confirm.
▷Convert to GPT in Command Prompt (data loss)
Command Prompt is a Window built-in tool, often used for coping with Windows computer problems. This method requires the knack of mastering command lines, and even some of the commands are complex and difficult.
In addition, the Command Prompt will ask users to clean their target disk when converting, which means you will suffer from data loss. If you have not stored much important data on the disk, you can try this method. Follow the step to convert a data disk with partitions:
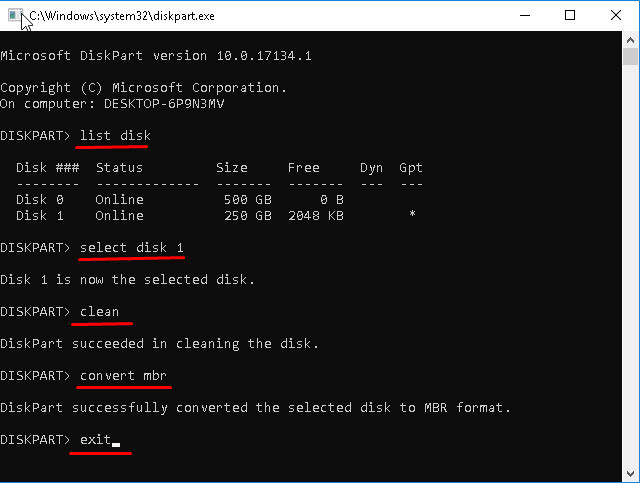
Step 1. Open "Start Menu" and input "DiskPart" in the search box, and then press the "Enter" key. Click "Yes" to open the Command Prompt.
Step 2. Input "list disk" with pressing "Enter”.
Step 3. Input "select disk Y" and press "Enter". (Y is the number of the disk you hope to convert).
Step 4. Input "clean" with hitting the "Enter" key to delete all the partitions on the selected disk. If there are no partitions, you can skip this step.
Step 5. Input “convert gpt” and press “Enter” to finish the conversion. At last, type “exit”.
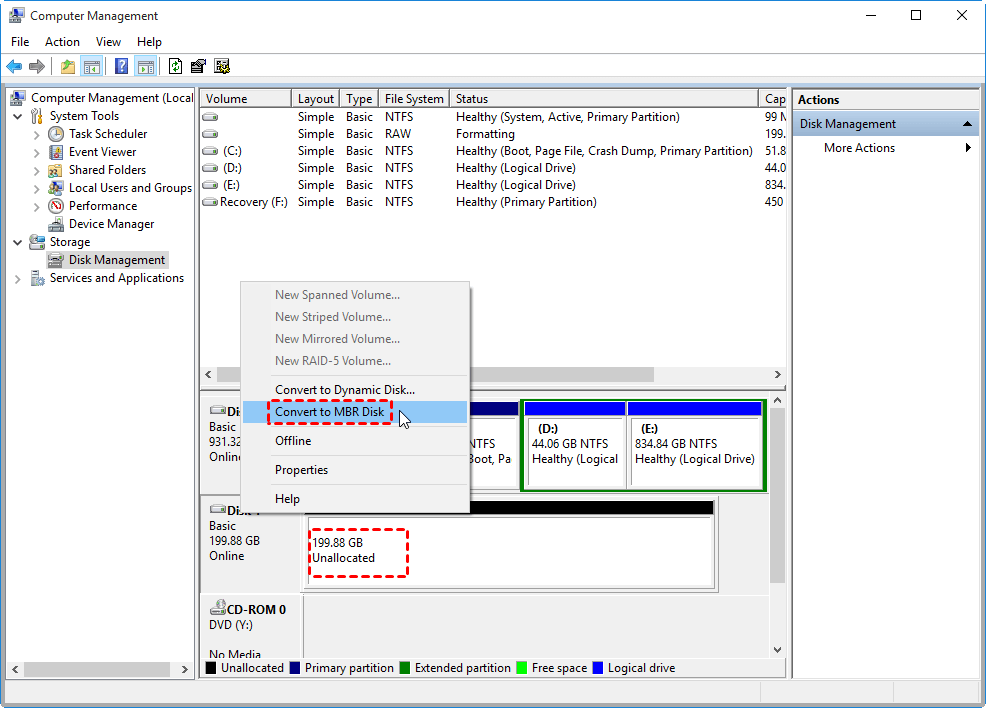
▷Use Disk Management to convert to GPT (data loss)
Like the Command Prompt, Disk Management is also a system built-in tool that can be used to convert to GPT. In the process of converting, it will demand you to delete volume, and it only works for a data disk. If you don’t mind these limitations, you can follow the concise guide to convert to GPT via Disk Management.
Step 1. After you back up all data on the target disk, please right-click partitions one by one to delete all partitions on the disk.
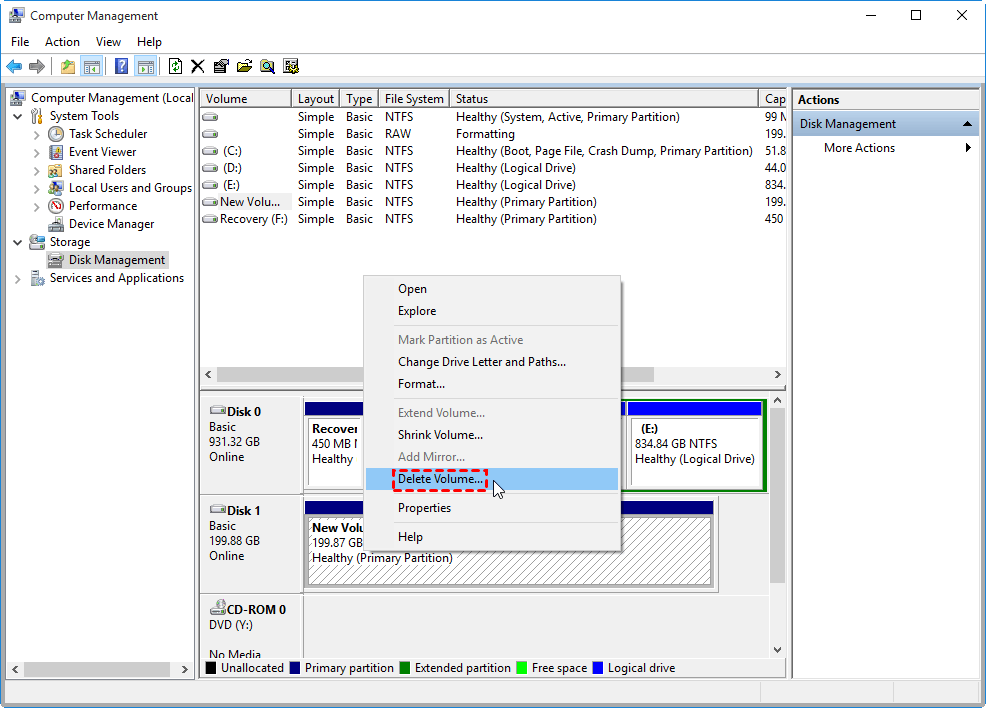
Step 2. You’ll see a note that all data on the partition will be wiped. Click “Yes”.
Step 3. Once all partitions are erased, right-click the disk and choose the “Convert to MBR Disk” option.
▷ An easier way to convert MBR to GPT (data safe)
The built-in tools like Disk Management and Command Prompt can indeed be used to convert to GPT, but we can find that both have a common shortcoming—causing data loss. To be honest, in modern society, people would like to choose other alternatives to easily and safely deal with the problem.
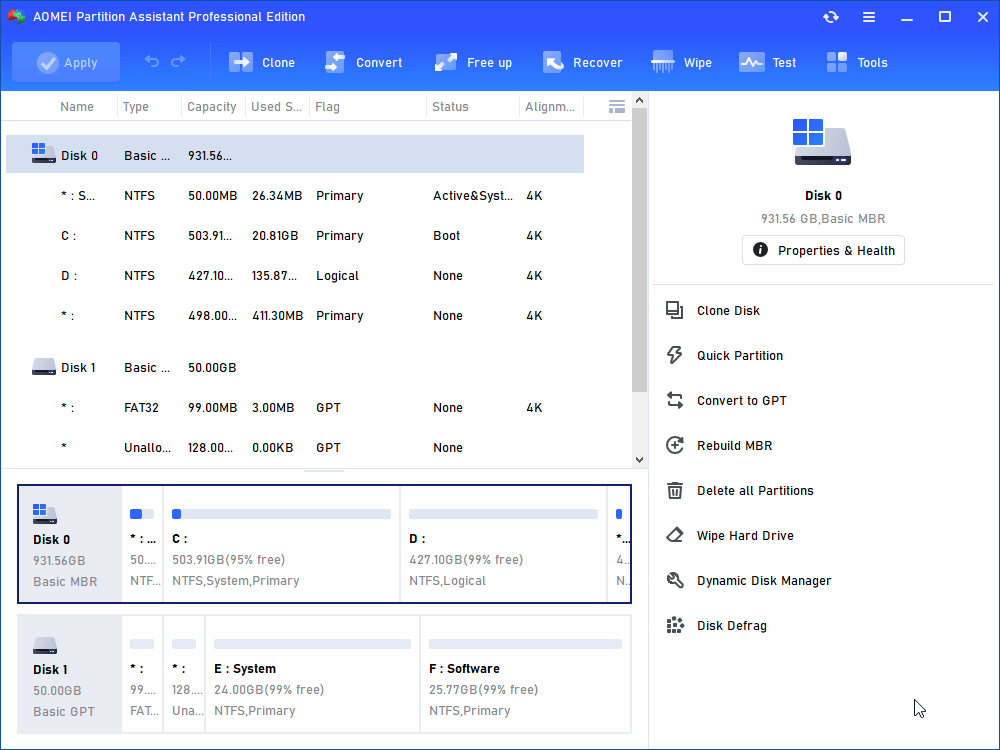
AOMEI Partition Assistant Professional is the most popular choice among mass computer users. This is a powerful and versatile computer management tool for Windows 11/10/8/8.1/7/XP/Vista computers. It allows users to convert MBR/GPT without losing data and permits converting for the system, data, and external disk instead of working for a data disk only.
Step 1. Open and launch the software. Right-click on the disk and choose the “Convert to GPT” option.
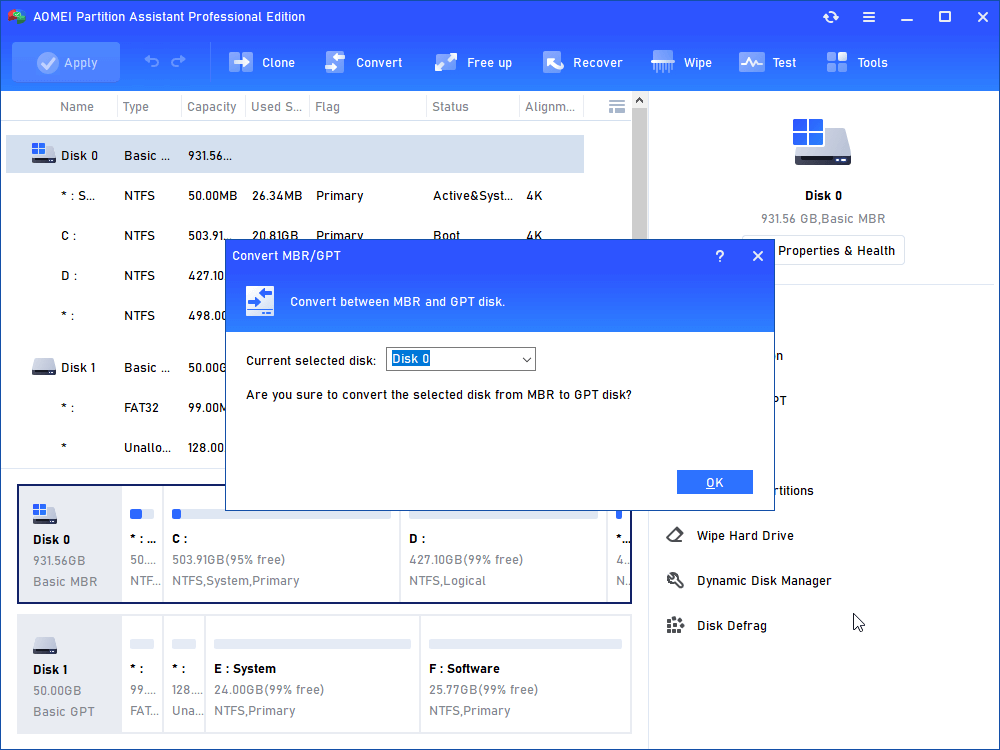
Step 2. Choose “OK” and “Yes” to confirm the operation.
Step 3. Then, select “Apply” on the corner of the upper left side to commit the operation.
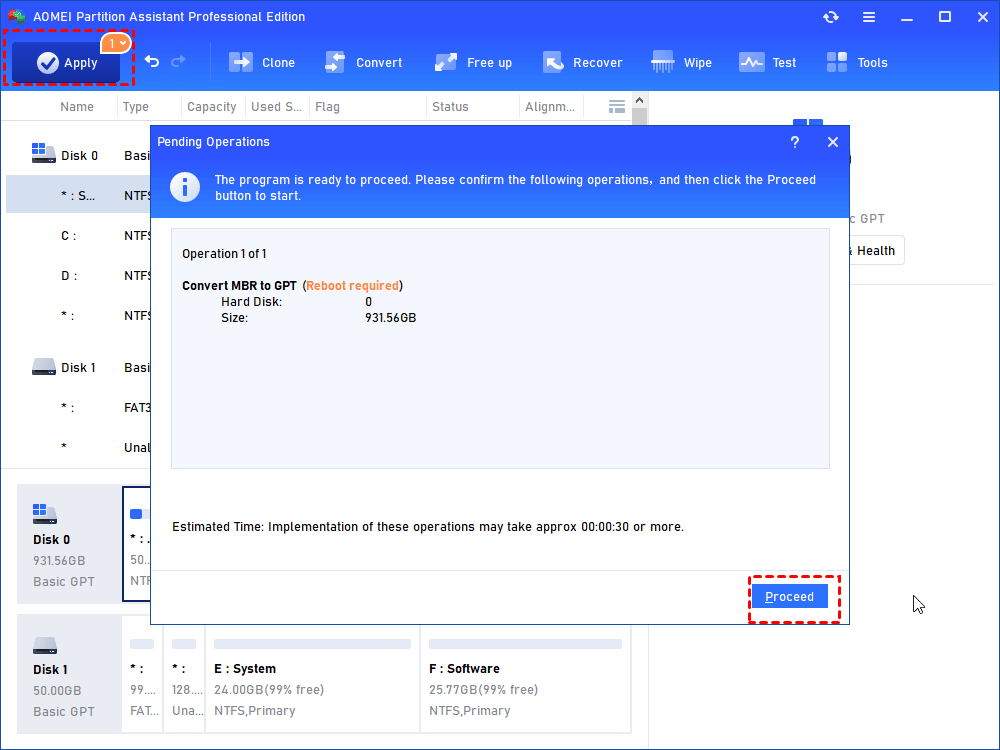
Next, the device will complete the operation in WinPreOS mode. When you successfully convert MBR to GPT, you can change BIOS to UEFI.
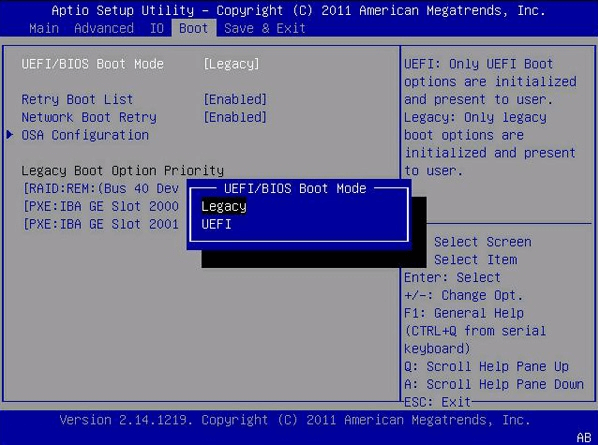
Step 4. Start your PC and hit the specific key (the key is different from computers, you can search for relevant information on the internet) to enter the firmware interface.
Step 5. Select the “UEFI/BIOS Boot Mode” and change the Legacy to UEFI.
Part 2. Enable Secure Boot
According to the official report, the system firmware includes UEFI and Secure Boot Capable. What is the relationship between them? Simply put, the Secure Boot is a feature in UEFI to defend against attacks and infected software.
If you can't download Windows 11, you should consider switching the BIOS boot mode to UEFI and converting the MBR format to GPT (GUID) format with performing the Secure Boot. We have discussed how to convert to GPT in the above text, and in this part, we need to enable the Secure Boot now.
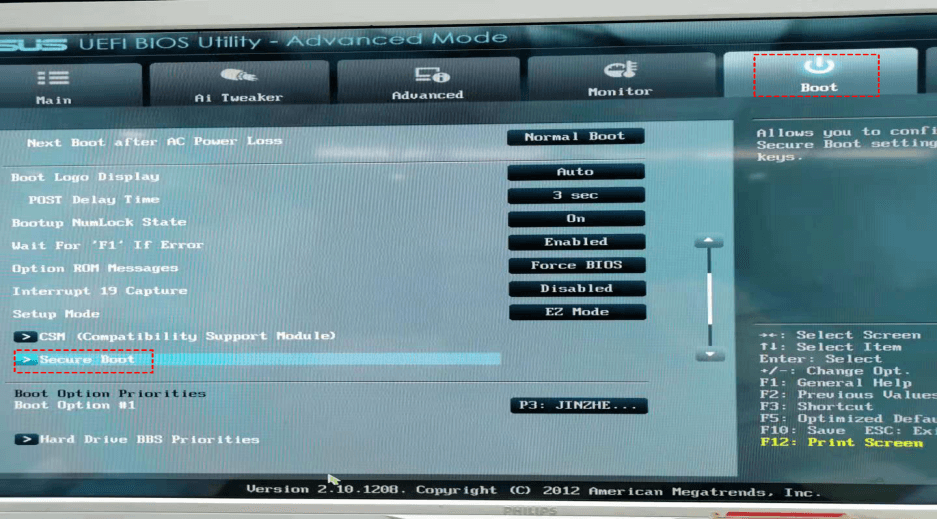
Step 1. Restart your PC and enter BIOS with hitting the specific key. Choose “Boot”>“Secure Boot”.
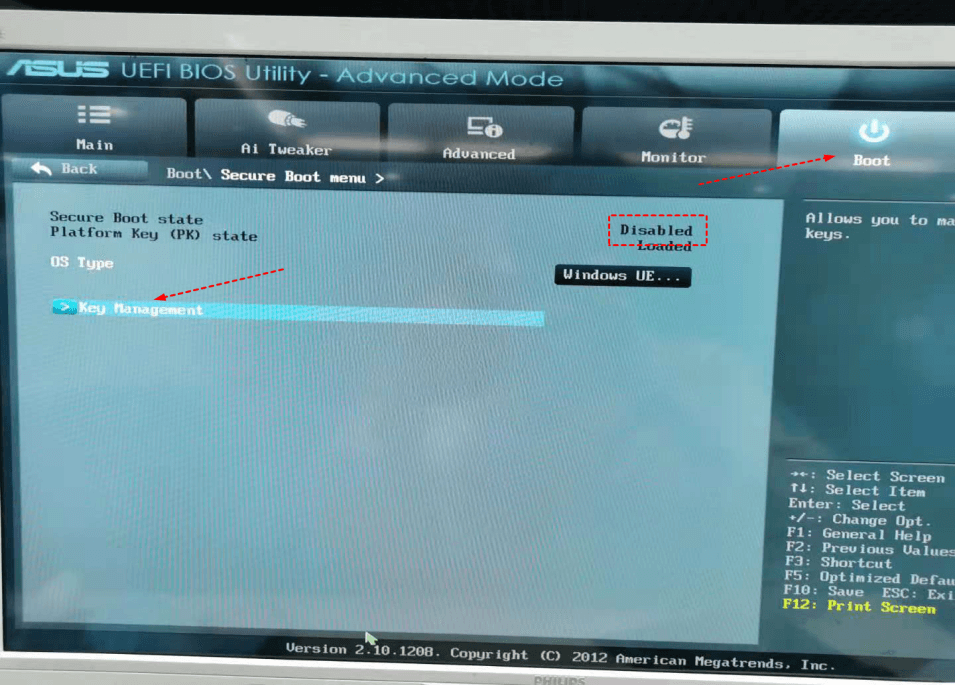
Step 2. Select “Key Management”.
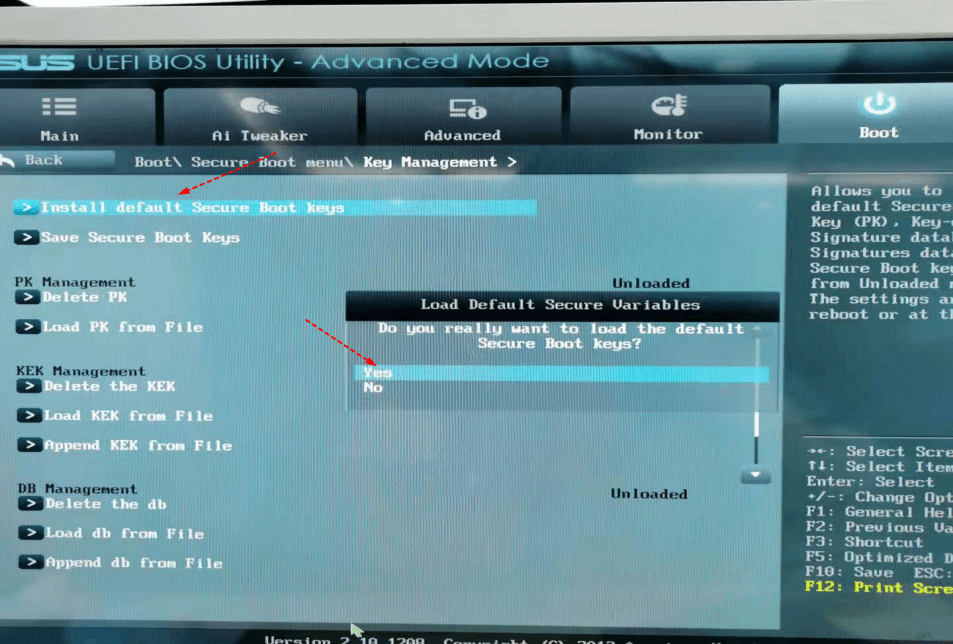
Step 3. Click the “Install default Secure Boot Keys” option. Now the Secure Boot is enabled.
▌Fix 2. Enable TPM 2.0
TPM 2.0 is also an indispensable demand for upgrading to Windows 11. Although you try to bypass the TPM 2.0 to upgrade to Windows 11, you may still shoulder the risk of instability or insecurity. Here we will guide you to check it and enable TPM 2.0.
Part 1. Check TPM
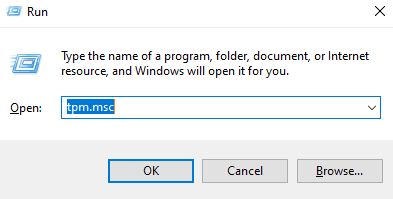
Step 1. Simultaneously it “Win+R” and input “tpm.msc” with clicking “OK”.
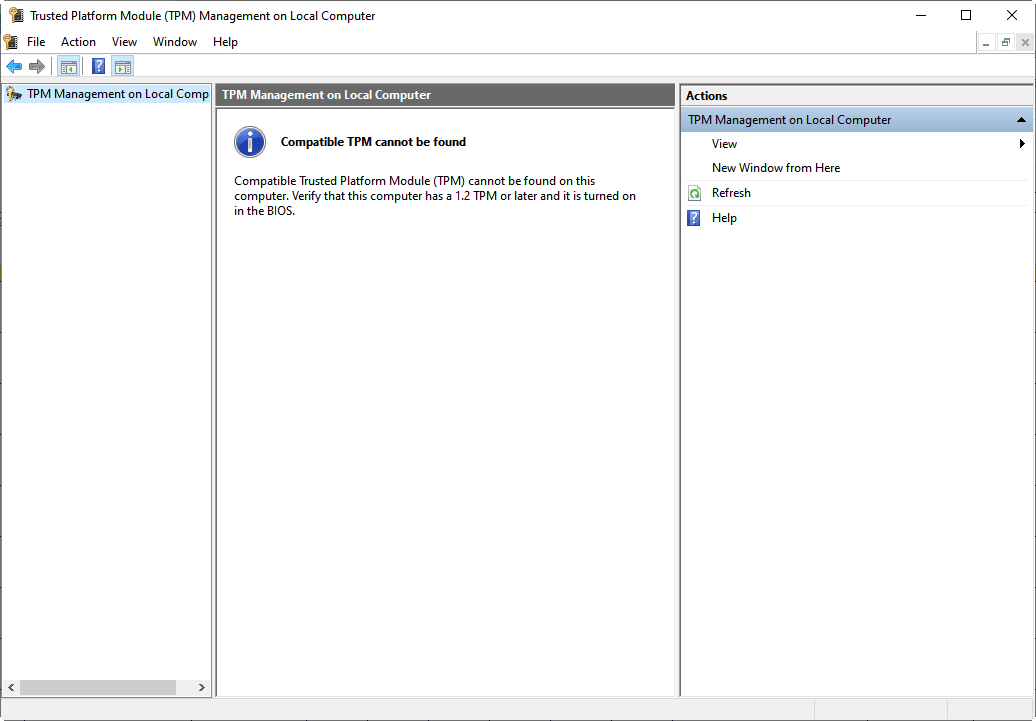
Step 2. Open the window to see details. If the “Status” displays “The TPM is ready for use”, it means the TPM is enabled. And you can check the TPM version in the right corner as the picture shows.

Step 3. If it is disabled but the version suits, the screen will show “Compatible TPM cannot be found”. Now, you should go to BIOS to turn it on.
Part 2. Enable the TPM
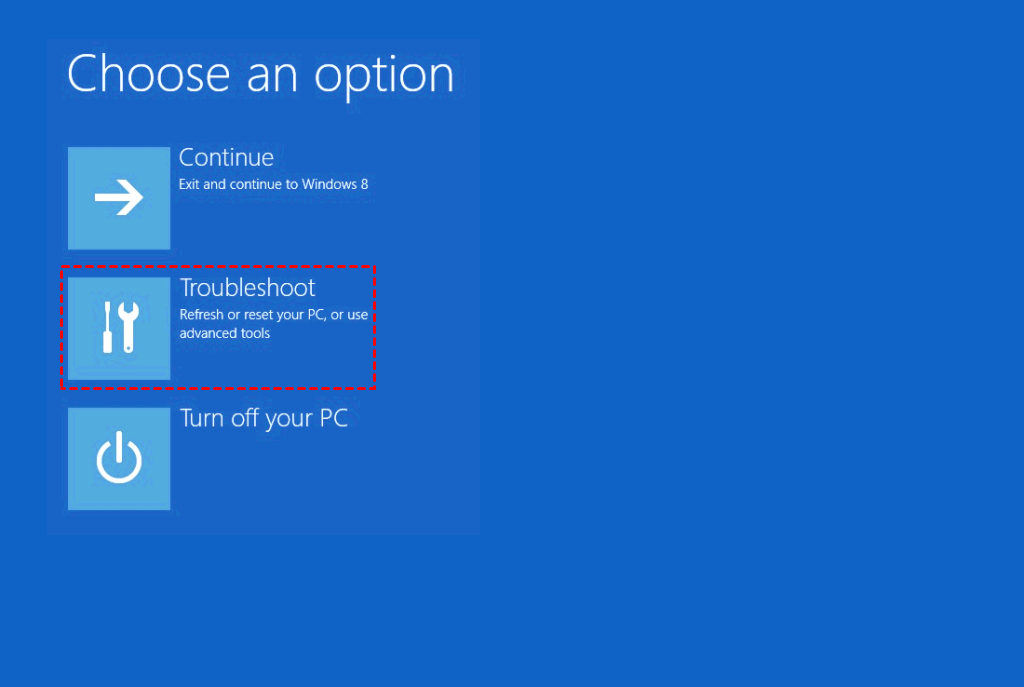
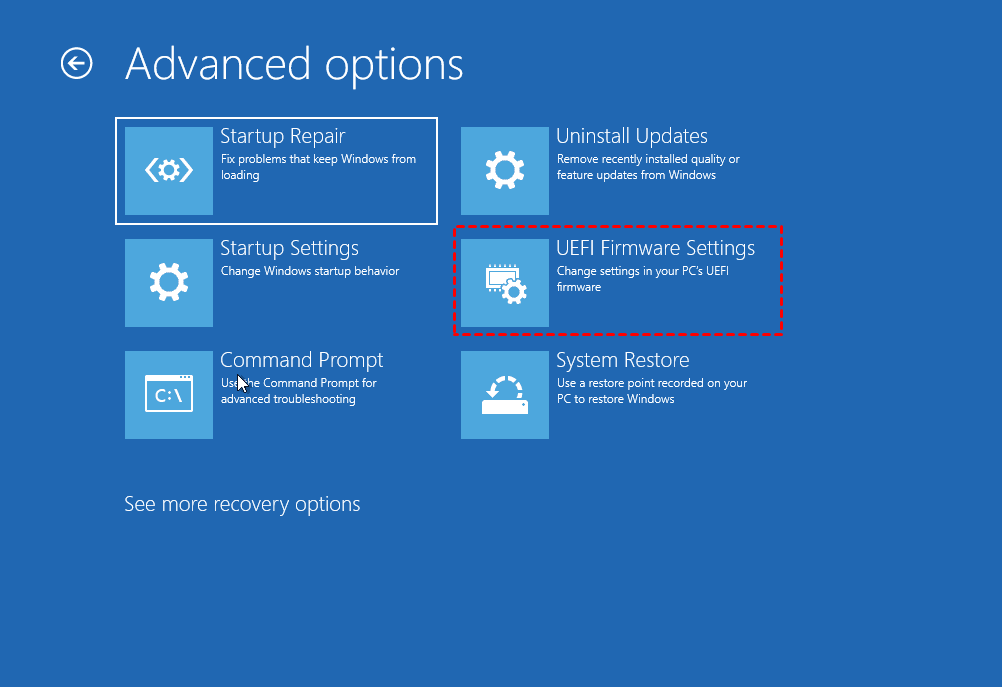
Step 1. After clicking restart, hit “Shift” to move on “Windows Advanced Options menu” and choose “Troubleshoot” option.
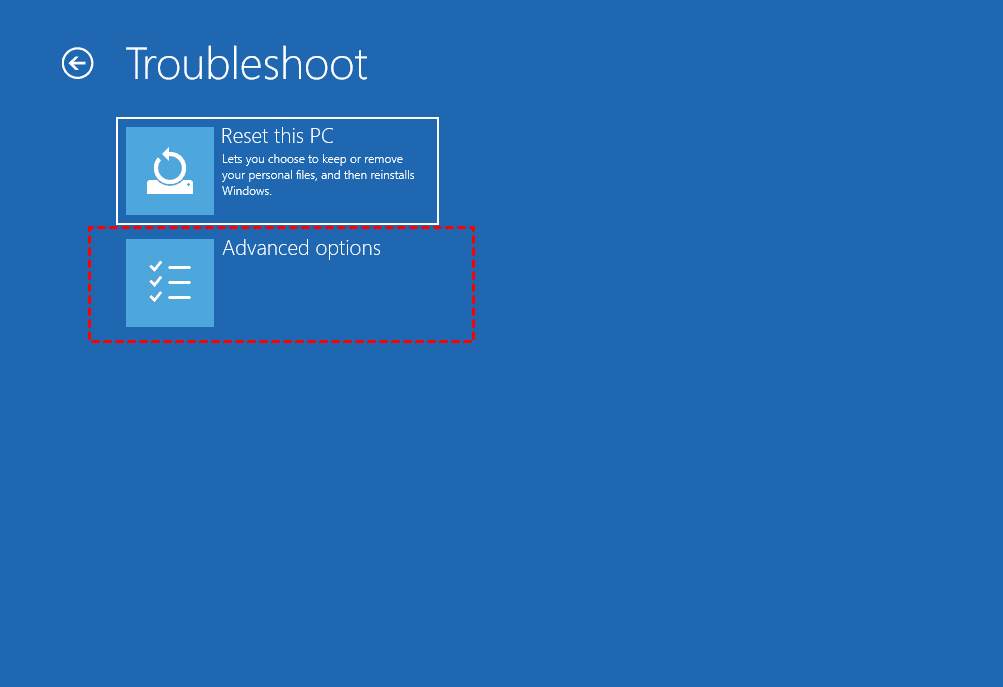
Step 2. Select “Advanced options”.
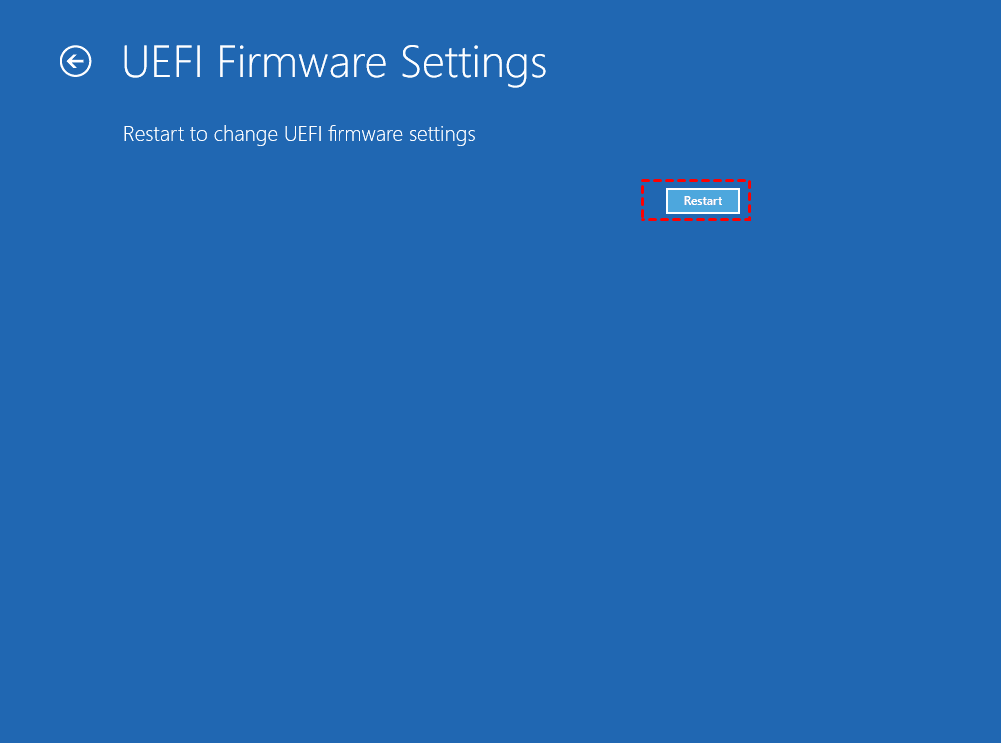
Step 3. Click “UEFI Firmware Settings” to open BIOS.
Step 4. Then hit the “Restart” button.
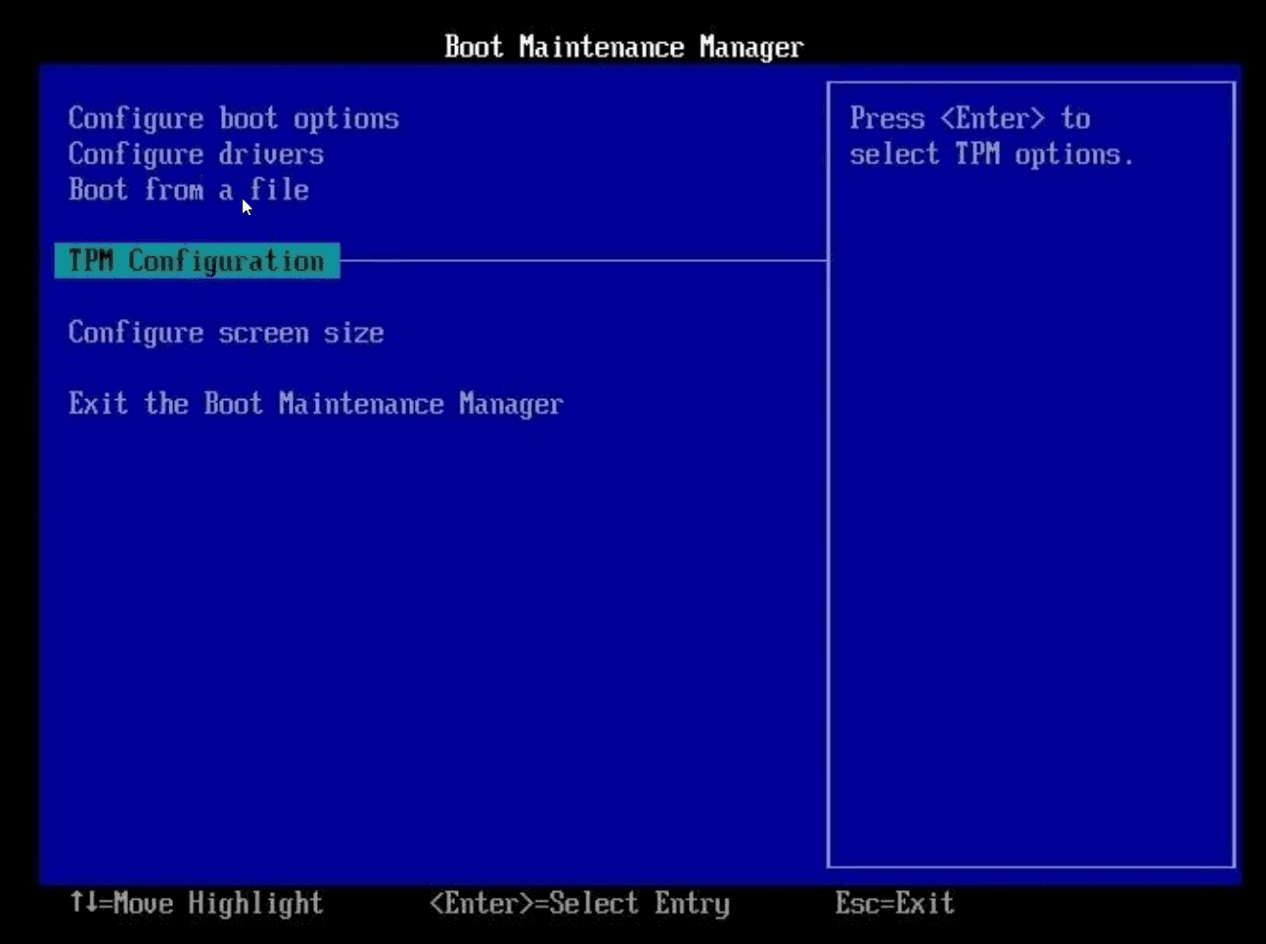
Step 5. Then continuously hit the “Del” (usually for desktops) or “F2” (usually for laptops) button to enter BIOS. Move on to the “Security Settings” to choose “TPM Configuration”.
▌Fix 3. Extend C drive space
Apart from the above problems, there is another cause that can also explain why you can't install Windows 11. That is, the storage space should be 64GB or greater.
Usually, the storage space refers to the C drive space. Experienced users will try to allocate the free space of other drives to extend the C drive space. Given some of them reported that they encountered the "Extend Volume" button greyed out in Disk Management, we would like to recommend using AOMEI Partition Assistant Professional to fix that as well.
This multifunctional software can provide two plans for solving storage issues. One is to use a nonadjacent unallocated space to merge partitions, and another is to allocate free space for other drives to extend the C drive space. Here we choose the function of Allocate Free Space as an example if you can't download Windows 11 for the storage issue.
Step 1. Launch the software and click the drive that has enough free space. Here we take D drive as an example. Right-click it and choose the “Allocate Free Space” button.

Step 2. Select the wanted size to allocate, and the destination drive you need to add it.

Step 3. Next, back to the main interface and click “Apply”>” Proceed” to commit the operations.

At last, please restart the computer to finish all the processes.
To sum up
If you can’t download Windows 11, you can consider the aforementioned three common causes: the system firmware requirement of UEFI and Secure Boot, TPM 2.0, and the 64 GB storage space requirement.
Although some issues can be solved in other ways, like CMD and Disk Management, we can still find they are less effective and safe than AOMEI Partition Assistant. It also boasts other advanced and practical features like moving installed applications to another drive, migrating OS to SSD, deleting large files, etc. For Windows Server 2025/2022/2019/2016/2012(R2)/2008(R2)/2003 users, please turn to the Server Edition.

