Fixed: Automatic Repair Couldn't Repair Your PC Windows 11
The sudden “Auto-repair couldn’t fix your PC Windows 11” dilemma can be confusing. If you find yourself encountering this issue on your Windows PC, this article aims to provide insights and suggestions to help you resolve the issue.
By Hedy / Updated on January 17, 2024
Why automatic repair couldn't repair your PC Windows 11?
It can be annoying to encounter error messages on your computer, especially error messages like "Startup Repair can't fix your PC" or "Automatic Repair can't fix your PC". These messages typically indicate a range of potential problems, ranging from software failures to hardware failures.
A few common causes of the "Automatic repair couldn't repair your PC Windows 11" error include:
▶ Operating system corruption: If your operating system files are corrupted or corrupted (perhaps due to a virus, malware, or other malicious software), a startup repair tool may have difficulty correcting the problem.
▶ Hardware issues: A faulty hardware component may disrupt the computer's startup process, making it challenging for automatic startup repair tools to run effectively.
▶ System settings: Outdated drivers, incorrect BIOS settings, or incompatible programs may prevent the repair process from starting automatically.
▶ Insufficient space or RAM: Insufficient free space or RAM on your computer may prevent new updates or fixes from being installed from Windows, causing the fix to fail.
Diagnosing the specific cause of the error is critical to effectively resolving the problem. By fixing the underlying problem, whether related to software, hardware, or system settings, you can restore functionality to your computer. Patience and determination are the keys to overcoming error messages and using your computer with confidence.
How to fix automatic repair couldn't repair your PC Windows 11?
When faced with this situation, consider exploring the following list of suggestions. It is recommended to review the entire list before deciding which suggestions may apply to your situation and which ones you would like to try:
Fix 1. Rebuild BCD & Repair MBR
To address issues related to the Boot Configuration Data (BCD) and repair the Master Boot Record (MBR), follow these steps:
Step 1. Click on "Advanced Options" after encountering the problem.
Step 2. Select "Command Prompt" from the menu.
Step 3. Enter your system password when prompted, and the command prompt will be displayed.
Step 4. Once in the command prompt, execute the following commands one by one:
bootrec.exe /fixmbr
bootrec.exe /fixboot
bootrec.exe /rebuildbcd
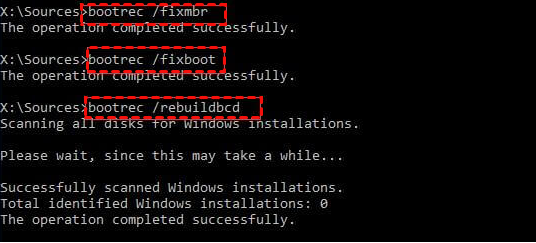
These commands are designed to fix boot sector problems. After running these commands, evaluate whether your system boots properly.
Fix 2. Run chkdsk
Performing a disk check to identify and resolve potential errors is a prudent step. Please follow the instructions below to run the check:
Step 1. Open a command prompt window using the method explained earlier.
Step 2. Run the following command:
chkdsk /r c:
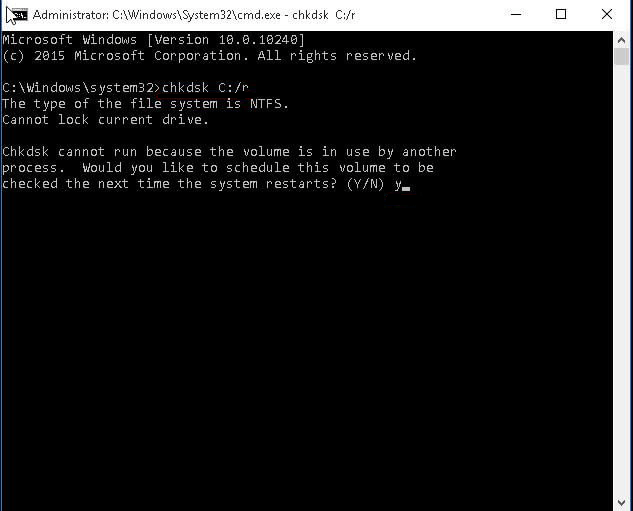
This command will start a scan and fix any issues on the C drive. This is a proactive measure to ensure the integrity of the disk and resolve any issues that may be causing the issues you are experiencing.
Fix 3. Run SFC and use DISM Tool
Running System File Checker (SFC Scan) is an effective way to identify and correct corrupted system files that may be the root cause of the "Automatic Startup Repair couldn't repair your PC" error. Follow these steps to initiate an SFC scan and possibly restore optimal performance to your PC:
Step 1. Enter WinRE (Windows Recovery Environment) by restarting your computer and navigating to Troubleshooting > Advanced Options > Command Prompt.
Step 2. When the command prompt interface appears, enter the following command and press the Enter key on your keyboard:
SFC/scannow
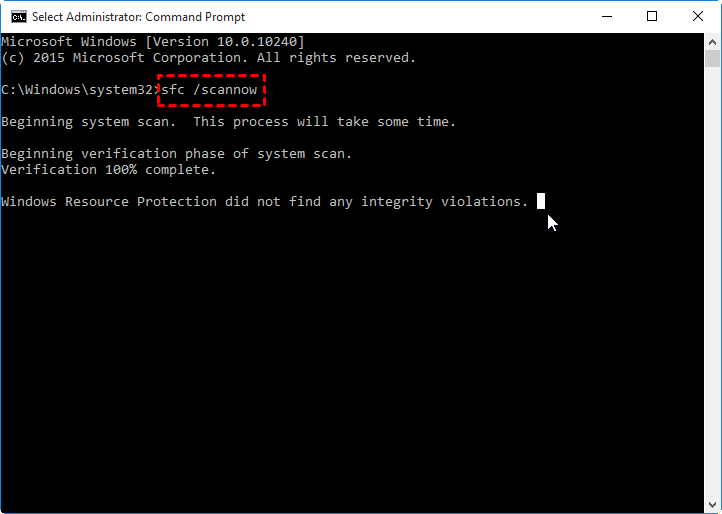
Step 3. Allows SFC scanning to complete checking the computer files.
Step 4. Wait for System File Checker to finish scanning. If a discrepancy occurs, the utility will automatically restore system files and resolve errors related to them.
Step 5. Then run DISM to repair the system image:
DISM/Online/Clean Images/RestoreHealth
Fix 4. Disable early launch anti-malware protection
If you have problems after installing an anti-malware program, the following solutions are designed to resolve the issue. In this order:
Step 1. After clicking Advanced Options, navigate to Troubleshoot > Advanced Options > Startup Settings.
Step 2. On the startup settings page, click the Restart button.
Step 3. After restarting, you will see a screen. Press the "8" key on your keyboard to select the "Disable early startup anti-malware protection" setting.
Step 4. Your system will then boot up with this specific setting disabled.
Fix 5. Disable Automatic Startup Repair
certainly! Disabling automatic restart is a practical step to identify error messages and resolve problems more efficiently. You can do this:
Step 1. Let your computer boot until the automatic startup repair tool fails to repair your computer.
Step 2. When your computer is about to automatically restart, press the F8 key (or the key associated with the Boot Options menu on your system) to interrupt the restart process.
Step 3. In the Startup Options menu, select Disable automatic restart on system failure.
Step 4. Your computer will now display all error messages instead of automatically restarting, allowing you to note the specific error causing the problem.
Fix 6. Restore registry from RegBack directory
Addressing the issue by restoring the registry is a prudent step. Here's how you can execute this process using the Command Prompt from Advanced options:
Step 1. Open the Command Prompt from Advanced options.
Step 2. Execute the following command:
copy c:\windows\system32\config\RegBack\* c:\windows\system32\config
Step 3. When prompted whether you want to overwrite all files or partially, type "All" and press the Enter key.
Step 4. Restart your computer after completing the file copy.
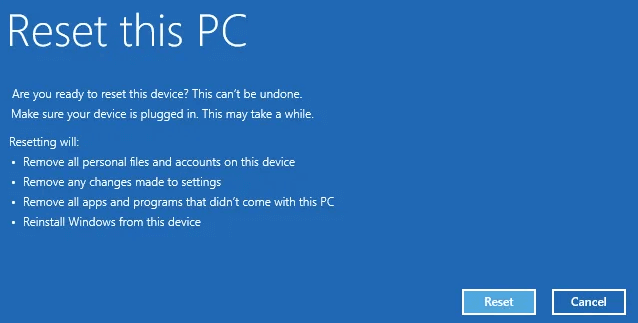
Fix 7. Reset This PC.
If none of the previous methods successfully resolve the issue, performing a Windows reset may be a viable option. It's important to note that resetting Windows will return your computer to its default settings, but may also result in the loss of all data stored on your hard drive. Here's how to initiate a Windows reset:
Step 1. Access the advanced options menu.
Step 2. Navigate to Troubleshooting > Reset this PC.
Step 3. Choose the appropriate reset option based on your preference:
Keep my files: Delete apps and settings but keep your personal files.
Delete everything: Delete all personal files, apps, and settings.
Step 4. Follow the on-screen instructions to proceed with the reset.
Best workaround to automatic repair couldn't repair your PC Windows 11
The complex process of resolving the "Windows 11 Automatic Repair can't repair your PC" issue usually involves complex steps such as utilizing the original Windows installation CD and requires a certain level of technical expertise. This may pose a challenge to the average user. Thankfully, there is a user-friendly alternative – AOMEI Partition Assistant Professional. This powerful software serves as a great solution when traditional methods like Windows startup repair don't cut it.
Experience the versatility of this tool by creating bootable media and accessing WinPE mode. From there, you can easily check your boot partition or rebuild your MBR, effectively troubleshooting and repairing various computer boot issues. Download it to explore its features and see your Windows problems solved seamlessly.
Start by connecting an empty USB drive with more than 8GB of capacity to a functioning computer. Install and launch the software to create bootable media, including the pre-installed AOMEI Partition Assistant.

Method 1. Rebuild MBR
1. Plug the USB into your Windows 11 computer with boot problems, power up it, and enter BIOS to make the bootable USB as the first boot device, then restart computer to enter Windows PE mode.
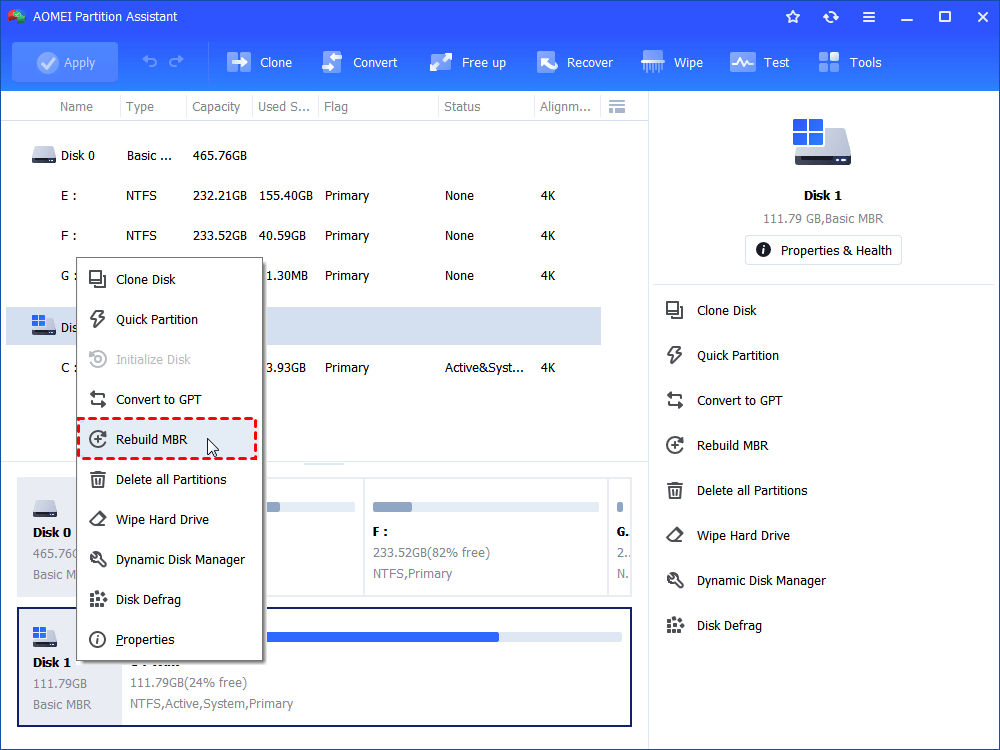
2. Once logged in, the AOMEI Partition Assistant Standard will load and start automatically. Right-click the system disk and choose Rebuild MBR.
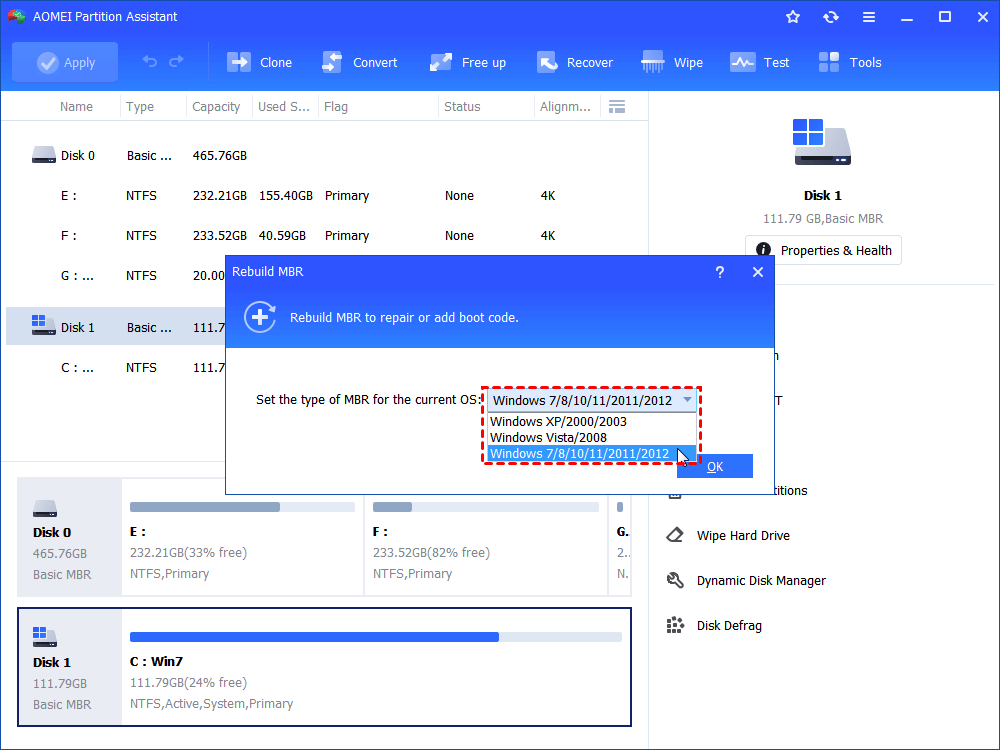
3. Choose a proper MBR type for your Windows operating system and click “OK”.
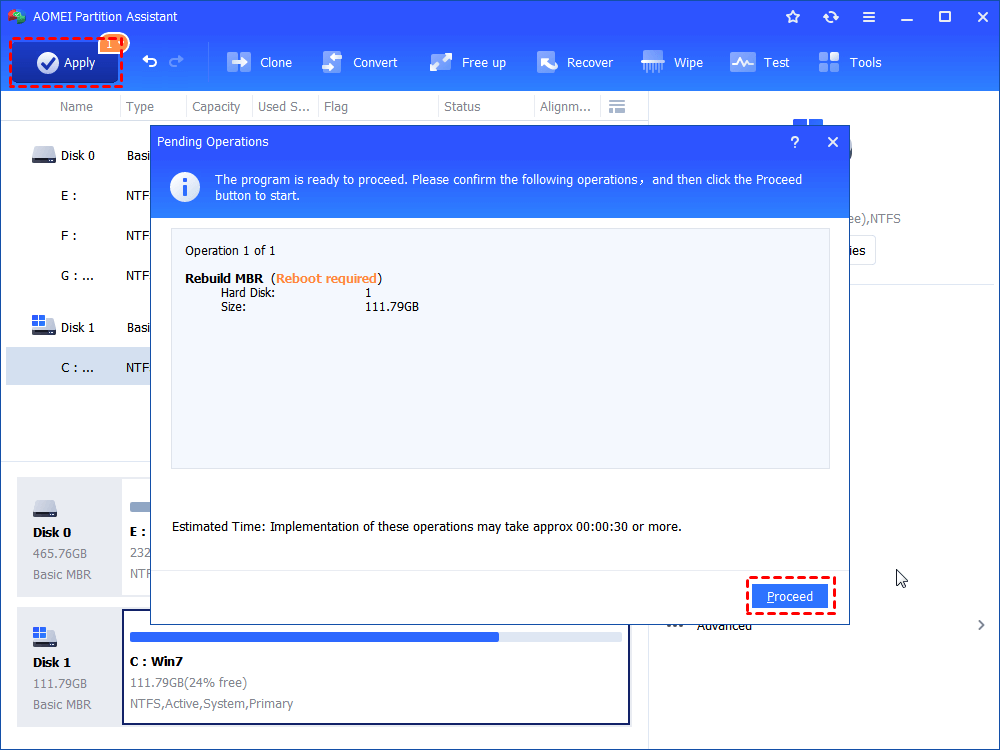
4. Back to the main interface, click "Apply" and then "Proceed" to commit the pending operation.
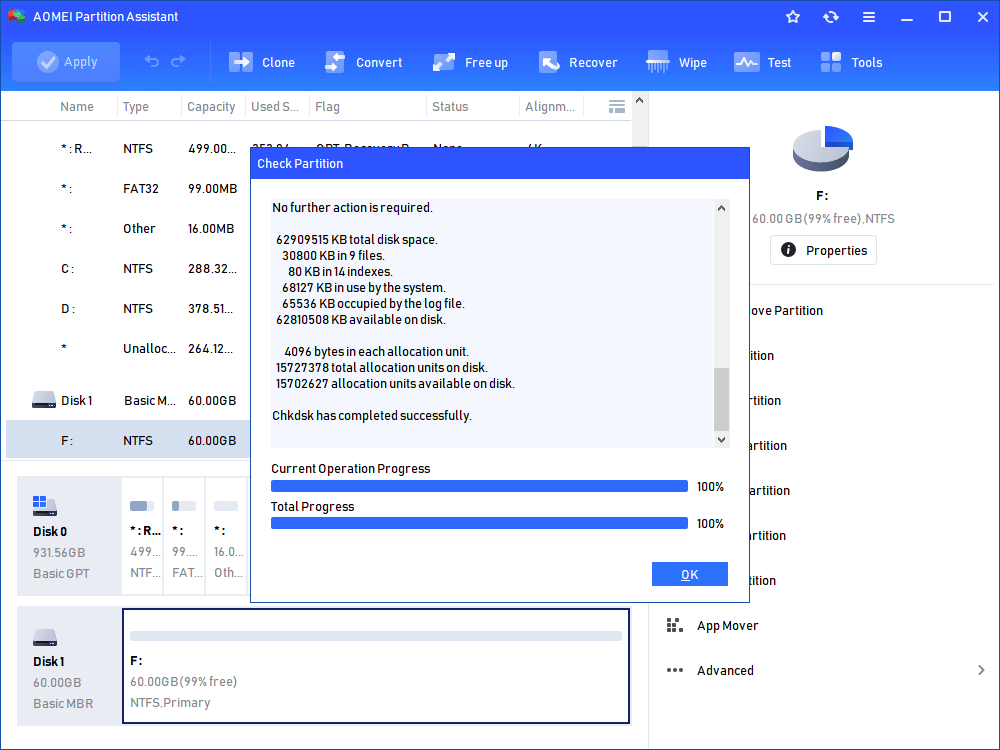
Method 2. Scan partitions for errors
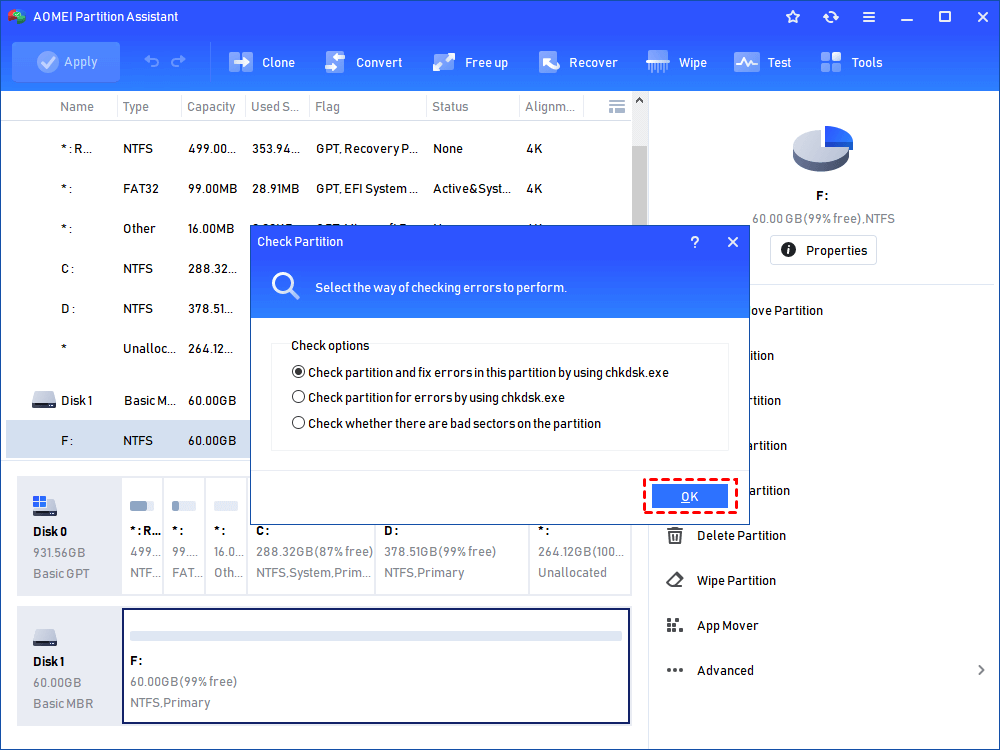
1. On the main interface of AOMEI Partition Assistant, right-click the partition and select “Check Partition”.

2. Select the first way to check partition and fix errors in this partition and click “OK”.
3. Wait for the process to be done.
Conclusion
Automatic startup repair tools in Windows play a vital role in maintaining optimal system functionality. The "Automatic repair couldn't repair your PC Windows 11" error can be resolved with a comprehensive series of steps. We encourage you to carefully follow our step-by-step guide to troubleshoot thoroughly to determine the root cause of the issue. By doing this, you increase the likelihood of effectively resolving the problem and preventing it from recurring.