How to Fix Windows 10 Slow after Clone [Easy & Quick Ways]
This article provides you with 5 effective ways to fix Windows 10 slow after clone, including using Windows 10 built-in tools and professional third-party software.
Usually, users choose to clone Windows 10 from HDD to SSD to boost Windows 10 running speed. However, according to some user feedback, Windows 10 is slow after cloning to SSD. In fact, the most common cause of this problem is that the SSD is not in optimal condition because it is misconfigured. This article aims to provide five effective ways to fix Windows 10 slow down after clone.
Method 1. SSD 4K alignment
4K alignment is a useful way to fix Windows 10 slow after clone. SSD adopts the smallest 4K sector in file system to save data. If the 4K sector is not aligned in SSD, the performance of SSD could be affected. To check if the 4K sector is aligned, press Windows + R key combo to start Run. Type “msinfo32” and hit Enter. Then go to Components>Storage>Disks and look for your SSD and check the Partition Starting Offset. It needs to be divisible by 4096; otherwise, the SSD block is not alignment correct.
To align SSD, you can use AOMEI Partition Assistant Professional. It is a powerful disk manager which is designed for Windows 11/10/8/7/Visa/XP. It has many excellent features, such as Securely Erase SSD to increase the speed of SSD, Allocate Free Space to free up space on the boot drive, and more functions are waiting for you to unlock.
Please download the Demo version to see how to fix Windows 10 boot slow SSD after clone via align SSD.
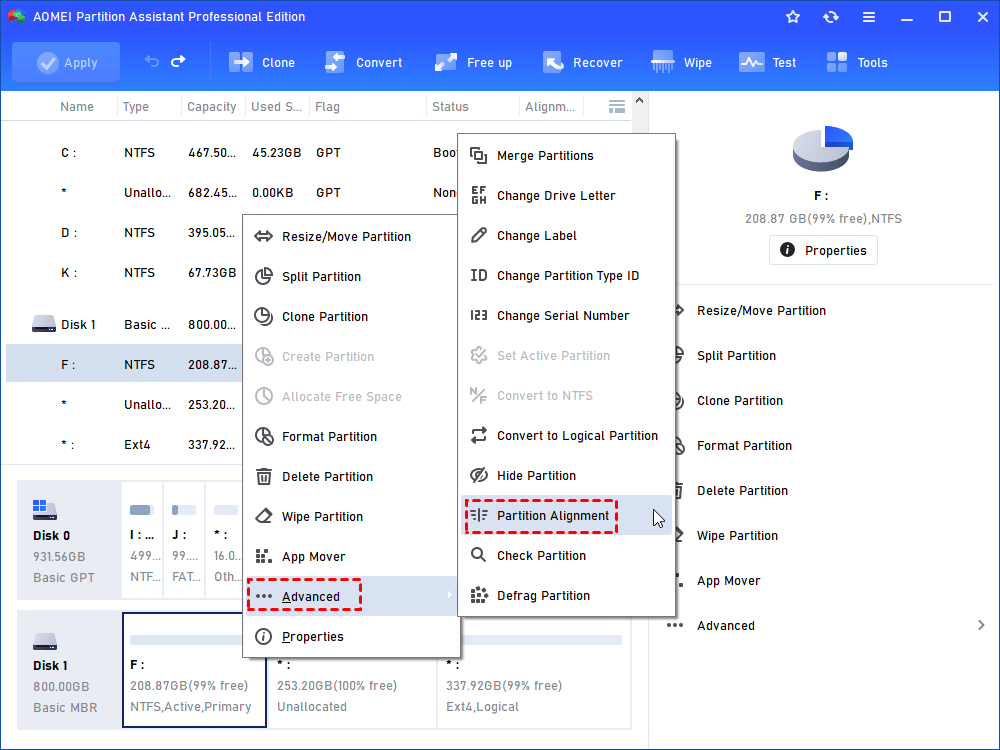
Step 1. Download and install AOMEI Partition Assistant. Right-click the partition you want to align and select Advanced > Partition Alignment.
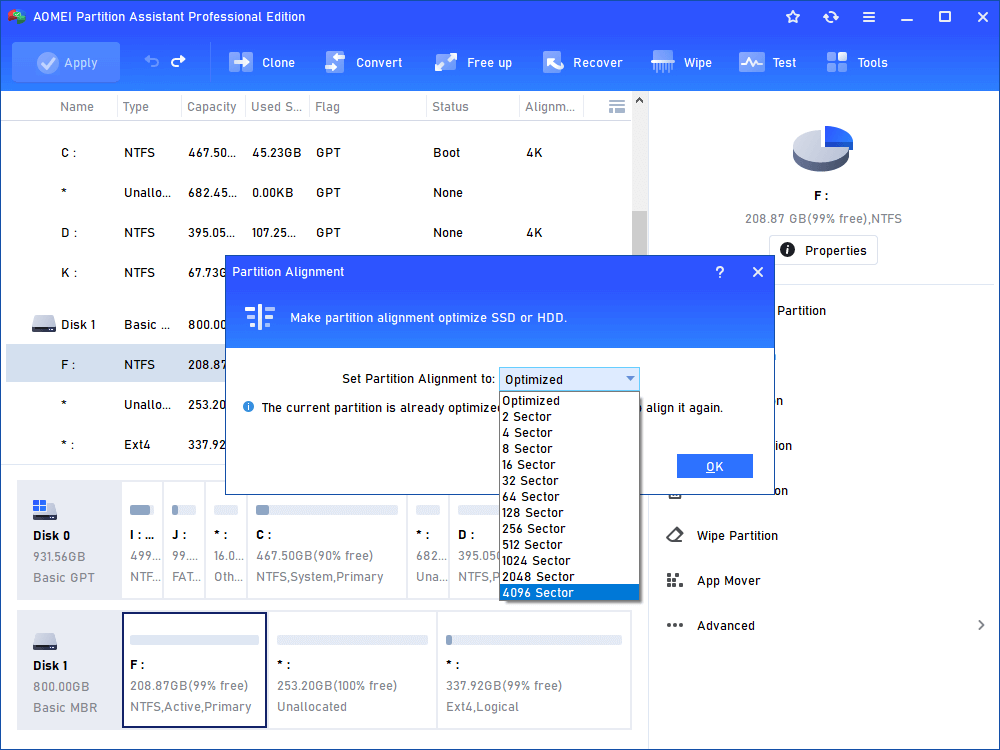
Step 2. in the pop-up window, select 4096 sector from the given list and click OK.
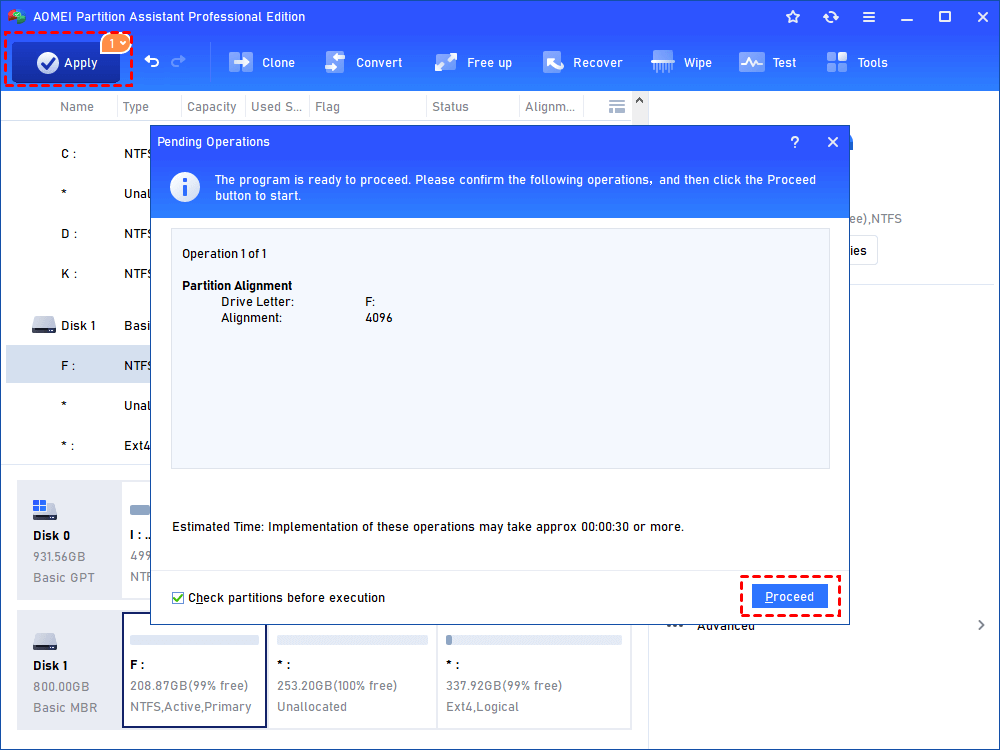
Step 3. Click Apply > Proceed to execute the operation.
In addition, AOMEI Partition Assistant can perform 4K alignment and boost SSD performance directly during the cloning process. The tool supports cloning partitions, hard disks, or OS.
Method 2. Enable AHCI
To get better performance of SSD, you can set SATA controller to AHCI (Advanced Host Controller Interface) mode in BIOS, which works better with SSD. You can follow the steps below to enable AHCI.
1. While in Windows, press the Win+R keys to open Run, type regedit, and click on OK to open Registry Editor.
2. In the left pane of Registry Editor, browse to the key location below:
HKEY_LOCAL_MACHINE\SYSTEM\CurrentControlSet\Services\iaStorV
3. In the right pane of the iaStorV key, double-click on the Start DWORD to modify it.
4. Type 0 for AHCI, and click on OK.
Method 3. Enable TRIM for SSDs
Modern SSDs and operating systems support the TRIM command, which can be used to selectively erase unwanted blocks of data and boost SSD boot speeds. The operating system may not automatically enable TRIM when you clone a Windows 10 system to a new SSD. So you can enable TRIM for the SSD and boost performance:
Step 1. Search for “Command Prompt” and click on “Run as administrator” option.
Step 2. Enter the command: “fsutil behavior set DisableDeleteNotify 0”. Press “Enter” and restart the computer to successfully enable TRIM.
Method 4. Turn off System Restore
System Restore is a built-in feature that allows you to restore your computer to a point where it is working fine. Since System Restore regularly backs up your computer, duplicate backups can take up a lot of space on your SSD system partition and slow down your computer over time. Therefore, you can turn off System Restore to free up some space on SSD.
1. Type System Restore in the start menu, select Create a restore point.
2. Select a drive and click Configure.
3. Change Restore Settings to turn off system protection, then click OK.
Method 5. Disable disk indexing
Indexing is a good feature designed to provide quick access to files or folders on a hard drive, but it becomes pointless on an SSD. It is recommended to disable disk indexing to decrease the rights to the SSD.
To optimize SSD on Windows 10 by disabling disk indexing:
1. Right-clicking on the specific drive in This Computer, and selecting Properties.
2. Under the General tab, uncheck “Allow files on this drive to have contents indexed in addition to file properties” to disable disk indexing.
Method 6. Do not Defrag
As it is known, disk defragmentation is very helpful for HDD, but it will have a negative impact on SSD. You can schedule defrag HDD to keep Windows 10 performance. But if you are using SSD, please don't do that.
1. Right-click on any drive connected to your PC and select Properties from the context menu.
2. Select the Tools tab, and then click the Optimize button under the “Optimize and defragment drive” section. Click on the Change settings button.
3. Uncheck the “Run on a schedule” box to disable automatic drive optimization completely. Or click on the Choose button to turn off automatic optimization for individual drives.
4. Click OK and you’re done.
Conclusion
If your Windows 10 is slow after clone, you can try the methods above to optimize SSD. For users who haven’t cloned hard drive or partition to SSD yet can use Clone Disk feature or Migrate OS to SSD feature of AOMEI Partition Assistant to optimize SSD during the process of clone.
Last but not least, if you want to align SSD in Windows Server, please upgrade to AOMEI Partition Assistant Server.


