Best Free Disk Partition Tool for Windows 10
A reliable and powerful Windows disk partition tool is essential to get your partition well-managed. This post will introduce 2 hard disk manager: Disk Part and AOMEI Partition Assistant and show you how to use them.
What is disk partition tool for Windows 10?
An effective Windows 10 disk partition tool is in a position to manage storage device by some disk management tasks, like creating/deleting/formatting/resizing partition. It is necessary if you want your hard drive get well-managed, especially when you encounter some unexpected disk issues.
For example, when you have a new hard drive or solid-state drive, there is only one partition (the system drive) or merely unallocated space in it, you need to partition the drive to manage system and data separately. And sometimes, you might receive a low disk warning because of too much file on the system or a data partition that will dramatically decrease the running speed. In all these conditions, a great hard disk partition tool can easily help you.
Manage Windows 10 disk partition with Command Line
In some cases, actually, the Windows built-in tool diskpart.exe can meet your needs. Disk Part utility is a command-line tool, which enables you to manage hard drive by entering several certain commands. This part will show you how to partition a hard drive with this tool.
Step 1. Press “Win + R” to open launch box, and type “cmd” on the box and press Enter.
Step 2. When the cmd.exe is launched, type “diskpart” on the interface and press Enter.
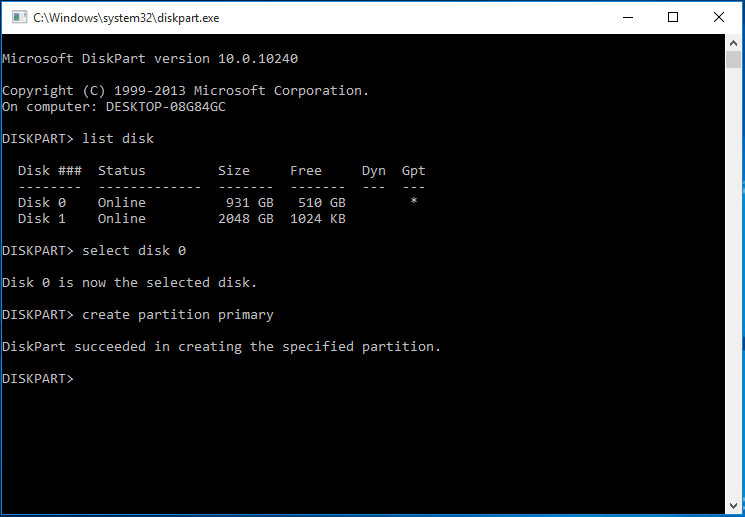
Step 3. Then the Disk Part window will appear. Input and execute the following commands one by one:
● list disk (All disks will be listed on the window)
● select disk 0 (you may need to change the disk number)
● create partition primary
And if it succeeds, it will show you that “DiskPart succeeded in creating the specified partition”.
Diskpart.exe is a powerful tool to manage your hard drive, it can also help you to shrink a partition, delete a partition, format a partition and so on with some certain commands. It is very helpful if you are familiar with them.
However, this tool has some disadvantages and is limited in some operations:
〉It is not friendly with most users who are not good at commands.
〉It can’t create a partition on removable media.
〉Unallocated space is required to create a partition. You may need to delete or shrink a partition beforehand.
〉It needs to delete some data to finish some operations, such as extend partition, convert partition table.
〉Diskpart.exe can’t format a drive that is larger than 32GB to FAT32 file system
Thus, if you are not satisfied with the Command-line tool you can turn to the next disk partition manager.
The best free disk partition tool for Windows 10
The third-party disk partition software-AOMEI Partition Assistant Standard is another good option to manage disk in Windows 10 system. With its various features, including creating, resizing, deleting, formatting, merging partition, changing partition table, you can easily administrate your hard drive, solid-state drive and cope with some disk issues.
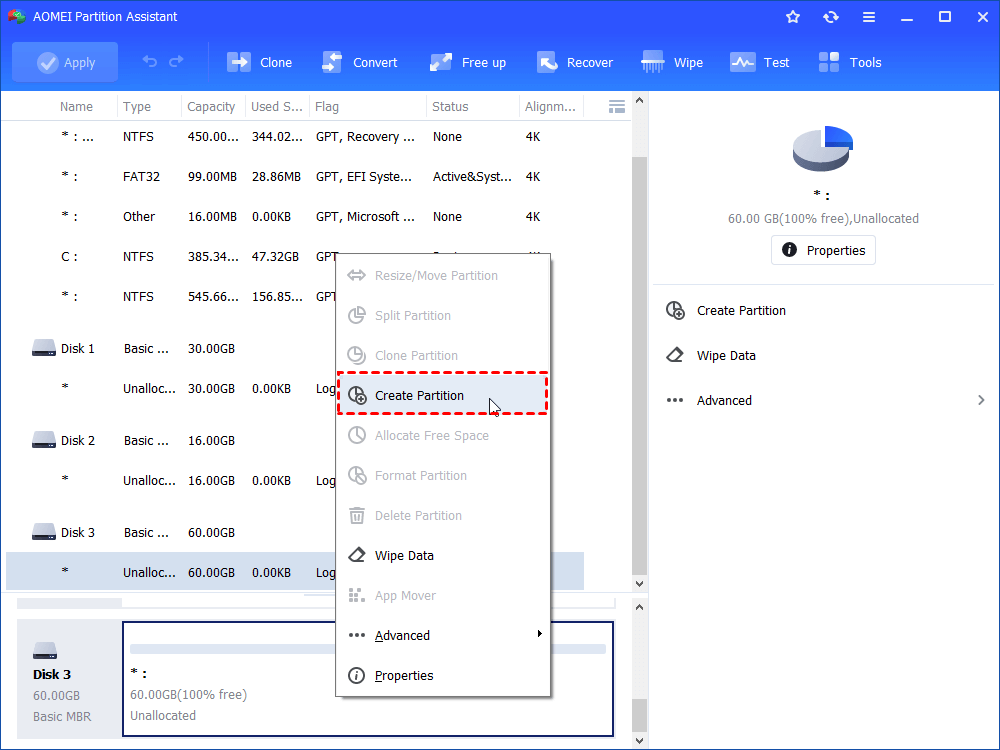
AOMEI Partition Assistant has none of these above drawbacks, and it provides a user-friendly interface that makes all processes simple and easy-to-operate. As you can see, the disk and partition information demonstrated on the main interface. If you want to perform a task, for instance, create a partition, right-choose a partition with free space or unallocated space, and click "Create Partition" from the drop-down menu.
Next, to show you how to use this disk partition utility, we are going to demonstrate how it solve the one of the most tiresome problem-"C drive in low disk space".
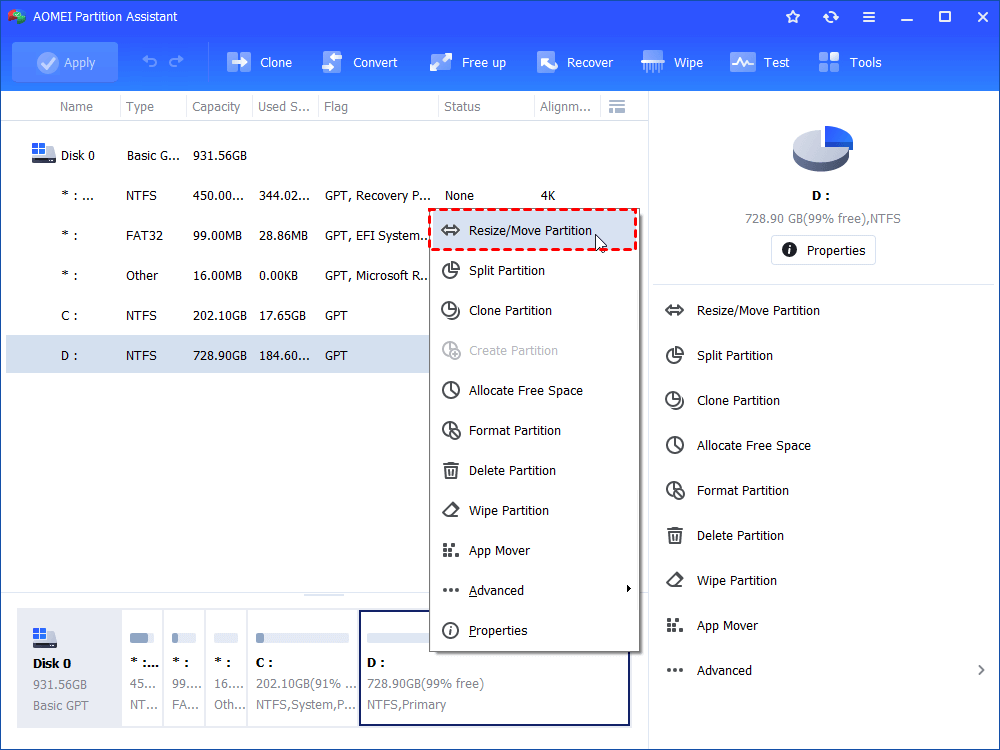
Step 1. Open AOMEI Partition Assistant. Right-click on the D drive, and choose “Resize/Move Partition”.
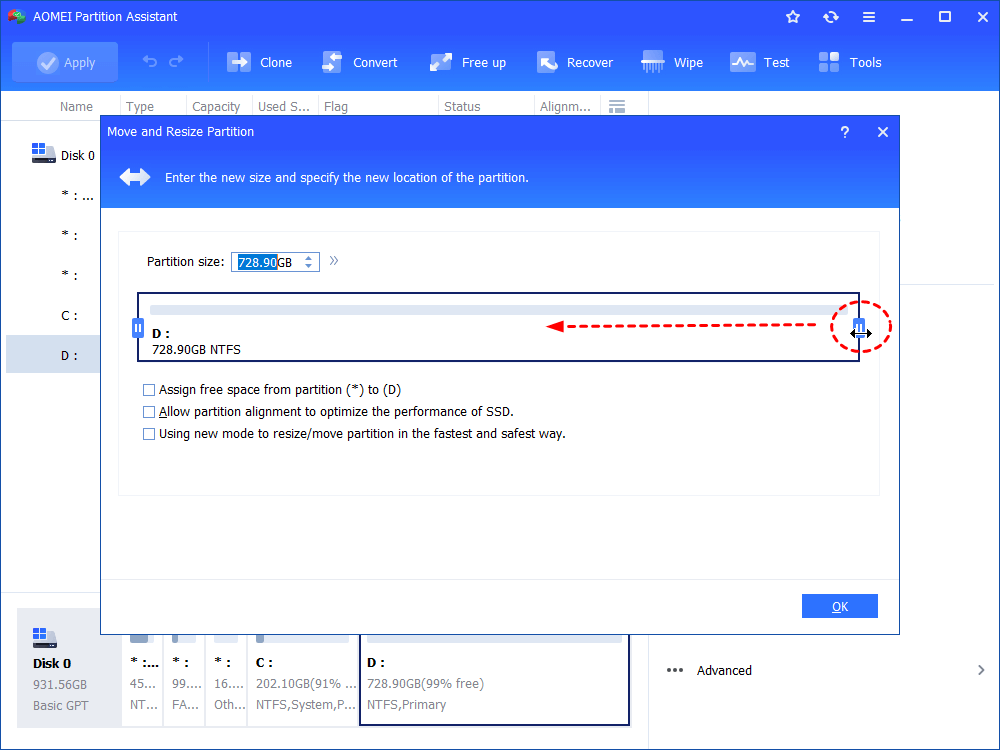
Step 2. Shrink D partition size by dragging the border leftwards. And hit “OK” button.
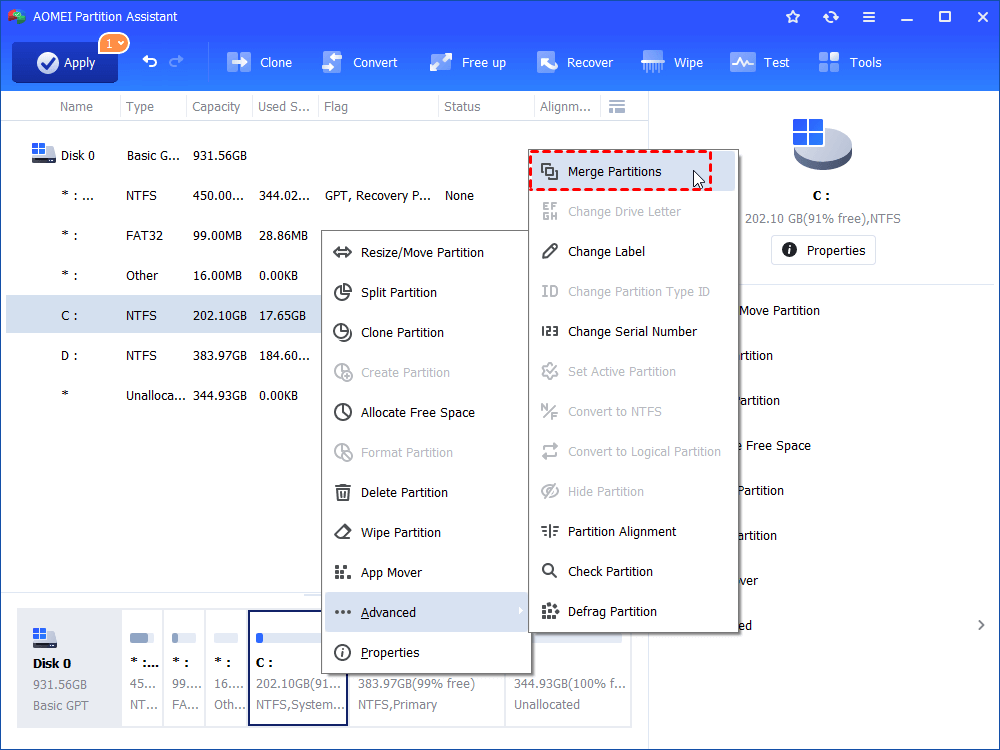
Step 3. Then, the shrank space will become unallocated. And select the C drive by right-clicking, and choose "Advanced" > “Merge Partition”.
Step 4. Tick the system drive and the unallocated space. And click “OK”.
Note: You can choose another partition as well. And the data will be merged into the system partition later.
Step 5. You can view the result of resizing. Then click “Apply” to execute the operations.
Other functions of AOMEI Partition Assistant
Besides the basic partition operations, AOMEI Partition Assistant also provides some features for some specific situations.
● Clone Disk/Partition: When you need to upgrade your hard drive to SSD or larger HDD, “Clone Disk” or “Clone Partition” assistants you migrate the data, system, applications you want to the targeted SSD/HDD without installing.
● Wipe hard drive: Differs from delete data to Recycle Bin or format a hard drive. It overwrites data on the hard drive to protect data from stealing.
● Convert file system between FAT32 and NTFS: You can format a drive to FAT32 or NTFS file system, but it will delete data on the drive. And with AOMEI Partition Assistant, you don’t need to format the drive to convert file system between FAT32 and NTFS.
● Make Bootable media: Sometimes, your PC can’t boot up successfully. This function helps you to create a bootable USB drive or CD to start up your computer. So that you can fix the boot issue or manage your hard drive.
Moreover, if you upgrade to professional edition, you can unlock more advanced features, like allocate free space from one partition to another, convert dynamic disk to basic.
You can go this page to know more details: https://www.diskpart.com/compare-edition.html
Conclusion
As a Windows 10 built-in disk partition tool, diskpart.exe performs well in some basic disk management tasks. If it can’t solve problems you encountered, or need an all-in-one utility, you can turn to AOMEI Partition Assistant.
