The Top 8 Tips for SSD Maintenance in Windows 10/8/7
What are the best ways for SSD maintenance in Windows 10, 8, 7? Here, you’ll learn the top 8 ways to keep an SSD in the best status and to get the most out of it.
By Cherry / Updated on May 12, 2023
SSD is popular nowadays

SSD is more and more acclaimed by users. Compared with HDD, its faster speed and more stable properties are always attracted users. Thus, many users replaced their HDD with SSD for better performance. However, over, the gets torn and worn, and your SSD running slows down. Well, you may ask - Is there anything that you can do for SSD maintenance in Windows 10/8/7?
Definitely yes! And here we will give you the top 10 tips for SSD using.
How to set up SSD in Windows 10?
Windows 10 has many features that help SSD operate to their full potential, but it doesn’t always activate them by default. And here we will show you what you should do when running SSD in Windows 10.
1. Set power plan to “High Performance”
By default, Windows uses a Balanced power plan that will automatically cut the power to your drives when they aren’t in use to save power. For the sake of SSD, you should switch to High Performance so that Windows would keep power on all the time. When you are not using them, the drives will only go to sleep instead of cutting the power.
For desktop users, to set power plane to High Performance, you can do as follows:
Access your control panel, click “System and Security” -> “Power Options”. and then, select “High Performance” from the list.
For laptop users, you can click battery icon in your notification area and select “High Performance”.
2. Update the SSD firmware
If you want your SSD to run as well as it can, you must update the SSD firmware to keep it staying on the top. This isn’t a simple thing. Each SSD manufacturer has its own method for SSD firmware upgrades, so you’ll need to go to the official site of your SSD manufacturer and follow their guides from there to update the SSD firmware.
3. Enable AHCI
AHCI, short for Advanced Host Controller Interface, is a paramount feature to ensure that Windows will support all of the features that come with running an SSD on your computer. So it is necessary to enable AHCI. But how to enable AHCI? It is recommended that you enable AHCI before installing the operating system. If you haven’t, you’ll need to enter the BIOS of your computer first, then, enable it somewhere within its settings.
4. Check whether the TRIM is enabled
The TRIM is vital to extending the lifespan of your SSD, it ensures your SSD can clean up deleted files and stay speedy. If you used an SSD with Windows XP or Vista, you needed to enable TRIM manually. However, ever since Windows 7, Windows has automatically enabled TRIM for any drive it detects as solid-state. Also, Windows 10 enables this by default. But you need to double-check that it has been enabled.
Open cmd, and type the following commands to make sure TRIM is enabled:
Fsutil behavior setdisabledeletenotify0
5. Keep Windows 10 defrag on
Generally, performing a typical defragmentation operation on an SSD was unnecessary and potentially does damages to the SSD as defragging chipped away at the number of read/write cycles left in the drive. Windows already knows this, too. and in fact, modern versions of Windows won’t even let you defragment an SSD. It will detect that SSD and will turn off defragging.
However, today’s defrag option in Windows 10 is an all-around disk-health tool, which windows now refers to the process as “Optimization” rather than “Defragmentation”. It will send the “retrim” on the schedule you configured, which forces the SSD to actually delete data that should have been deleted when TRIM commands were originally sent. Windows 10 will also perform an SSD-optimized type of defragmentation about once a month.
6. Disable indexing
A good part of your SSD speed is consumed in indexing files for Windows search. To keep SSD maintenance in Windows 10, you need to disable indexing as the following steps:
1) Click Start menu, and then, click Computer.
2) Right-click your SSD and click “Properties”.
3) Select the box labeled “Allow files to have contents indexed in addition tofileproperties” and click “OK”.
7. Configure write caching
On many SSDs user-level write caching can have a detrimental effect on the drive. To figure this out, you’ll have to disable the option in Windows and see how the drive performs afterward. We do not suggest you turn off this option. If you disable this feature, you could lose data in the case of a power failure. So, you need to configure write caching.
1) Right-click Start menu -> Computer.
2) Click Properties -> Device Manager ->Disk Drives.
3) Right-click yourSSD -> Properties.
4) Under the Policies tab, check Enable write caching on the device.
8. Use third-party SSD management tool
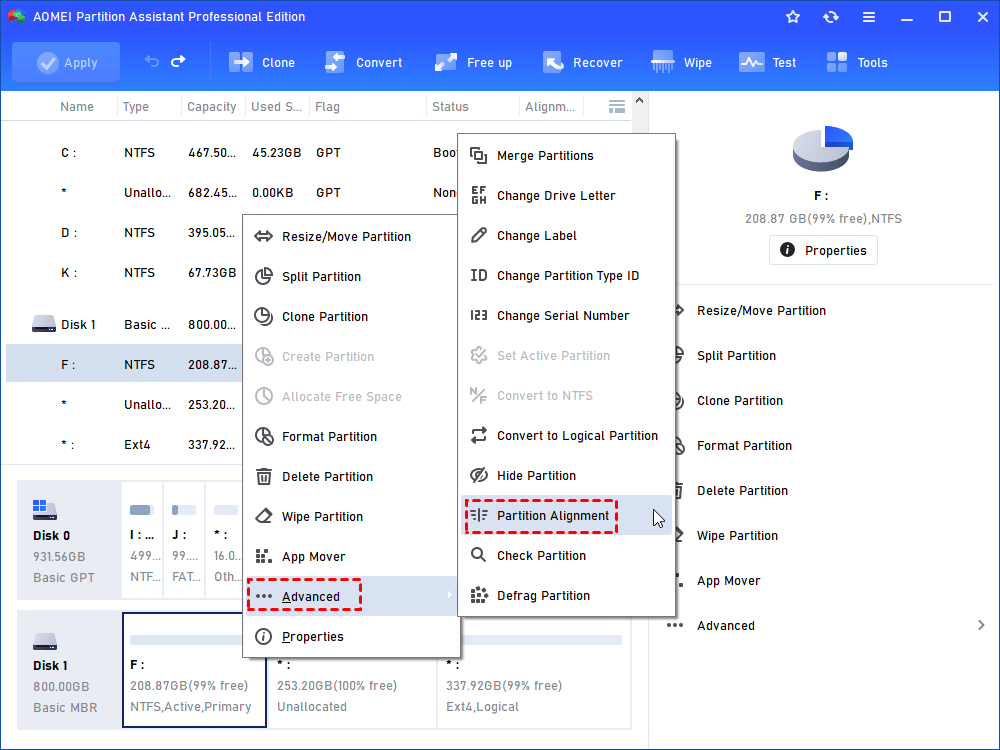
An SSD management tool could help you a lot for SSD maintenance in Windows 10/8/7. AOMEI Partition Assistant Professional should be the best SSD management tool for Windows users. It can help you do surface test, check and fix partition errors, etc. For SSD, it especially provides you many functions to make your SSD in the best status:
1) 4K Alignment - If you find your SSD running slow, you should consider to realign the partition. And AOMEI Partition Assistant allows you to make a 4K alignment for SSD with its Partition Alignment function.
2) Secure Erase SSD - AOMEI Partition Assistant also provides you a function Secure Erase SSD, which can help you restore SSD to its factory settings and restore it to its peak performance.
3) Repartition SSD - The resize partition, delete partition, format partition, etc functions can help you partition your SSD reasonably, it will improve its performance too.
...
AOMEI Partition Assistant can do for your SSD more than this. You can download it to have a try. Its interface is so simple that even a computing novice knows how to use it.
Conclusion
SSD maintenance in Windows 10/8/7 is an important thing for SSD users. Actually, there are more things you can do more than the tips we mentioned above. If you have a better method, welcome to write to us in the comment area.

