[Detail Guide] Create Windows 10 Bootable USB from ISO
Do you want to create Windows 10 bootable USB from ISO? This post will show you how to make bootable Windows 10 USB from ISO with Diskpart and Windows To Go Creator.
Why create Windows 10 bootable USB from ISO?
Generally, there are two reasons for you to make bootable Windows 10 USB from ISO file.
● Make Windows 10 clean installation: You can create a bootable USB of Windows 10 via Diskpart and then boot from it to install Windows 10.
● Get a portable Windows 10 environment: It’s available to create a Windows 10 To Go disk with a USB drive from ISO, and then you can use the familiar Windows 10 environment even when you are in different places.
How to: create Windows 10 bootable USB from ISO for two purposes
You can choose a proper way to make a bootable USB drive of Windows 10 from ISO based on your specific demand:
PS.: It is supposed that you have downloaded Windows 10 ISO file from Microsoft and mounted the ISO file.
▶ Create bootable Windows USB from ISO for installing Windows
If you intend to install Windows 10 on SSD or HDD from USB drive, you can make a bootable USB drive from ISO via Diskpart utility. I. Then, Check out those detailed steps:
Step 1. Prepare an empty USB whose capacity should not be smaller than 4GB (for Windows 10 32bit) or 8GB (for 64GB). And connect it to your PC.
Step 2. Press Windows + R, input cmd, and press Enter.
Step 3. Run those commands:
• diskpart
• list disk
• select disk n (n is the disk number of the USB drive)
• clean
• create partition primary
• select partition 1
• format fs=ntfs quick (if you plan to create UEFI bootable USB of Windows 10, replace “format fs=ntfs quick” with “format fs=fat32 quick” to the USB into FAT32 file system)
• active
• assign letter=m (m is the drive letter that you want to assign to the USB drive)
• exit
Step 4. Go to the boot folder of the Windows 10 ISO files by running the commands listed below:
• g:
• cd boot
Note: g is the drive letter of your mount drive as it appears in File Explorer.
Step 5. Then, run those commands and wait for the process to complete.
• bootsect /nt60 N:
• xcopy G:\*.* N:\ /E /F /H
Note: You should replace N and G with the right drive letters for the USB drive and Windows 10 ISO image receptively.
▶Make Windows 10 bootable USB drive from ISO for portable Windows environment
If you are running Windows 10 Enterprise/Education/Pro edition, you can use Windows built-in function, Windows To Go to create a Windows 10 bootable USB drive. See the steps given below:
Step 1. Mount the ISO file and connect a certified USB drive to your Windows 10 computer.
Step 2. Click the Windows button and go to Control Panel > Windows To Go.
Step 3. In the Create a Windows To Go workspace window, choose the certified USB drive onto which you want to install Windows 10 and click “Next”.
Step 4. Click “Add search location” to search for the Windows 10 installation ISO file and choose the mounted ISO file.
Step 5. Choose whether to use BitLocker on the USB drive.
Step 6. Click "Create".
Step 7. Wait for the process to finish. Click Yes or No to make this computer boot from the newly created Windows 10 USB drive.
Notes:
• The capacity of the target USB drive should not be less than 32GB.
• This operation will erase all data on the destination USB drive, thus you should back up the necessary data on it in advance.
If you are Windows 11, Windows 10 Home, Windows 8/8.1 Home/ Pro/Education, or Windows 7 user, you can’t enjoy Windows To Go function. If the capacity of the USB drive is where you want to put Windows OS, you can’t create a Windows To Go workplace on a such USB drive.
Here, AOMEI Partition Assistant Standard is highly recommended. It allows you to create Windows bootable USB for a portable environment even when you are using Windows Home Edition. And it only demands a USB drive not less than 13GB. Let’s see how it works:
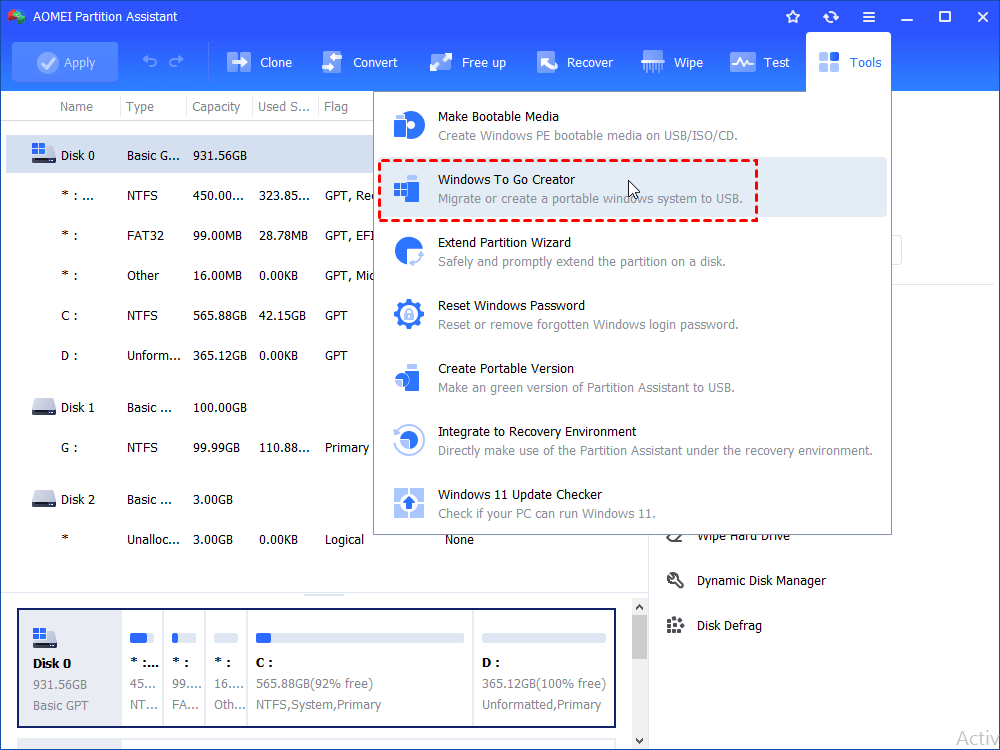
Step 1. Insert an empty USB drive that is larger than 13GB to your computer and make sure that it can be detected. Install and run AOMEI Partition Assistant Standard. In the main interface, click Tools and choose Windows To Go Creator.
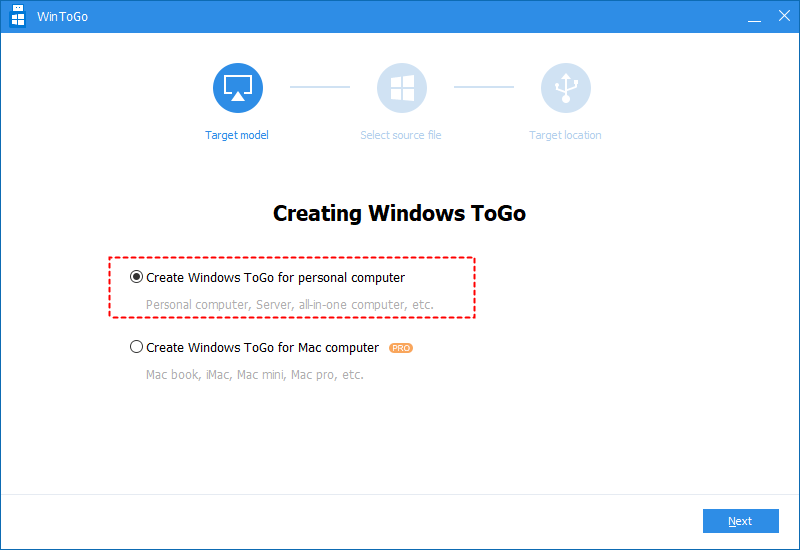
Step 2. Choose to Create Windows To Go for your personal computer. If you want to run Windows from an external USB on Mac, you can upgrade to the Professional Version and choose the second option.
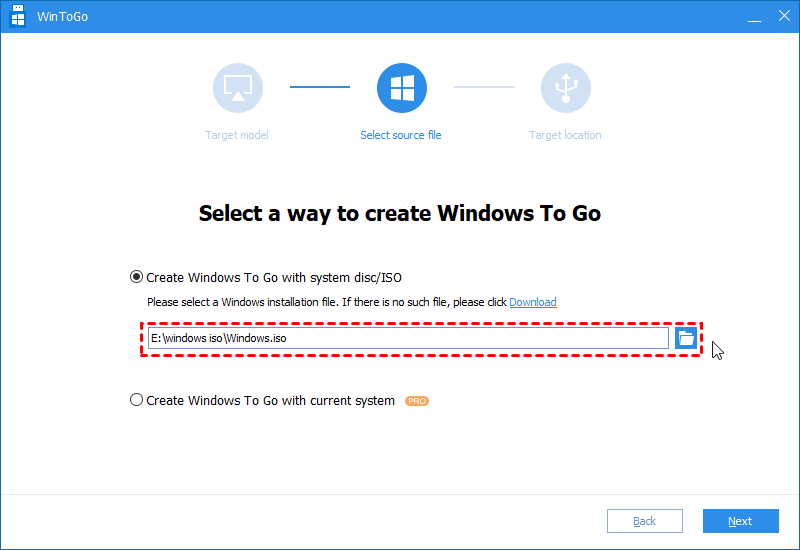
Step 3. Select Create Windows To Go with system disc/ISO. If it doesn’t detect Windows 10 ISO, click the folder icon to select it manually.
Step 4. Choose the USB drive as the target path.
Step 5. The program prompts you that the data on the USB drive will be erased. If there are important files on it, back up them in advance.
Verdict
After realizing different methods on how to create Windows 10 bootable USB from ISO, you can pick up one based on your specific situation. Then, you can boot from the bootable USB drive to install Windows or enjoy the familiar environment.


