How to Use Windows 8 BCDBoot BCD Boot File Creation and Repair tool
Do you have starting problems on your Windows 8 computer? Frequently, such issues are caused by faulty or missing Boot Configuration Data (BCD). This post explains in detail how to use Windows 8 BCDBoot BCD boot file creation and repair tool.
By Hedy / Updated on November 15, 2024
What is Windows 8 BCDBoot BCD boot file creation and repair tool?
BCDBoot is a critical command-line tool included in Windows operating systems, specifically for managing the Boot Configuration Data (BCD) store, which houses essential information for booting Windows. Originally designed for use in Windows 7 and later adapted for Windows 8 and other versions, BCDBoot allows users to create or repair boot files, helping Windows start smoothly by ensuring that the boot configuration data is correctly set up.
A Windows 8 BCDBoot BCD boot file creation and repair tool offers several core functions designed to help users manage boot configurations, especially for troubleshooting scenarios. Some of its main features include:
▶ Creating new boot entries: Allows the creation of boot entries for Windows systems, especially useful when the system partition has been altered or Windows has been reinstalled.
▶ Repairing boot files: BCDBoot can be used to restore missing or corrupted boot files, resolving issues like the “Bootmgr is missing” error.
▶ Rebuilding the BCD store: By regenerating a fresh BCD store, BCDBoot can resolve errors in the existing configuration data, ensuring Windows can boot properly.
▶ Setting up multi-boot environments: BCDBoot enables users to add boot entries for multiple operating systems, making it simpler to switch between different Windows versions on a single machine.
Adding boot entries for UEFI or Legacy BIOS systems: The tool can also help with compatibility issues, creating BCD configurations for systems that rely on UEFI or legacy BIOS, depending on the user’s hardware.
How to use Windows 8 BCDBoot BCD boot file creation and repair tool
Step 1. Insert the Windows 8 installation media (USB or DVD).
Step 2. Restart your computer and press the necessary key to access the Boot Menu (usually F12, F8, or ESC depending on your system).
Step 3. Select the Windows 8 installation media to boot from it.
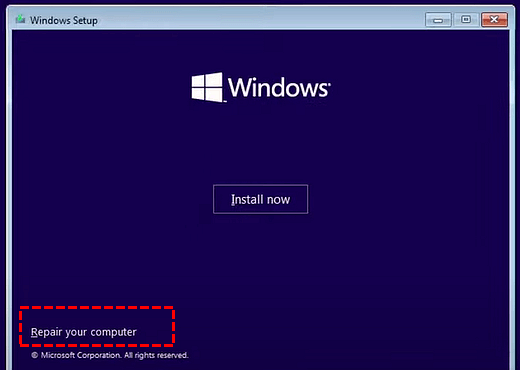
Step 4. At the Windows Setup screen, choose Repair your computer.
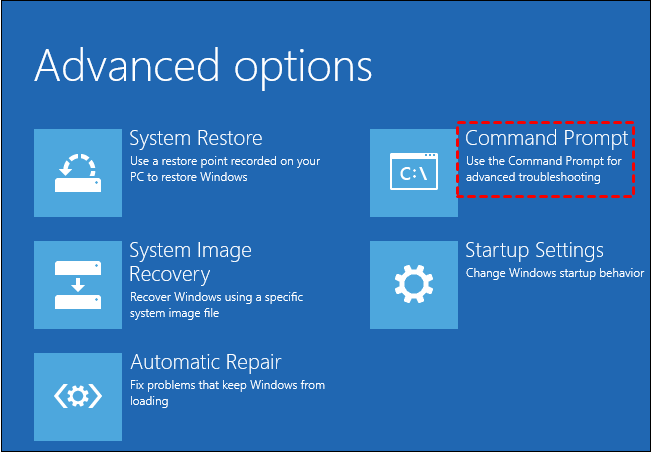
Step 5. In the recovery options, select Troubleshoot > Advanced options > Command Prompt.
Step 6. The Command Prompt window will open. Here, you'll execute the BCDBoot commands to repair the BCD.
1. Determine the Windows Partition
You’ll need to identify which partition contains the Windows installation. Here’s how:
Step 1. In the Command Prompt, type:
diskpart
Step 2. Next, type:
list volume
This command displays all volumes, helping identify the Windows partition (typically labeled with the drive letter C:).
Step 3. Once you've located the correct drive, exit DiskPart by typing:
exit
2. Use BCDBoot to Rebuild the BCD
With the Windows partition identified, proceed with the BCDBoot command:
Step 1. To recreate the BCD file on your system, type:
mathematica
bcdboot C:\Windows
✍ Note: Replace C: with the drive letter containing the Windows folder, if different.
Step 2. This command copies the boot files from the Windows partition to the system partition and rebuilds the BCD.
Step 3. Wait for a success message indicating that the files were copied. This confirms that the BCD file has been successfully created or repaired.
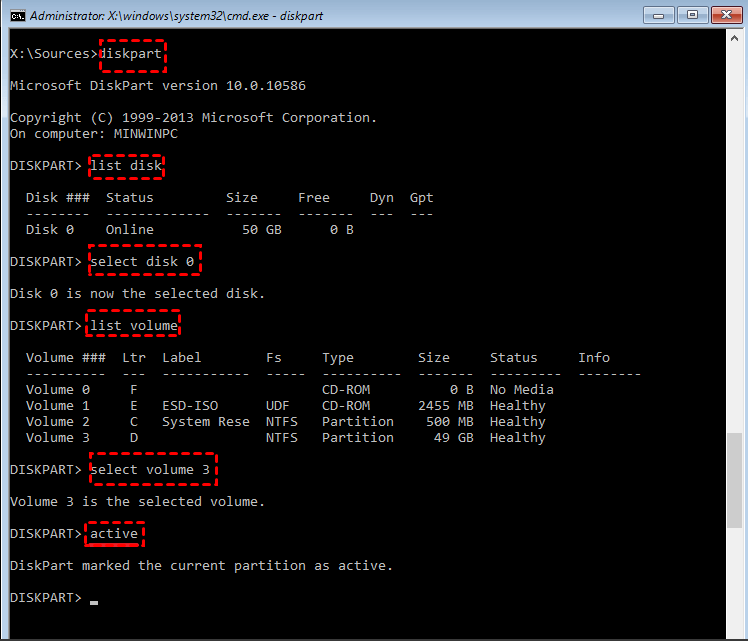
3. Set the System Partition as Active (if Needed)
If the system partition is not active, it might prevent the computer from booting. Use DiskPart to set it as active:
Step 1. Ensure the target partition is active and formatted as NTFS.
Step 2. Use Diskpart to set the partition as active:
diskpart
list disk
select disk 0 (replace 0 with the number of your system disk)
list volume
select volume 3 (replace 3 with the number of your system volume)
active
4. Create BCD for UEFI Systems
If your system is configured with UEFI, you’ll need to specify the UEFI mode in BCDBoot:
bcdboot C:\Windows /s S: /f UEFI
-
C:\Windows is the Windows installation path.
-
/s S: specifies the target drive for the system partition (adjust the drive letter as necessary).
-
/f UEFI configures the files for UEFI-based systems.
5. Configure for BIOS Boot
For systems using BIOS boot, use:
bcdboot C:\Windows /s S: /f BIOS
The /f BIOS option configures the boot files for legacy BIOS systems.
Get a third-party Windows 8 BCDBoot repair tool
If you're struggling with a boot error on Windows 8, you're not alone. Boot Configuration Data (BCD) errors are common and can prevent your system from starting up properly. Fortunately, there's a reliable third-party tool that can help repair these issues: AOMEI Partition Assistant. This tool is well-known for its powerful features in partition management and, importantly, for its ability to repair the BCD boot files that are essential to Windows' startup process.
Here are some reasons why it's a go-to tool for many users:
◉ User-friendly interface: Even if you're not tech-savvy, AOMEI makes the repair process straightforward.
◉ Compatibility: AOMEI Partition Assistant works with most Windows versions, including Windows 8, 10, and 11.
◉ Advanced disk management features: Beyond BCD repair, it offers extensive partition management, including resizing, formatting, merging, and more.
Step 1. Install AOMEI Partition Assistant on a working PC and connect a USB drive with enough storage to this PC.
Step 2. Open this software and select the Boot Repair tool below the Recover section.

Step 3. Click the create a bootable disk option to create a WinPE Boot Repair USB drive.

Step 4. Plug the created drive into the non-booting computer, then enter the BIOS settings to change the boot order so that the computer boots from it. It will automatically load the Boot Repair tool and perform a scan of boot entries.

Step 5. Once the process completes, you will see all scan results, including system paths, system versions, and boot status. Select the repairable boot entries you want to repair and click the Repair button.
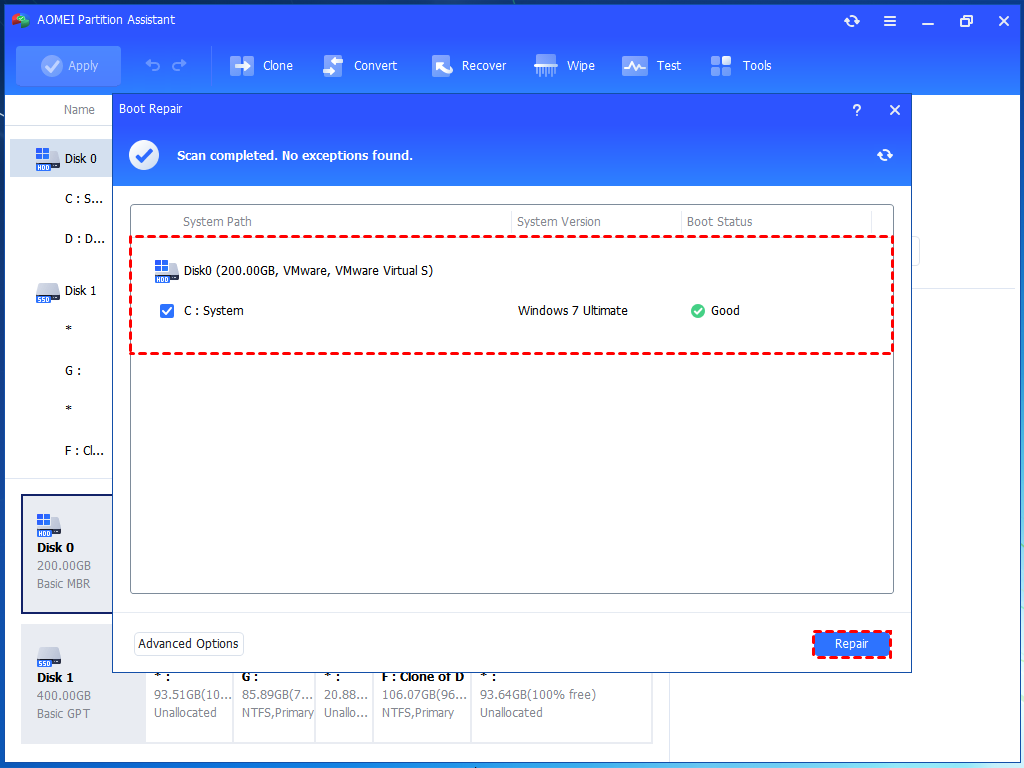
Step 6. Wait for the repair process to finish, then remove the bootable USB drive and boot the PC from the original system drive.

Conclusion
Using BCDBoot to repair and rebuild your BCD can resolve many common Windows boot issues without requiring a full OS reinstallation. Follow the steps carefully, and in most cases, your Windows 8 system should be up and running smoothly. BCDBoot is a powerful tool, and with these instructions, you can confidently tackle BCD-related problems.
Besides, you can also resort to a third-party Windows 8 BCDBoot repair tool like AOMEI Partition Assistant to fix the system errors automatically.