How to Repair Windows Boot Manager Failure [5 Ways]
Is your computer struggling to start up normally? Find out how to address the Windows Boot Manager failure on your Windows 11/10/8/7. Several proven solutions are covered in this post.
By Hedy / Updated on October 15, 2024
Imagine when you are using your Windows PC as usual, suddenly the screen freezes. You restart the system, but instead of booting normally, you're met with an error message, "Windows Boot Manager Failed to Start", accompanied by an unusual error code like 0xc00000f, 0xc00000e, or 0xc00000d. Now, what should you do?
Windows Boot Manager failure is a serious problem that prevents access to your system until it's resolved. Although the situation might feel overwhelming, it’s essential to stay calm and take the right steps to fix the issue promptly.
If you're facing a similar problem, keep reading for a step-by-step guide to resolve the Windows Boot Manager failure.
Why Windows Boot Manager failed to boot?
Before we proceed, it’s essential to grasp the factors that contribute to this unexpected situation. Several issues can lead to the Windows Boot Manager's failure to boot:
◉ Corrupted Master Boot Record (MBR): The MBR is a vital data structure found in the first sector of the hard drive. It contains the boot code and a partition table. If the MBR becomes corrupted, the boot manager may struggle to load the operating system.
◉ Damaged hard drive cable: A faulty cable connecting the hard drive to the motherboard can prevent the boot manager from accessing the necessary operating system files.
◉ Improper computer shutdown: An improper shutdown can corrupt or damage system files that the boot manager depends on, leading to boot failures.
◉ Missing hardware components: If any hardware component is absent or incorrectly installed, it can hinder the boot manager's functionality.
Now that you have an understanding of what a Windows Boot Manager failure entails, you might be curious about how to resolve it. Let's explore the solutions in the following section.
How to repair Windows Boot Manager failure in Windows 10/11
Are you seeking effective methods to troubleshoot the Windows Boot Manager failure? You’re in the right place! This section will present you with some of the best strategies for properly loading your operating system:
Fix 1. Update Your BIOS or UEFI
Updating your BIOS or UEFI (Unified Extensible Firmware Interface) offers several advantages, including bug fixes, enhanced system performance, and improved support for new hardware and devices.
Here’s how to update your BIOS or UEFI:
Step 1. Launch the Microsoft Store and search for "MSI Center".
Step 2. Click the Get button to begin the download.
Step 3. Go to the Support section and select Advanced Options. Choose BIOS Update and wait for the process to complete.

Keep in mind that updating your BIOS or UEFI carries some risks. If the update process encounters issues, it could potentially render your system unusable.
Fix 2. Edit Windows Boot Manager
The Windows Boot Manager can occasionally become corrupted or damaged, leading to difficulties when trying to boot into the operating system. By modifying the Windows Boot Manager, you may resolve issues such as a corrupted boot configuration or an incorrect boot order. To edit the Windows Boot Manager, follow these steps:
Step 1. Boot your system using Windows installation media.
Step 2. Choose your language, keyboard or input method, and time format, then click Next.
Step 3. Using the arrow keys, select Repair Your Computer and click on Troubleshoot.
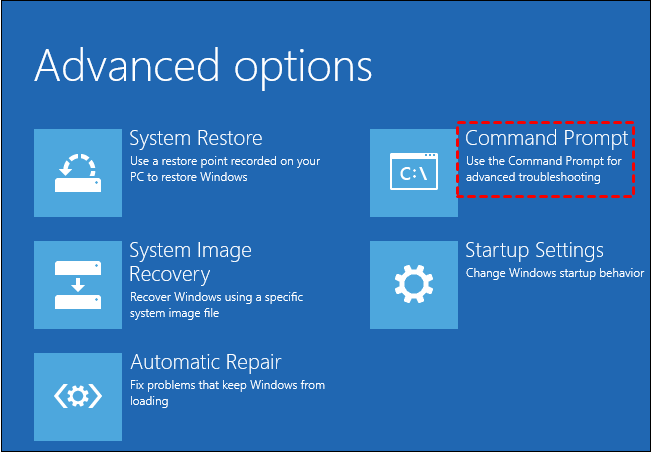
Step 4. Click on Advanced Options, then select Command Prompt.
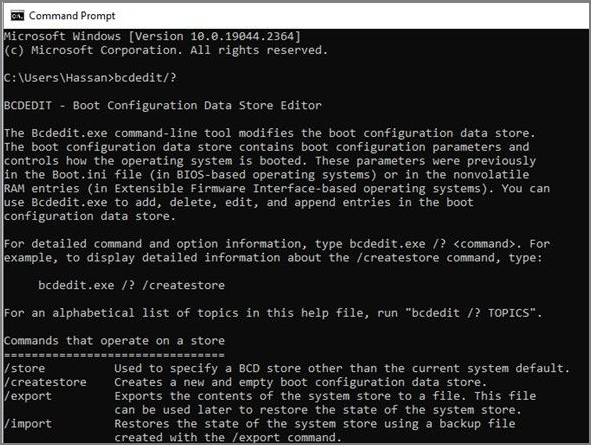
Step 5. Type bcdedit /? to view the commands available for editing.

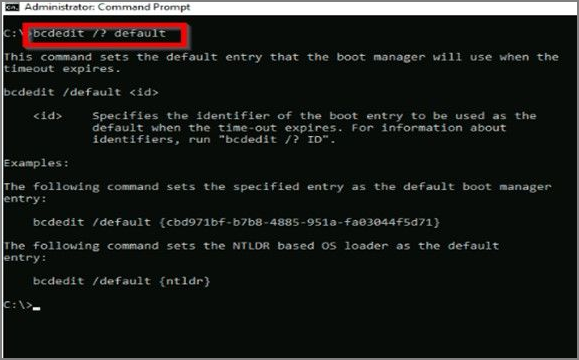
Step 6. Enter bcdedit /? default to set the default boot entry.
After executing these commands, your system should no longer experience booting issues.
Fix 3. Perform Automatic Repair
You can resolve the "Windows Boot Manager failed to start" error by using Windows Automatic Repair. For this, you'll need Windows installation media, such as a USB flash drive or a Windows CD/DVD.
If you don’t already have installation media, you can create a bootable USB drive using tools. After successfully creating the installation media, follow these steps to initiate Automatic Repair:
Step 1. Boot your system using the Windows installation media.
Step 2. On the initial screen, select your language, time zone, and other preferences, then click Next.
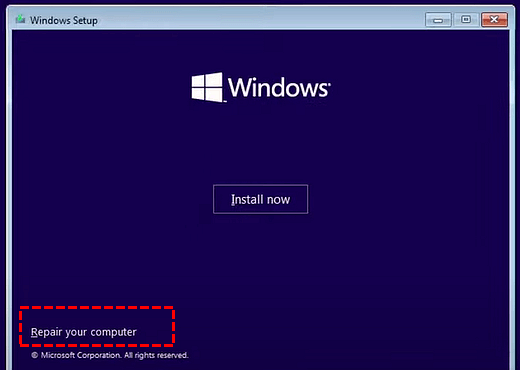
Step 3. Click Repair Your Computer located in the bottom-left corner.
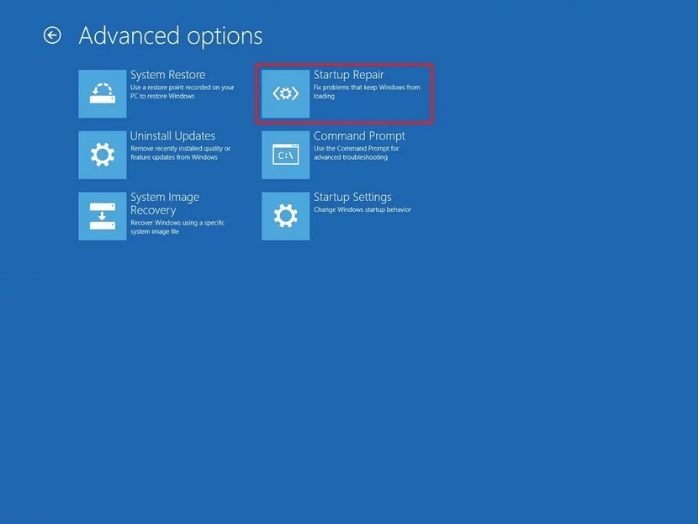
Step 4. Navigate to Troubleshoot > Advanced Options, and select Startup Repair.
Follow the on-screen instructions carefully to complete the repair process and fix your system.
Fix 4. Rebuild MBR
When the Master Boot Record (MBR) is damaged or corrupt, it can prevent the Windows Boot Manager from starting the system. To resolve this problem, the MBR may need to be rebuilt by replacing the faulty record with a fresh, working version. Here are two favorable ways:
Way 1. Rebuild MBR via Command Prompt
This approach is recommended for experienced users familiar with command line parameters. If the operating system won’t boot, the Windows installation tool will be required to start the computer. Let’s see how to repair Windows Boot Manager command line:
Step 1. Start your system using Windows installation media.
Step 2. Choose your language, time and currency format, and keyboard or input method, then click Next.
Step 3. Use the arrow keys to select Repair Your Computer, then click on Troubleshoot.
Step 4. Click on Advanced Options, then select Command Prompt.
Step 5. Enter bootrec.exe /fixmbr and press Enter. This command repairs the Boot Manager.
Step 6. Next, type bootrec.exe /fixboot and press Enter. This will repair the boot sector.
Step 7. Then, type bootrec.exe /rebuildbcd and press Enter to rebuild the Boot Configuration Data (BCD).

Step 8. Once all commands have been executed successfully, remove the installation media and restart your computer. Following these steps should help you boot your system normally.
Way 2. Rebuild MBR via MBR repair tool
For Windows users who prefer not to use installation media or avoid multiple forced restarts, AOMEI Partition Assistant Professional offers a simpler solution. This partition software allows you to create a bootable USB drive from a working computer, use it to boot the system with the damaged MBR, and then repair the MBR in just three steps. Download the software on a functional computer and follow the steps outlined below.
Step 1. Install and launch AOMEI Partition Assistant on a working PC. In the main interface, click Tools > Make Bootable Media and follow the wizard to create a Windows 10/11 bootable USB drive.

Step 2. Connect the bootable media created via AOMEI Partition Assistant to the computer with a boot issue and enter BIOS to boot computer from the USB drive.
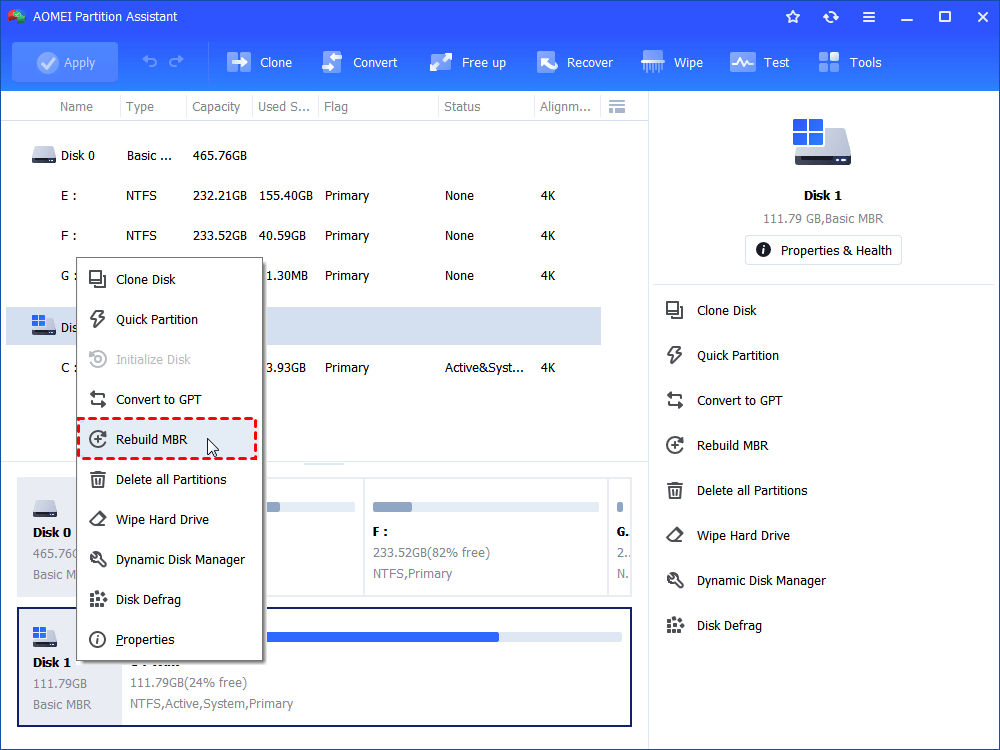
Step 3. Once logged in, the AOMEI Partition Assistant will run automatically. In the main interface, right-click the system disk that contains the corrupted MBR and choose Rebuild MBR.
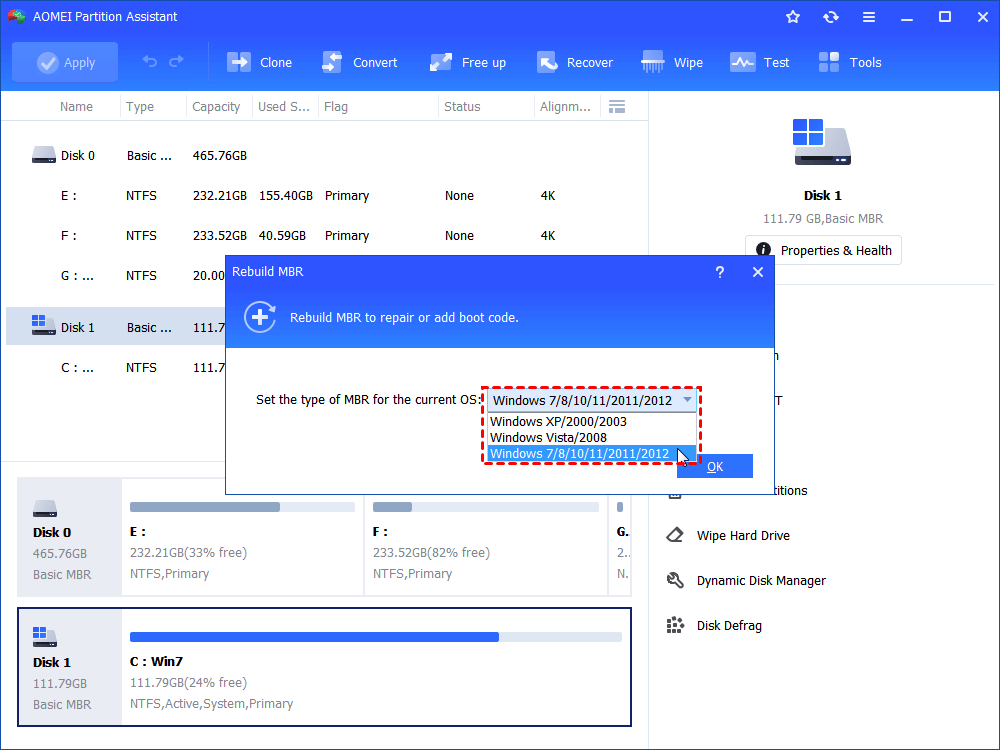
Step 4. Set the type of MBR for Windows 10 in the pop-up window. (Choose a proper MBR type according to your operating system.)
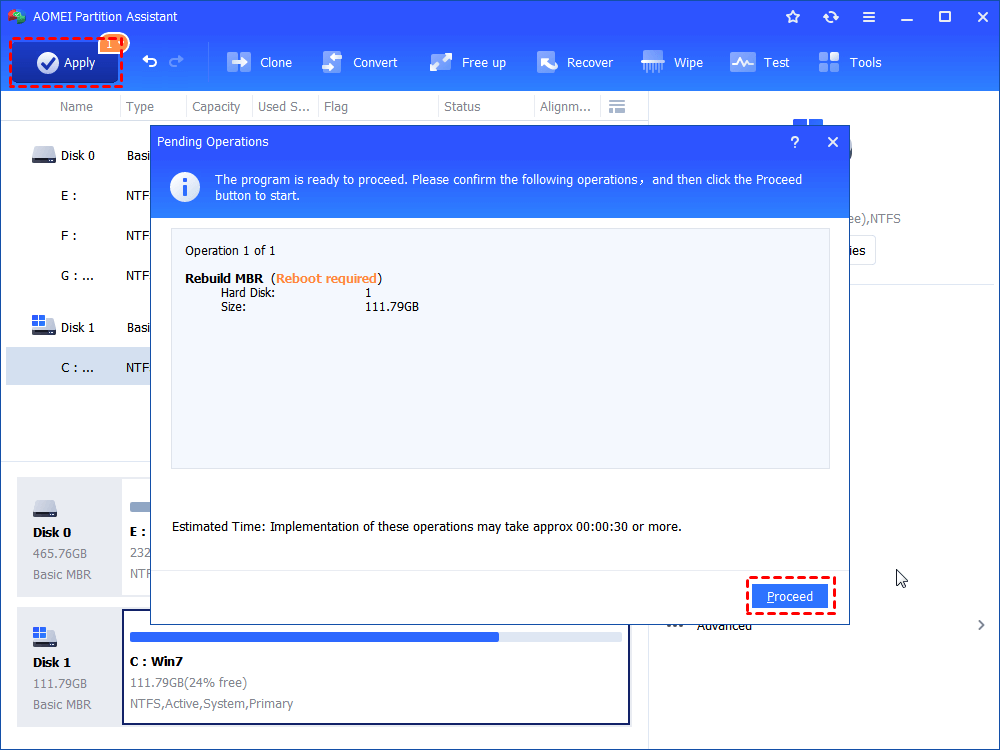
Step 5. Click Apply and Proceed on the toolbar to commit the Rebuild MBR operation.
Fix 5. Repair Windows Boot Manager🔥
Boot issues can also arise from corrupt or missing boot configuration data (BCD) files. In such a case, it’s a good choice to use AOMEI Partition Assistant Professional again. It is a specialized boot repair tool that works on all editions of Windows 11/10/8/7. Its "Boot Repair" feature is designed to fix damaged or missing BCD files, offering a straightforward solution to quickly restore normal boot functionality.
Let’s see how to fix Windows Boot Manager Windows 10/11 with AOMEI Partition Assistant Professional:
Step 1. Install and launch AOMEI Partition Assistant on a working PC, click "Recovr"-"Boot Repair" and then click the "create a bootable disk" option to create a WinPE "Boot Repair" disk.

Step 2. Boot the PC that cannot boot into WinPE. It will automatically load the Boot Repair tool and start the boot entries scan process. All boot entries will be displayed.

✍ Advanced Settings(Select a location to store the repaired boot entry):
1. Repair to the current disk: The system will boot from the current disk and ensure the boot files are complete and functioning properly. (By default)
2. Repair to another disk: This operation will repair the boot entry or create a new system boot entry to ensure the system can boot from the disk you select.

You can either repair to the current disk or repair to another disk. Repair to the current disk is recommended for common users.
Step 3. Select one/multiple repairable boot entries you want to repair and click the "Repair" button to start the boot repair.

Step 4. Wait for the repair process to finish. Once it is finished, you can check the repair result. If it succeeds, you will get a "Repair Successfully" result.

Bonus tip: How to recover lost data if Windows Boot Manager boot failed
When all above fails, a critical hardware error may be causing the issue. In this end, it’s best to seek professional help to get your PC repaired. However, before doing so, ensure that your data is backed up to avoid losing any valuable information.
If you don’t create a backup of your important files, don’t worry, you can recover all lost data using a professional data recovery tool named AOMEI Partition Assistant for Recovery. This tool allows users to create a bootable repair USB on another computer, which can then be used to start the PC that can’t boot. Follow the steps below to recover files from an crashed PC using AOMEI Partition Assistant for Recovery.
Step 1. Run AOMEI Partition Assistant for Recovery and click "Crashed PC Recovery".

Step 2. Select a way to create bootable disk as per your needs and click "Create".

Step 3. After the process is finished, please insert the bootable USB to boot up the crashed PC and then you will see the main interface of AOMEI Partition Assistant for Recovery again. Choose the exact partition or disk where your data is lost and click Scan.

Step 4. Then, the recovery tool starts to scan and search. lt will execute the “Quickly Scan" first to find your deleted data fast, and then execute the “Deep Scan" for searching other lost data.

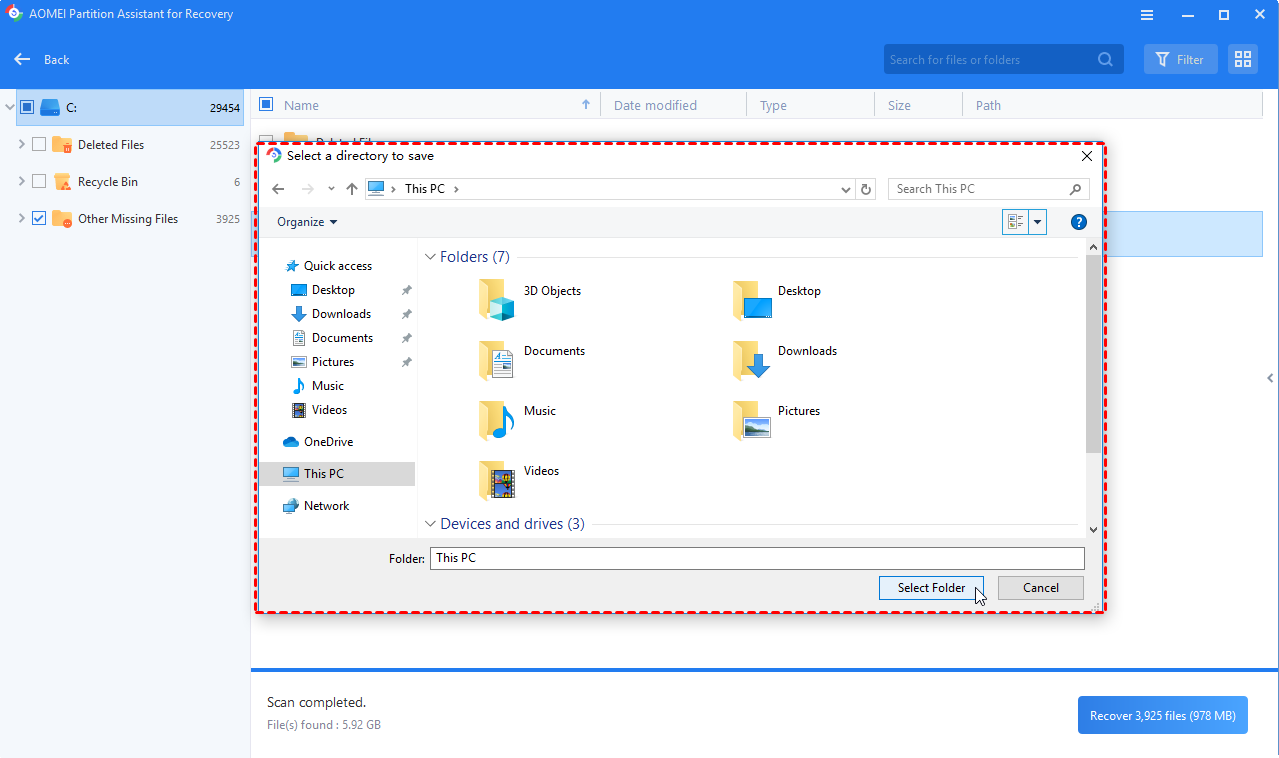
Step 5. Once the scan is completed, all deleted files, recycle bins and other missing files will be displayed. Please select the file you would like to recover and then click "Recover".

Step 6. Then, select a folder path to save your recovered files. Wait patiently for this process of recovering ends.
FAQs about Windows Boot Manager repair
What is Boot Manager failure?
Boot Manager failure occurs when the boot manager is unable to load the operating system. As a result, the system may display an error message or remain stuck on a black screen, preventing the computer from starting properly.
How do I fix a corrupted Windows boot file?
To fix a corrupted Windows boot file, boot from installation media and select "Repair your computer". Go to "Troubleshoot" > "Advanced Options" > "Command Prompt". Run bootrec.exe /fixboot and bootrec.exe /rebuildbcd to repair the boot files. Restart your computer afterward.
Will CHKDSK fix boot problems?
CHKDSK can fix certain boot problems caused by file system errors. Boot from installation media, select "Repair your computer", then open "Command Prompt". Run chkdsk C: /f /r, replacing "C:" with the appropriate drive letter. This command scans and repairs disk errors.
How do I fix corrupted Windows from BIOS?
To fix corrupted Windows from BIOS, access the BIOS setup and set the boot order to prioritize your installation media (USB or DVD). Boot from the media, select "Repair your computer", and choose "Troubleshoot" > "Advanced Options" for repair tools like "Startup Repair".
Conclusion
That’s all about how to repair Windows Boot Manager if you encounter an error like "Windows Boot Manager failed to start". The methods shared above will enable you to quickly rectify the problem and restore normal boot functionality. If the error is linked to a significant BCD issue, be sure to use AOMEI Partition Assistant Professional to repair Windows Boot Manager UEFI easily and quickly.
In addition, AOMEI Partition Assistant also plays an important role in solve other tricky problem such as “cloned SSD won’t boot Windows 10”, “ SSD not showing up”, "Windows won't boot from hard drive", "This Device cannot Boot Code 10", etc.