PC Won’t Turn on After Installing SSD Drive Windows 10? Here's How to Fix It
Is your PC won't turn on after installing SSD drive Windows 10 or can't boot from new SSD? In this post, you can learn how to fix common causes for a quick boot repair.
By Lucas / Updated on April 23, 2025
Installing a new Solid State Drive (SSD) is an exciting upgrade that promises faster boot times and snappier performance for your Windows 10 PC. However, the excitement can quickly turn into frustration if your computer refuses to turn on or boot correctly after the installation. This is a common issue, leaving users wondering why their previously working system is now unresponsive or unable to load Windows.
Why your PC won't turn on after installing SSD?
Facing a black screen or persistent error messages when you expect to see the familiar Windows logo can be alarming. Several factors can prevent your PC from booting correctly after adding or replacing a drive:
Boot configuration problems
Incorrect physical connections
Improper BIOS settings
Compatibility issues between the SSD and your motherboard
Corrupted boot files that occurred during the installation or configuration process
Sometimes, the issue isn't with the installation itself but requires updating drivers or even a boot repair to restore the system's ability to load Windows from the correct drive.
Addressing these areas systematically will help you pinpoint and resolve the reason your PC won't turn on after installing the SSD drive on Windows 10.
Quick perform boot repair to fix boot failure on Windows 10
Sometimes, the issue isn't hardware or BIOS settings but a problem with the Windows boot configuration files themselves, especially after significant hardware changes like installing a new SSD. If boot files become corrupted, misconfigured, or aren't pointing to the correct Windows installation on your new or existing drive, your PC can't boot, often displaying errors like "BOOTMGR is missing" or similar messages indicating that Windows not booting. While Windows has built-in repair options accessible from installation media, they aren't always effective or user-friendly.
For a more reliable and easier way to fix boot problems, specialized tools are often recommended. One such tool is AOMEI Partition Assistant Professional. This software is a comprehensive disk partition manager designed for Windows PCs, but it also includes powerful utilities specifically for fixing boot issues. It can automatically scan for and repair common problems with the Windows boot configuration data (BCD), master boot record (MBR), or partition table that prevent your system from starting.
Step 1. Install AOMEI Partition Assistant on a working PC and connect a USB drive with enough storage to this PC.
Step 2. Open this software and select the Boot Repair tool below the Recover section.

Step 3. Click the create a bootable disk option to create a WinPE Boot Repair USB drive.

Step 4. Plug the created drive into the non-booting computer, then enter the BIOS settings to change the boot order so that the computer boots from it. It will automatically load the Boot Repair tool and perform a scan of boot entries.

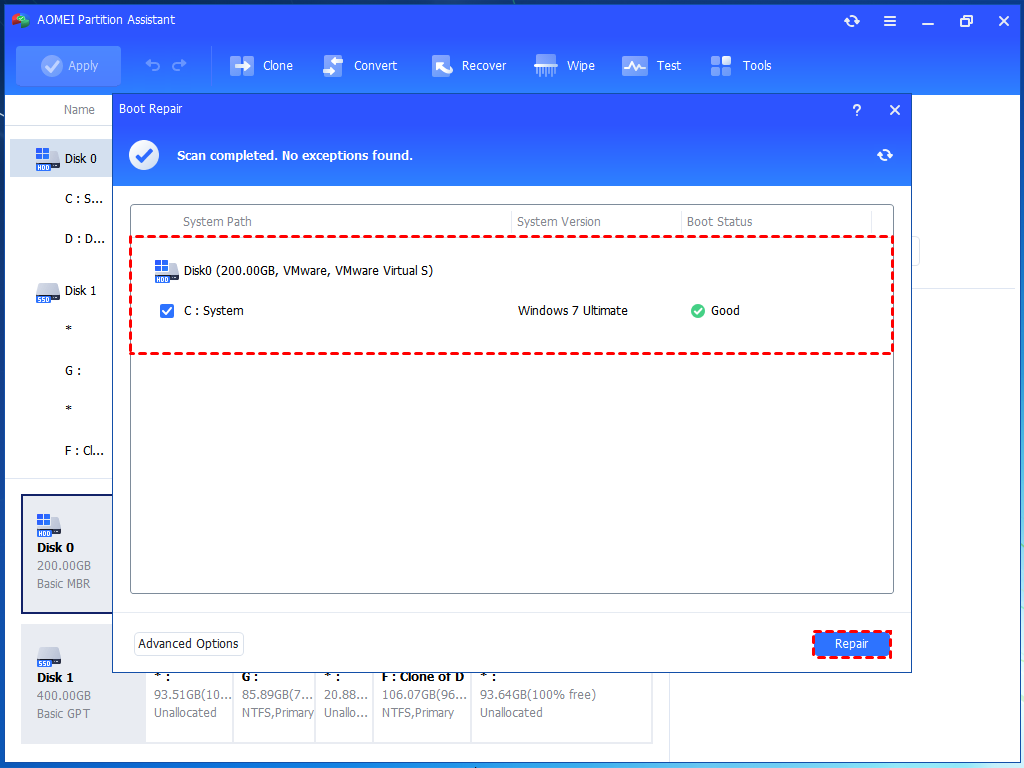
Step 5. Once the process completes, you will see all scan results, including system paths, system versions, and boot status. Select the repairable boot entries you want to repair and click the Repair button.
Step 6. Wait for the repair process to finish, then remove the bootable USB drive and boot the PC from the original system drive.

This boot repair process targets issues with the system's boot configuration files, which are often the cause when the PC fails to boot after hardware changes like installing an SSD.
How to fix PC won't turn on after installing SSD drive Windows 10
When your PC won't turn on after installing the Windows 10 SSD drive, it can be incredibly frustrating, but there are several systematic approaches you can take to diagnose and fix the issue. These methods cover the most common causes, starting with the simplest physical checks and moving towards more complex software or configuration problems. Follow these detailed steps carefully to troubleshoot and resolve why your computer can't boot from new ssd or old drive after the upgrade.
1. Check the connection between the computer and the hard drive
Loose or incorrect physical connections are one of the most frequent reasons a new drive isn't detected or prevents a PC from booting. Ensuring both the power and data cables are securely attached to the SSD and the motherboard is a critical first step. A cable that seems connected but isn't seated properly can lead to intermittent detection issues or a complete failure to recognize the drive.
Before performing this check, make sure your computer is completely shut down and unplugged from the power source to avoid electric shock.
Step 1. Turn off your PC completely. Unplug the power cable from the back of the computer and wait 30-60 seconds.
Step 2. Open your computer case according to its design (usually involves removing side panels).
Step 3. Find the newly installed SSD inside your case.
Step 4. Locate the thin SATA data cable connecting the SSD to the motherboard. Ensure it's pushed firmly into both the SSD's port and the motherboard's SATA port. Try unplugging and replugging it on both ends.
Step 5. Locate the wider SATA power cable coming from the power supply unit. Ensure it's pushed firmly into the SSD's power port. Try unplugging and replugging it.
Step 6. If you have other drives, ensure their connections are also secure. Make sure the drive you intend to boot from is connected to a primary SATA port, often labeled on the motherboard (consult your motherboard manual).

Carefully close your computer case, plug the power cable back in, and try turning on the PC.
2. Ensure the boot drive order is correct in the BIOS
Even if your new SSD is detected, your PC might still not boot correctly if the system is trying to load the operating system from the wrong drive. The BIOS (Basic Input/Output System) or UEFI (Unified Extensible Firmware Interface) settings control which drive the computer attempts to boot from first. If the boot order is set to try the new SSD (especially if Windows isn't installed on it yet) or another drive before the one containing your Windows installation, your PC won't turn on or will show a boot error.
Changing this setting is crucial when your PC can't boot from new SSD because the system is simply looking in the wrong place for the operating system files required to start Windows.
Step 1. Turn on or restart your computer. As the computer starts, press the designated key repeatedly to enter BIOS or UEFI settings. Common keys include Del, F2, F10, F12 or Esc. The key is usually displayed on the screen during the initial boot sequence. Consult your motherboard or PC manufacturer's manual if you're unsure.
Step 2. Inside the BIOS/UEFI menu, find the "Boot," "Boot Order," "Boot Sequence," or similar setting. The location and naming vary depending on your motherboard manufacturer and BIOS version.
Step 3. You will see a list of connected drives and devices. Use the indicated keys (often arrow keys, Enter, F5/F6, or +/-) to move the drive containing your Windows 10 installation to the top of the boot order list.
Step 4. Find the option to "Save and Exit," "Save Changes and Exit," or similar. This is often mapped to the F10 key. Confirm your changes when prompted.
Your computer will restart with the new boot order settings. Check if Windows 10 now boots correctly.
3. Check the Compatibility Between the Motherboard and SSD
While most modern motherboards are compatible with standard SATA SSDs, compatibility issues can arise, especially with older motherboards or specific types of SSDs like NVMe drives. Not all motherboards support NVMe drives, or they might require a specific adapter or BIOS setting. Even with SATA drives, an older motherboard might have limitations on drive size or transfer speeds that could potentially cause issues. In some cases, the motherboard's firmware (BIOS/UEFI) might need to be updated to fully support newer SSD technologies.
Step 1. You can find your motherboard model by checking documentation, physically inspecting the board, or by using system information tools in Windows (if you can boot using alternative methods or before the issue occurred).
Step 2. Note the exact model name and type (SATA, NVMe) of your new SSD.
Step 3. Go to the support section of your motherboard manufacturer's website. Search for your specific motherboard model.
Step 4. Look for sections on storage support, compatible devices, or specifications. Check if your SSD type (SATA/NVMe) and capacity are listed as supported.
Step 5. While on the motherboard manufacturer's site, check if there are any available BIOS/UEFI updates. Updates often include improved compatibility with newer hardware.
Step 6. Refer to your motherboard and SSD manuals for any specific installation requirements or known compatibility notes.
4. Update the Motherboard and disk drivers
Outdated drivers, particularly for your motherboard's chipset and storage controllers (SATA or NVMe), can cause conflicts or prevent the operating system from properly interacting with the newly installed SSD. Even if the SSD is detected in BIOS, the Windows 10 operating system might not be able to fully utilize or boot from it if the necessary drivers are missing or not current. Updating these drivers ensures that your system has the correct software components to communicate effectively with the new hardware.
Visiting your motherboard and SSD manufacturers' websites to download and install the latest drivers can resolve compatibility issues and improve performance.
If you can boot into your previous Windows installation (e.g., on your old drive) or boot into Windows Safe Mode, proceed with the following steps. If not, you may need to perform this after getting your PC to boot using one of the other methods or prepare the drivers on another computer.
Step 1. Determine your motherboard model (as in Fix 3) and the exact model of your SSD.
Step 2. Go to the support/download section of your motherboard manufacturer's website and the SSD manufacturer's website. Download the latest chipset drivers for your motherboard and any specific drivers for your SSD (some SSDs have their own drivers for performance or management).
Step 3. Run the downloaded motherboard chipset driver installer and follow the on-screen instructions. Restart your PC if prompted.
5. Reinstall the New SSD or Test the New SSD on Another Laptop or PC
If the above steps haven't resolved the issue, the problem may lie with the physical installation of the SSD itself or potentially a defect with the new SSD. Reinstalling the SSD involves removing it and putting it back in, which can help correct any subtle misalignments or connection issues missed during the initial check. This is a more thorough version of Fix 1.
Testing the new SSD on a different computer is a crucial diagnostic step to determine if the SSD is functioning correctly. If the SSD is recognized and works without issues on another system, it strongly suggests the problem is with your PC's configuration, compatibility, or motherboard, rather than the SSD itself.
However, if the SSD is also not detected or causes problems on another working computer, it indicates that the new SSD may be faulty and needs to be replaced. This step helps isolate whether the PC won't turn on after installing SSD drive Windows 10 issue is due to your system or the new hardware.
Ending
Navigating the challenges of a PC won't turn on after installing SSD drive Windows 10 can be daunting, but as we've seen, there's a range of effective troubleshooting steps you can take. In this post, we've shown you reasons and solutions to fix Windows not booting after installing new SSD.
Tools like AOMEI Partition Assistant Professional offer specialized solutions for problems that are harder to fix manually, such as corrupted boot files causing Windows not booting. Beyond its powerful "Boot Repair" function detailed above, it is a versatile utility for managing your disk drives and partitions, such as migrating your operating system (OS) to the new SSD without reinstalling Windows, cloning entire disks or partitions for backups or upgrades, resizing/moving partitions to optimize storage space, and securely wiping old drives before disposal...

