How to Fix It Looks Like Windows Didn't Load Correctly Windows 11
If you get the error saying it looks like Windows didn’t load correctly Windows 11, don’t worry. You can learn why it happens and get 8 useful and effective methods to fix it with ease.
By Hedy / Updated on January 7, 2025
Why does my computer keep saying Windows didn't load correctly?
The "Windows didn't load correctly" error typically appears when there are issues that prevent Windows from starting properly. Several factors can contribute to this problem, including:
1. Corrupted system files
If critical system files are damaged or corrupted, Windows may fail to load. This could happen due to improper shutdowns, virus infections, or software conflicts.
2. Startup issues
Problems with the startup process, such as incorrect boot configurations or conflicts in startup settings, can cause this error. Issues with the Boot Configuration Data (BCD) or Master Boot Record (MBR) might prevent Windows from loading correctly.
3. Recent updates or changes
A failed or incomplete Windows update, new driver installation, or recently installed software might cause startup issues. Sometimes, updates conflict with existing system settings, leading to boot problems.
4. Driver conflicts
Incompatible or outdated drivers, especially for graphics, storage, or motherboard components, can trigger boot issues. A recent driver update may have introduced a conflict or bug that prevents Windows from loading.
5. Malware or virus infections
Malware or viruses can corrupt essential system files or interfere with the boot process. If malicious software affects Windows startup files, it could prevent the system from loading correctly.
6. BIOS/UEFI settings
Incorrect BIOS or UEFI settings, such as boot order or secure boot settings, can interfere with the boot process. A recent change in BIOS/UEFI settings could have impacted how Windows loads.
How to fix it looks like Windows didn't load correctly Windows 11
To fix the "It looks like Windows didn't load correctly" error in Windows 11, follow these methods.
Fix 1. Enter Safe Mode
Safe Mode in Windows serves as a diagnostic tool, loading the system with only essential drivers and services. It's a dependable method for resolving PC issues, particularly when Windows fails to load properly. If you encounter this problem, follow these steps to access Safe Mode:
Step 1. On the Recovery page, select See Advanced Repair Options to open the troubleshooting menu. Alternatively, restart your computer multiple times during the Windows logo screen to enter the Windows Recovery Environment (WinRE).
Step 2. Choose Troubleshoot > Advanced options to view additional settings.
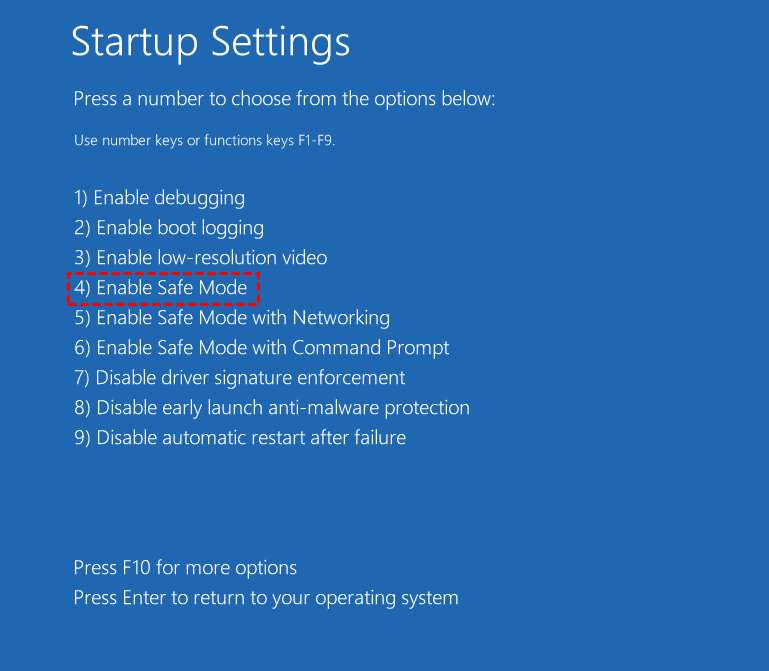
Step 3. Select Startup Settings, then click Restart. When the options appear, press F4 or F5 to boot into Safe Mode.
Once in Safe Mode, you can perform diagnostics such as removing problematic software or uninstalling recently added drivers.
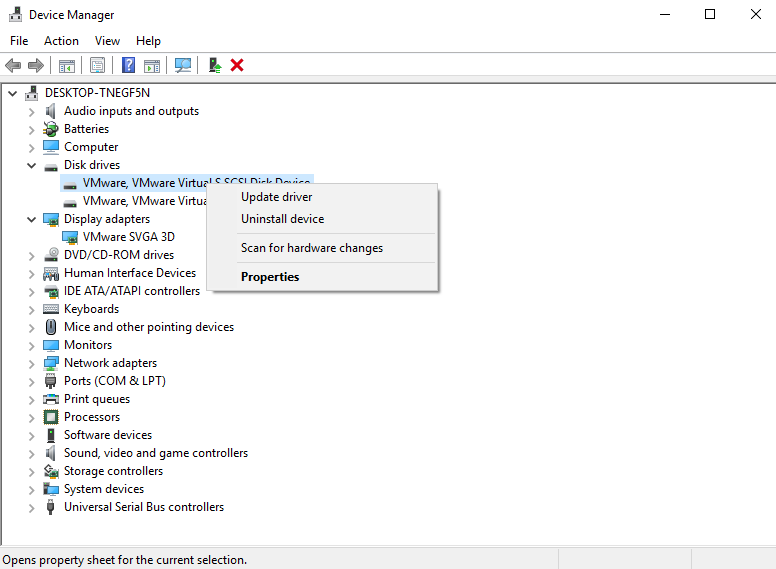
To uninstall a driver, open Device Manager, locate the driver, right-click, and choose Uninstall device.
To remove an application, go to Control Panel, select Uninstall a program, right-click the app, and choose Uninstall.
Finally, restart your Dell or Lenovo PC to check if the "Windows didn’t load correctly" error is resolved. If the issue persists, proceed with further troubleshooting steps.
Fix 2. Turn off Hybrid Sleep
Some users report that the Hybrid Sleep feature can lead to the issue of Windows failing to load properly on Windows 10 or 11. To resolve this, you can disable Hybrid Sleep by following these steps:
Step 1. While in Safe Mode, search for Control Panel using the search bar and open it. Ensure the view mode is set to Large icons.
Step 2. Select Power Options and then click Change plan settings for your active power plan.
Step 3. Click the Change advanced power settings link to open the Advanced Settings window.
Step 4. Expand the Sleep category, then expand Allow hybrid sleep. Change the setting from On to Off.
Step 5. Click Apply, followed by OK, to save the updated settings.
Fix 3. Run SFC and DISM scans
Corrupted system files are often responsible for Windows failing to load correctly. To resolve this issue on Windows 10 or 11, you can repair system file corruption using the System File Checker (SFC) and the Deployment Image Servicing and Management (DISM) tool. Follow these steps to perform the scans:
Step 1. Boot your computer into Safe Mode, type cmd in the search bar, right-click Command Prompt, and select Run as administrator. Alternatively, access Command Prompt via WinRE by navigating to Troubleshoot > Advanced options > Command Prompt.
Step 2. Enter the command sfc /scannow and press Enter. Allow the scan to complete; this process may take some time.

Step 3. After the SFC scan, execute the following DISM commands one by one, pressing Enter after each:
Dism /Online /Cleanup-Image /ScanHealth
Dism /Online /Cleanup-Image /CheckHealth
Dism /Online /Cleanup-Image /RestoreHealth

These scans will identify and repair corrupted files and bad system images. Once the process is complete, restart your computer and verify whether the issue has been resolved.
Fix 4. Run CHKDSK
A corrupted file system or bad sectors on the hard drive can often trigger the error message, "Recovery: It looks like Windows didn’t load correctly" on Windows 10 or 11. To address this issue, running a CHKDSK scan is essential. Follow these steps:
Step 1. Open Command Prompt as an administrator. You can do this either in Safe Mode or through WinRE by navigating to Troubleshoot > Advanced options > Command Prompt.
Step 2. Enter the following command and press Enter:
chkdsk C: /f /r

This command will check the drive for file system errors and bad sectors. It will also repair detected errors and recover readable data from damaged sectors.
Fix 5. Rebuild BCD
Missing or corrupted BCD (Boot Configuration Data) files in Windows 10 or 11 can lead to the error, "It looks like Windows didn’t load correctly." To resolve this issue, rebuilding the BCD is an effective solution. Here's how to do it:
Step 1. Boot into the Windows Recovery Environment (WinRE) and navigate to Troubleshoot > Advanced options > Command Prompt.
Step 2. In the Command Prompt window, type the following command and press Enter:
bootrec /fixmbr
bootrec /fixboot
bootrec /scanos
bootrec /rebuildbcd

For a simpler and more user-friendly solution to repair boot issues, consider using AOMEI Partition Assistant. This powerful partition management tool features a Boot Repair function designed to fix damaged or missing BCD files without the need for complex commands.
With its intuitive interface, AOMEI Partition Assistant provides an efficient way to restore your system and resolve boot errors, making it an ideal choice for both beginners and advanced users. Download the tool to explore its wide range of features and bring your device back to full functionality.
Step 1. Install and launch AOMEI Partition Assistant on a working PC, click "Recovr"-"Boot Repair" and then click the "create a bootable disk" option to create a WinPE "Boot Repair" disk.

Step 2. Boot the PC that cannot boot into WinPE. It will automatically load the Boot Repair tool and start the boot entries scan process. All boot entries will be displayed.

✍ Advanced Settings(Select a location to store the repaired boot entry):
1. Repair to the current disk: The system will boot from the current disk and ensure the boot files are complete and functioning properly. (By default)
2. Repair to another disk: This operation will repair the boot entry or create a new system boot entry to ensure the system can boot from the disk you select.

You can either repair to the current disk or repair to another disk. Repair to the current disk is recommended for common users.
Step 3. Select one/multiple repairable boot entries you want to repair and click the "Repair" button to start the boot repair.

Step 4. Wait for the repair process to finish. Once it is finished, you can check the repair result. If it succeeds, you will get a "Repair Successfully" result.

Fix 6. Run Startup Repair
Many users suggest using Startup Repair within the Windows Recovery Environment (WinRE) to fix the "Recovery: It looks like Windows didn’t load correctly" error. To proceed:
Step 1. If your computer isn’t entering repair mode, you can force a restart three times in a row. Just power it off when you see the Windows logo and turn it back on.
Step 2. When your computer enters Automatic Repair, you’ll see a screen that reads "Preparing Automatic Repair" or "Diagnosing your PC". Click on Advanced options.
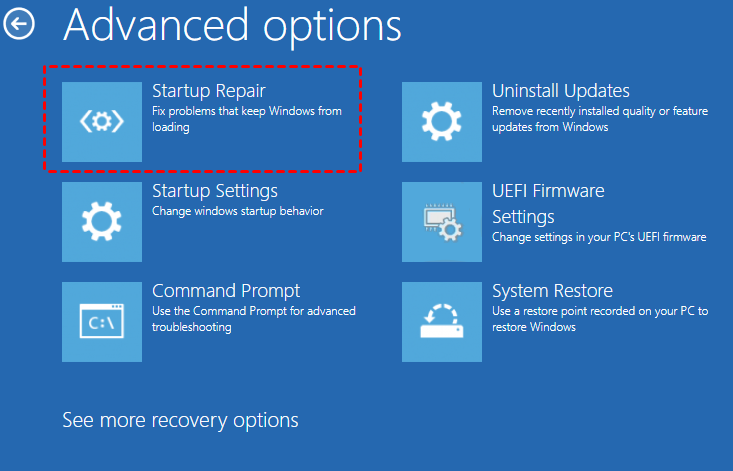
Step 3. From the Advanced Options menu, select Startup Repair. This will start the repair tool, which will check for issues that might prevent Windows from booting.
Fix 7. Perform System Restore
If you regularly create backups using System Restore, you can use a restore point to revert your Windows 10 or 11 system to a previous state and resolve the issue of Windows not loading correctly on devices like Dell or Lenovo PCs. Follow these steps:
Step 1. In the Windows Recovery Environment (WinRE), select System Restore.
Step 2. Opt for the recommended restore point or manually select a different one based on your preferences.
Step 3. Click Finish to initiate the restoration process.

Fix 8. Reset your PC
If all other methods fail to resolve the "It looks like Windows didn’t load correctly" error on Windows 10 or 11, resetting your PC may be the final solution. This process reinstalls the operating system and can help resolve persistent issues. While Windows 11 allows you to retain your personal files during the reset, it’s still recommended to back up important files, especially those on your desktop, to prevent any unexpected data loss.
Once your files are secured, follow these steps to reset your PC:
Step 1. Restart your PC several times when the Windows logo appears to access the Windows Recovery Environment (WinRE).
Step 2. Navigate to Troubleshoot > Reset this PC.
Step 3. Select the Keep my files option to preserve personal data.
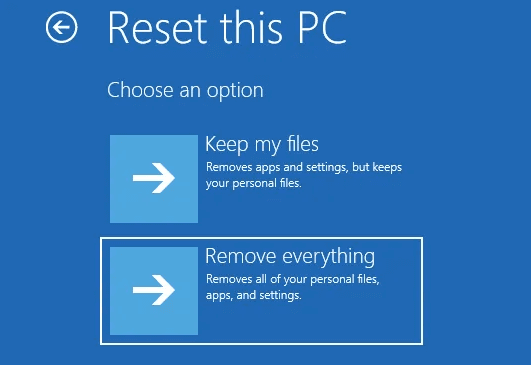
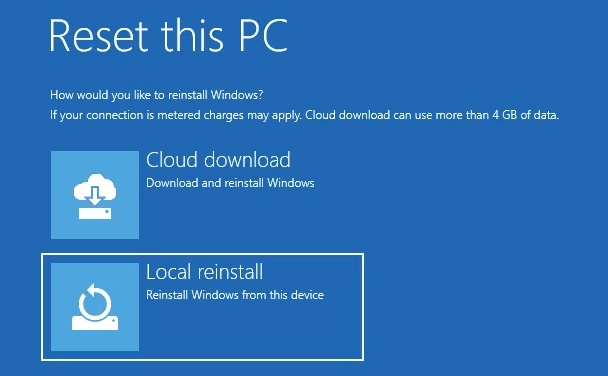
Step 4. Choose either Cloud download or Local reinstall based on your preference.
Step 5. Follow the on-screen instructions to complete the reset process.
After the reset, your system will reinstall, potentially resolving the loading error.
Conclusion
If you encounter a blue screen with the message "Recovery: It looks like Windows didn’t load correctly" on your Windows 10 or 11 PC, such as a Lenovo or Dell, you can try the solutions mentioned above to fix the issue. Simply follow the steps for each method one by one.