How to Create Boot Repair Disk for Windows 10 & 11
In this post, you’ll learn how to make a boot repair disk for Windows 10 & 11 to fix Windows boot failure issues.
By Lucas / Updated on October 18, 2024
Why do you need to boot repair disk for Windows 10?
A boot repair disk for Windows 10 is used when the operating system is unable to boot due to issues with the boot configuration or corrupted system files. There are several scenarios where a boot repair disk is necessary:
-
Corrupted or Missing Boot Files: If key boot files such as the Master Boot Record (MBR), Boot Configuration Data (BCD), or EFI partition are missing or corrupted, the system may fail to start properly. A boot repair disk allows you to repair these files.
-
Boot Loop: Sometimes Windows may get stuck in a boot loop where it repeatedly tries to boot but fails and restarts. A boot repair disk can be used to break this loop and fix the underlying issue.
-
Blue Screen of Death (BSOD): Certain critical system errors that cause a BSOD can prevent the system from booting. A repair disk can help fix these errors by restoring or repairing system files.
-
Failed Windows Updates: If a Windows update fails and corrupts system files, a repair disk can help recover from this issue and restore the system to a working state.
In short, boot repair disk can perform automatic repairs by scanning and fixing common boot issues, provide access to System Restore to roll the system back to a previous, working state, and offer command-line access via the Command Prompt for advanced troubleshooting tools.
2 methods to create boot repair disk for Windows 10/11
Two methods for building boot repair disks are discussed in this part. The first is creating a USB from CMD that functions as both an installation and a repair USB. The second is a third-party program to create a boot repair disk to fix boot disk without entering the OS.
Method 1. Using CMD to create boot repair disk
· Download the Windows 10 ISO files from the official site.
· If you use a USB, make sure the USB flash drive has at least 16GB of free space.
· You need to find a working computer.
Step 1. Press “Win”+ “R” at the same time to open the “Run” dialogue. Input “cmd” and hit on the “Enter” key.
Step 2. When the Command Prompt opens, type “diskpart” and press “Enter” to launch the DiskPart.exe tool. Then execute the following command in sequence.
list disk
select disk #
clean
create partition primary
select partition 1
format fs= ntfs quick (If your Windows requires UEFI boot, format it as FAT32 with command “format fs=fat32 quick” instead)
active

What if file copy fails?
If the Windows image file is over than 4GB, surpassing the file size limit of FAT32 file system, you will fail to copy files onto the USB flash drive. Once it happens, do as below:
1. Copy everything except the Windows image file (sources\install.wim) to the USB drive (either drag and drop, or use the following command, where D: is the mounted ISO and F: is the USB flash drive.) robocopy D: F: /s /max:3800000000
2. Split the Windows image file into smaller files, and copy them onto the USB drive: Dism /Split-Image /ImageFile:D:\sources\install.wim /SWMFile:F:\sources\install.swm /FileSize:3800
Method 2. Make boot repair disk for Windows 10/11 with 3rd party disk manager
If you know the CMD, you might operate all steps fast to make a Win 10 boot repair disk to fix the Windows boot repair problems. For average users, nevertheless, the complicated commands could be a bit challenging. So, if you are not very good at this tool, you can try AOMEI Partition Assistant Professional, a disk expert for Windows 11/10/8/7.
With this tool, you can not only create boot repair disk, but also use this tool to easily and quickly solve the boot failure. The "Boot Repair" function of this Windows disk and partition manager is designed to rectify corrupted or absent BCD files. It offers clients a straightforward and efficient means to promptly restore their computer's standard boot functionality.
No commands are necessary; a few clicks enough to execute all the aforementioned ways.
Step 1. Install and launch AOMEI Partition Assistant on a working PC, click "Recovr"-"Boot Repair" and then click the "create a bootable disk" option to create a WinPE "Boot Repair" disk.
Step 2. Follow the instruction, you can enter the guide to create window for creating a Win PE bootable Media. Please download ISO file that fit your OS.
Step 3. After you create a boot repair disk for Windows, you can plug the bootable disk you created into the target computer you wish to repair the boot issue.
Step 3. Enter BIOS in your computer, choose the bootable disk as the boot drive to access AOMEI Partition Assistant.
Step 4. The PC that cannot boot into WinPE will automatically load the Boot Repair tool and start the boot entries scan process. After the process is completed, it will display the scan result: system paths, system versions, and boot status. And, all repairable boot entries will be available to select.
If you click "Advanced Options", you can customize the a location to store the repaired boot entry.
Step 5. Select one/multiple repairable boot entries you want to repair and click the "Repair" button to start the boot repair.
Step 6. Wait for the repair process to finish. Once it is finished, you can check the repair result. If it succeeds, you will get a "Repair Successfully" result.
Now you can remove the USB and boot your computer to check.
Bonus tips to repair boot for Windows
Besides the Boot Repair, AOMEI Partition Assistant can help users check disks, rebuild MBR, manage UEFI and so on. Here we'll show you how to perform check and rebuild functions when your computer stuck into boot failure.
1. Check and repair disk via AOMEI Partition Assistant
When you boot your computer from your boot repair USB and see the main windows of this tool, you'll the basic situation of your hard drives. Select the partition that you want to check for, right-click it, select Advanced -> Check Partition.
Step 2. It will pop up a small window that you can select the way of checking errors to perform. Choose one according to your needs and click OK. It will proceed immediately.
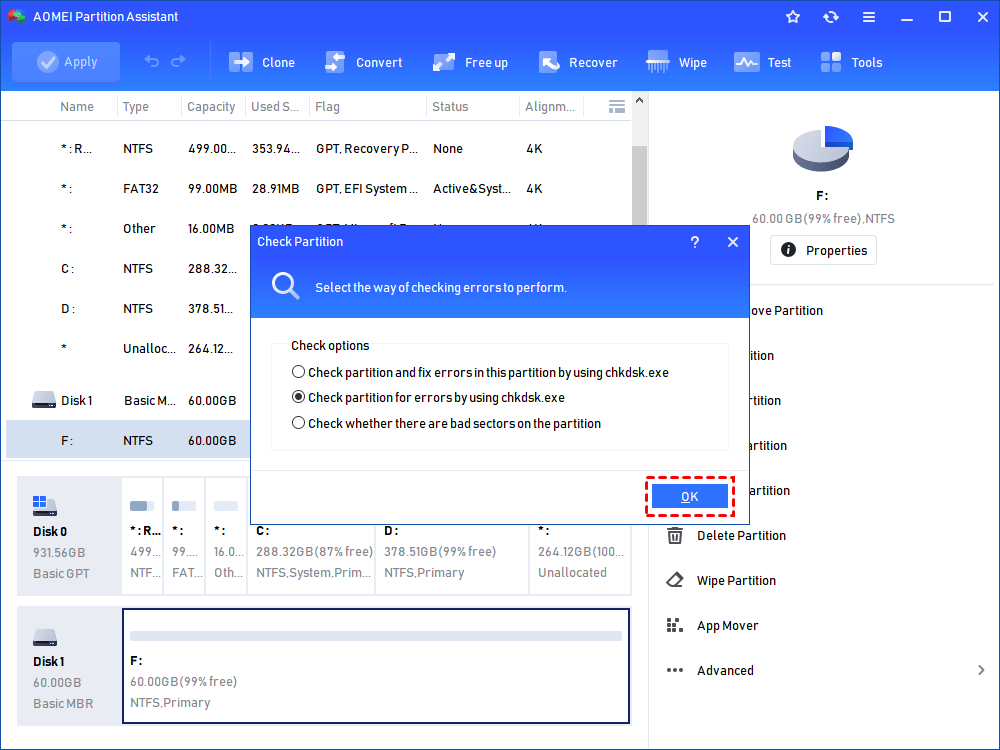
There are 3 ways you can select to perform: check partition and fix errors in this partition by using chkdsk.exe; check the partition for errors by using chkdsk.exe; check whether there are bad sectors on the partition. Select the one as your command.
If the partition you selected is being used by another process, you cannot continue the operation. A window will pop up to tell that you can continue the operation again if this partition is dismounted.
But it will make all the running programs invalid. When asked “would you like to force a dismount on this partition”. click Yes, it will execute the task, click No, it will cancel the operation.
2. Rebuild MBR from boot repair disk
Another way you can try is the "Rebuild MBR" feature in AOMEI Partition Assistant. Once you have successfully logged in, the AOMEI Partition Assistant Standard will begin operating on its own. By right-clicking the system disk that has a faulty MBR and selecting Rebuild MBR from the main interface, you may fix the problem.
Set the type of MBR for Windows 10 in the pop-up window. (Choose a proper MBR type according to your operating system.)
Click Apply and Proceed on the toolbar to commit Rebuild MBR operation.
Conclusion
If you have a boot repair disk for Windows 10 or other Windows systems, you can try to quickly fix Windows boot problems. Some users may not want to choose those complex commands, so we introduce AOMEI Partition Assistant to help you. This tool just requires some clicks, you don't have to worry about any commands. What's more, it has many practical functions for you to try.
Besides the functions we've mentioned, this tool can also extend drive space, recover lost data from disks/drives, move installed apps, clone disks, etc. And the Server edition of this tool supports Windows Server 2025/2022/2019/2016/2012.

