Fixed: BCD Files Not Created Windows Shut Down
If you encountered the BCD files not created Windows shut down issue, you come to the right place. This post explains the causes to it and offers 8 effective ways to solve it.
By Hedy / Updated on November 15, 2024
Why BCD files not created on Windows Shutdown?
The Boot Configuration Data (BCD) file in Windows contains essential boot-related information that the system needs to start up correctly. Ideally, Windows should automatically update and maintain BCD files whenever significant changes happen, such as updating system files or drivers. However, certain factors can prevent the BCD file from being created or updated on shutdown. Here are some common reasons:
1. Fast Startup feature
Windows 10 and 11 use a feature called Fast Startup, which is a hybrid shutdown process that combines a full shutdown with hibernation. With Fast Startup enabled, Windows does not fully shut down; instead, it partially hibernates to speed up the next boot. This process may prevent Windows from writing or updating BCD files because the system assumes it doesn’t need to create or modify them.
2. Corrupted BCD or boot files
The corrupted or missing BCD files or other boot-related files can stop Windows from properly creating or updating the BCD. This could be due to improper shutdowns, malware infections, or hard drive errors. When the BCD becomes corrupted, Windows might skip the file creation process to avoid further issues.
3. Insufficient permissions
BCD files require administrative permissions to create or modify. If the system lacks proper permissions due to group policy changes, file permission errors, or certain security software, Windows might not be able to create or update the BCD file on shutdown.
4. Driver issues
New or incompatible drivers, especially storage and motherboard drivers, can affect how Windows handles the boot and shutdown processes. If these drivers do not properly unload or save settings, they could prevent the BCD files from being generated correctly.
How to fix BCD file creation issues in Windows 11/10/8/7
Fix 1. Check for disk errors with CHKDSK
Before diving into BCD repairs, it’s a good idea to check your hard disk for issues.
Step 1. Boot your system using a Windows Installation Media (USB or DVD).
Step 2. Select Repair your computer on the setup screen.
Step 3. Go to Troubleshoot > Advanced options > Command Prompt.
Step 4. In the Command Prompt, type:
chkdsk C:/f /r

Step 5. Press Enter and let CHKDSK scan for and fix any disk errors.
Fix 2. Use the Bootrec utility to repair BCD
The Bootrec tool is highly useful for fixing boot issues, including BCD errors. Here’s how:
Step 1. Insert your Windows installation USB or DVD and boot your system.
Step 2. Choose Repair your computer > Troubleshoot > Advanced options > Command Prompt.
Step 3. In Command Prompt, type the following command one by one, and press Enter:
bootrec /fixmbr
bootrec /fixboot
bootrec /scanos
bootrec /rebuildbcd

Step 4. This command scans for installed Windows installations and attempts to rebuild the BCD.
Step 5. If the tool finds a Windows installation and asks you to add it to the boot list, type Y (for yes) and press Enter.
Step 6. Once done, restart your computer and see if the issue is resolved.
Fix 3. Manually repair the BCD file
If the Bootrec utility doesn’t fix the problem, you can try manually rebuilding the BCD.
Step 1. Back in Command Prompt, type:
bcdedit /export C:\bcdbackup
Step 2. This command creates a backup of the current BCD configuration.
Step 3. Delete the existing BCD file by typing:
attrib c:\boot\bcd -h -r -s
del c:\boot\bcd
Step 4. Now, recreate the BCD file using the following command:
bootrec /rebuildbcd
Step 5. Restart your system to see if this has resolved the boot issue.
Fix 4. Use System File Checker (SFC) for additional repairs
System File Checker can help repair any corrupted files that might be contributing to the BCD issue.
Step 1. In Command Prompt, type:
sfc /scannow

Step 2. Press Enter and let the scan complete. This command will identify and replace corrupted system files with clean copies.
Step 3. Once the scan is done, restart your computer.
Fix 5. Use DISM to repair Windows image
If SFC doesn’t fully resolve the issue, you can use the Deployment Imaging Service and Management Tool (DISM) for deeper repairs.
Step 1. In Command Prompt, enter the command:
Dism /Online /Cleanup-Image /CheckHealth
Dism /Online /Cleanup-Image /ScanHealth
Dism /Online /Cleanup-Image /RestoreHealth

Step 2. Allow the command to complete. It may take several minutes as it checks for and fixes issues with your Windows image.
Fix 6. Verify BIOS settings
Incorrect BIOS settings can interfere with the boot process, causing BCD errors. Check the following in BIOS:
Step 1. Restart your computer and press the F2, F12, Delete, or similar key to enter BIOS setup.
Step 2. Verify that the boot order is correctly set to boot from the drive where Windows is installed.
Step 3. Ensure UEFI is enabled if Windows was installed in UEFI mode, or Legacy Boot if installed in Legacy mode.
Step 4. Save changes and exit BIOS.
Fix 7. Perform Startup Repair from Windows recovery environment
Windows offers a built-in Startup Repair tool that can fix many common boot issues.
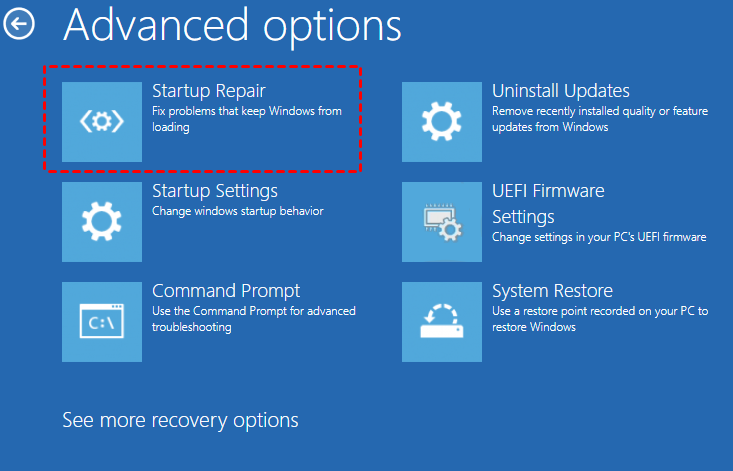
Step 1. .Boot into Windows Recovery by using installation media, then go to Troubleshoot > Advanced options > Startup Repair.
Step 2. Follow the on-screen instructions to let Windows attempt a repair.
Step 3. Restart your system afterward to see if the issue is fixed.
Fix 8. Resort to a third-party boot repair tool
If the above methods fail to resolve your BCD file creation issues, a third-party tool like AOMEI Partition Assistant can be a lifesaver. This powerful software not only helps manage partitions but also includes specialized features for fixing boot issues, including BCD errors. Using AOMEI Partition Assistant’s built-in Boot Repair tool can help you quickly rebuild the BCD file and restore your system to working order without the hassle of manual commands.
Step 1. Install and launch AOMEI Partition Assistant on a working PC. In the main interface, click Tools > Make Bootable Media and follow the wizard to create a Windows 10/11 bootable USB drive.

Step 2. Connect the bootable media created via AOMEI Partition Assistant to the computer with a boot issue and enter BIOS to boot computer from the USB drive.
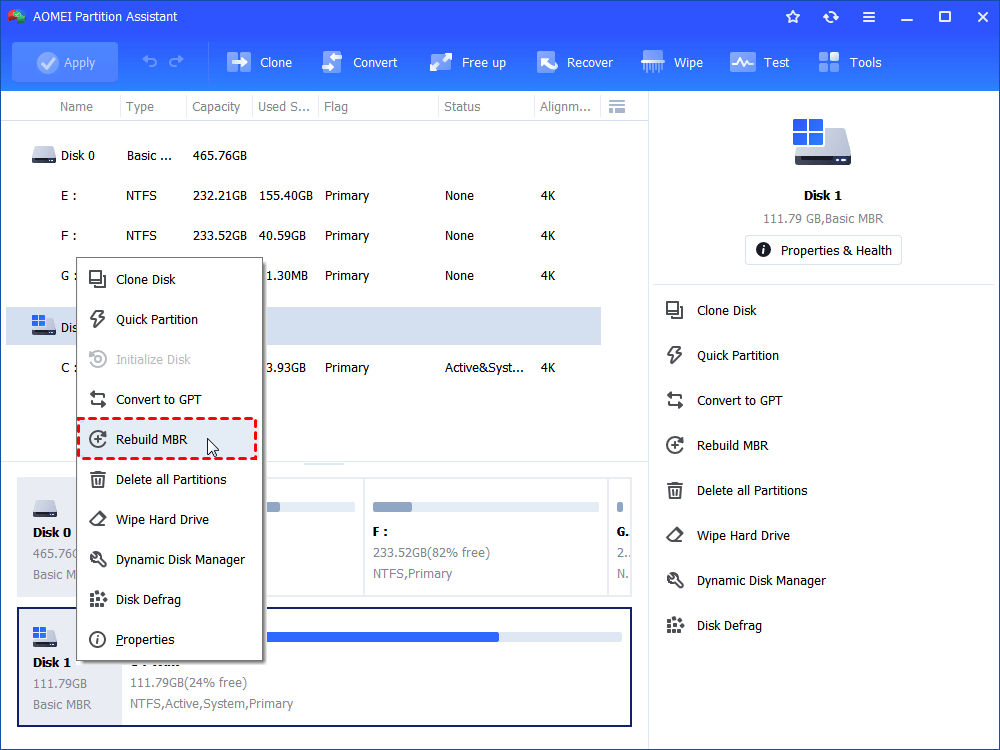
Step 3. Once logged in, the AOMEI Partition Assistant will run automatically. In the main interface, right-click the system disk that contains the corrupted MBR and choose Rebuild MBR.
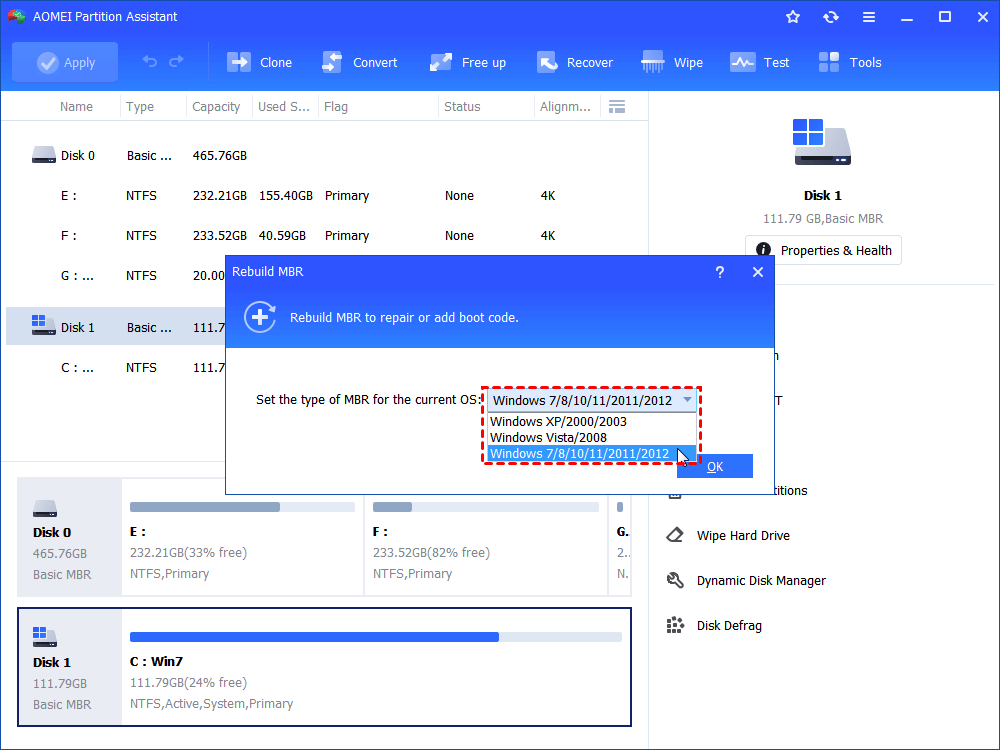
Step 4. Set the type of MBR for Windows 10 in the pop-up window. (Choose a proper MBR type according to your operating system.)
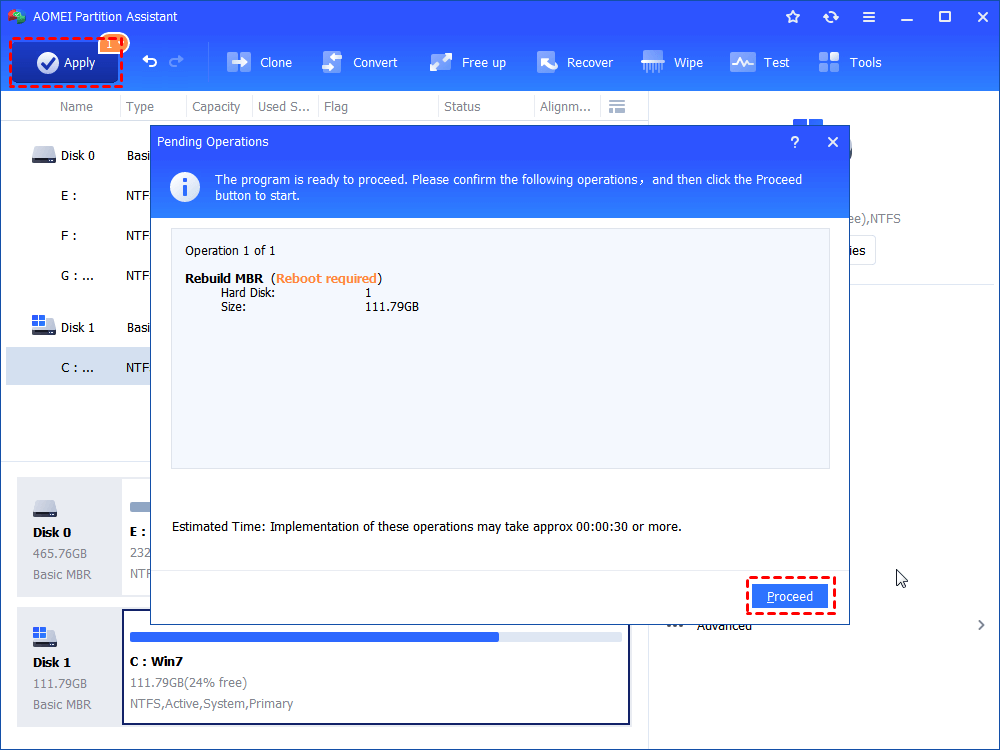
Step 5. Click Apply and Proceed on the toolbar to commit the Rebuild MBR operation.
Conclusion
The BCD file is a critical part of your Windows boot system, ensuring that your computer starts up smoothly and reliably. When Windows fails to create or update the BCD file on shutdown, it often points to issues. By following the troubleshooting steps above, you can address BCD-related issues and get your system back up and running.
If manual methods do not resolve the problem, consider leveraging a dedicated tool like AOMEI Partition Assistant. Its Boot Repair feature can streamline the repair process, quickly rebuilding the BCD file and restoring your system to normal operation.