How to setup network in Windows 11
In this guide, we delve into the intricacies of setting up a network on Windows 11, exploring essential steps, troubleshooting tips, and best practices to ensure seamless connectivity.
By Hedy / Updated on September 3, 2024
About Windows network setup
Setting up a Windows network involves configuring various components to enable devices to communicate and share resources such as files, printers, and internet connections. This process typically includes establishing network connections, configuring network settings, and ensuring proper security measures are in place to protect data and devices from unauthorized access. Windows provides tools and settings that allow users to manage network connections, set up shared folders, and configure network adapters to connect to different types of networks (such as wired or wireless).
Additionally, Windows offers options for network discovery and sharing that enable devices within the same network to find each other and access shared resources seamlessly. Efficient network setup ensures smooth communication and collaboration among devices within a networked environment.
How to setup network in Windows 11
1. Hardware Setup:
Network Devices: Ensure all devices (computers, printers, routers, switches) are powered on and connected to the network.
Cabling: Use Ethernet cables or ensure Wi-Fi connections are stable and configured correctly.
2. Network Sharing Settings:
Network Location: Windows categorizes networks into Public, Private, or Domain. Private networks allow for easier sharing of files and devices.
To change network location:
Go to Settings > Network & Internet > Status > Change connection properties.
Set network profile to Private if it's a home or work network.
3. File and Printer Sharing:
Sharing Files:
Right-click the folder or drive you want to share.
Select Properties > Sharing > Advanced Sharing > Share this folder.
Adjust permissions as needed.
Sharing Printers:
Connect the printer to one computer on the network.
Go to Settings > Devices > Printers & scanners.
Click Add a printer or scanner and follow prompts to share the printer.
4. Network Discovery and Connections:
Ensure network discovery is enabled:
Go to Settings > Network & Internet > Sharing options.
Turn on Network discovery and File and printer sharing.
Connect to shared resources:
Open File Explorer and click Network to see other computers and devices on the network.
5. Firewall and Security:
Windows Firewall may block file and printer sharing. Adjust settings:
Go to Control Panel > System and Security > Windows Defender Firewall > Allow an app or feature through Windows Defender Firewall.
Ensure File and Printer Sharing is checked for private networks.
6. Troubleshooting:
Network Troubleshooter: Use Windows' built-in troubleshooter to diagnose and fix common network problems.
Go to Settings > Update & Security > Troubleshoot > Internet Connections or Network Adapter.
Check Network Connections: Ensure cables (if applicable) are securely plugged in and Wi-Fi connections are stable.
7. Advanced Settings (Optional):
HomeGroup (Deprecated in newer versions): Previously used for easier file sharing, it's been replaced with direct sharing methods.
Network Drive Mapping: Map network drives for easier access to shared folders.
Right-click This PC > Map network drive.
How to Manage Windows 11 Better After Setting up Network
Managing Windows 11 efficiently after setting up your network is crucial for maintaining optimal system performance and ensuring that your data is well-organized. AOMEI Partition Assistant is a powerful tool that can help you manage your partitions, optimize your storage, and enhance your system’s performance. In this guide, we'll walk you through the best practices for managing Windows 11 using AOMEI Partition Assistant after configuring your network.
Using AOMEI Partition Assistant brings several benefits to your Windows 11 management:
- Easy Partition Management: Resize, merge, or split partitions without losing data.
- Enhanced System Performance: Align partitions to improve disk performance.
- Secure Data Management: Safeguard your data during partition operations.
- Seamless OS Migration: Migrate your OS to SSD without reinstalling Windows.
- Recovery Options: Recover lost or deleted partitions easily.
The Best Windows Disk Partition Manager and PC Optimizer
1. Optimize Your System Partition
After setting up your network, the first step in managing your Windows 11 is to optimize your system partition. This can help in speeding up your system boot time and overall performance.
Step 1. Right-click on your system partition (usually C:) and select “Advanced.”
Step 2. Click on “Align Partition” to align your partition for better performance, especially if you are using an SSD.
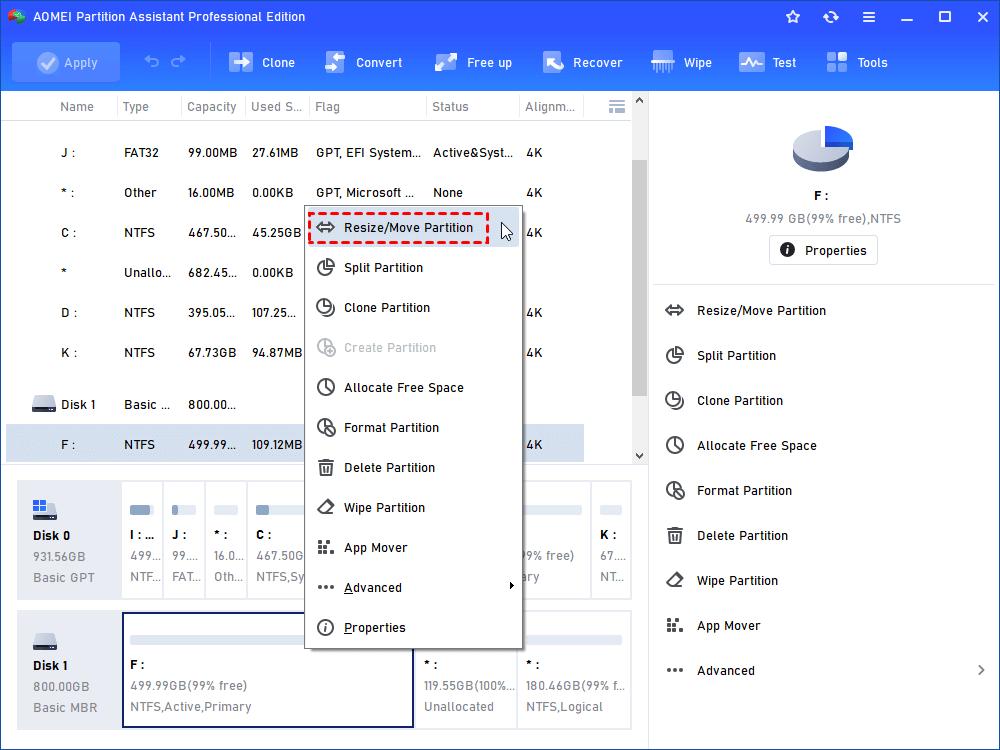
2. Resize Partitions to Allocate Space Efficiently
Efficient use of disk space is crucial for smooth performance. You can resize partitions to allocate more space to your system partition or other partitions as needed.
Step 1. Right-click on the partition you want to resize and select “Resize/Move Partition.”
Step 2. Drag the slider to adjust the partition size or enter the exact amount of space you want to allocate.
Step 3. Click “OK” and then “Apply” to execute the changes.
3. Merge Partitions for Better Space Management
Merging partitions can help in consolidating free space and managing your files more efficiently. This is particularly useful if you have multiple small partitions.
Step 1. Right-click on the partition you want to merge and select “Merge Partitions.”
Step 2. Choose the partition you want to merge it with and click “OK.”
Step 3. Click “Apply” to save the changes.

4. Split Partitions to Organize Data Better
If you have a large partition and need to organize your data better, you can split it into smaller partitions.
Step 1. Right-click on the partition you want to split and select “Split Partition.”
Step 2. Specify the size of the new partition and click “OK.”
Step 3. Click “Apply” to complete the process.
5. Create New Partitions for Specific Uses
Creating new partitions can help in organizing your files, such as separating your work files from personal data.
Step 1. Right-click on unallocated space and select “Create Partition.”
Step 2. Set the partition size, file system (NTFS, FAT32, etc.), and partition label.
Step 3. Click “OK” and then “Apply” to create the new partition.
6. Migrate OS to SSD for Faster Performance
If you want to boost your system’s speed, consider migrating your OS to an SSD using AOMEI Partition Assistant.
Step 1. Click on “Migrate OS to SSD” from the left panel.
Step 2. Select the target SSD and follow the prompts to complete the migration.

Managing your Windows 11 system with AOMEI Partition Assistant after setting up your network can significantly enhance your system’s performance and ensure your data is well-organized. From resizing partitions to migrating your OS, this tool provides comprehensive solutions for all your disk management needs. By following these steps, you can maintain a clean, efficient, and well-organized system, ensuring your Windows 11 experience is smooth and hassle-free.
FAQs
What are the minimum system requirements for setting up a network on Windows 11?
Windows 11 requires a compatible network adapter and recommended system specifications for optimal performance.
How do I back up my network settings on Windows 11?
You can export network profiles using built-in tools in the Network and Sharing Center.
What should I do if I forget my Wi-Fi network password on Windows 11?
You can retrieve saved Wi-Fi passwords through the Control Panel or using command-line utilities.
Can I set up a VPN connection on Windows 11?
Yes, Windows 11 supports VPN configurations through its network settings for enhanced privacy and security.
How often should I update my network drivers on Windows 11?
It's advisable to check for driver updates periodically to ensure compatibility and performance improvements.
Conclusion
Setting up a Windows network involves configuring devices to share files and printers securely. Ensure all devices are connected and categorized correctly (Public, Private, or Domain) for sharing permissions. Enable network discovery and adjust firewall settings to allow file and printer sharing. Use Windows Troubleshooter for problem diagnosis and keep systems updated for security. This setup promotes seamless communication and resource sharing among connected devices.