Stepwidse Guide: Download Windows 10 to a USB Drive
This guide provides a comprehensive walkthrough on downloading and preparing Windows 10 for installation on a USB drive.
By Irene / Updated on July 12, 2024
Want to make a Windows 10 working USB but don't know any of the steps? Don't look any further. In this help, we'll show you how to do it step by step. With our simple steps, you can say goodbye to hard steps and hello to easy operation.

How to do Windows 10 thumb drive download?
When upgrading to Windows 10, you will get a lot of new features and better things, but before you have to create a USB file that works well, whether you are using Windows for the first time or you are upgrading from previous versions, you will need to make sure your USB drive works fine. In this process, it is easy and does not require much technical knowledge if you want to build a USB drive that can activate Windows 10. Please follow these simple steps.
1. Necessary Preparations
Before we begin, let's gather the materials needed for creating a Windows 10 bootable USB drive:
- A USB flash drive with at least 8GB of storage capacity.
- A Windows 10 ISO file downloaded from the official Microsoft website.
- A reliable USB creation tool such as Rufus or the Windows Media Creation Tool.
Now that we have everything we need let's proceed to the next steps.
2. Formatting the USB Drive
To ensure compatibility and proper functioning, it's essential to format the USB drive correctly. Follow these steps to format the USB drive:
- Insert the USB flash drive into an available USB port on your computer.
- Open Disk Management by right-clicking on the Start menu and selecting "Disk Management."
- Locate your USB drive in the list of available drives, right-click on it, and select "Format."
- Choose the file system as "FAT32" and leave the allocation unit size as "Default." If you are using NTFS, you can also convert NTFS to FAT32 without formatting on the USB stick.
- Click "OK" to start the formatting process.
Once the formatting is complete, you're ready to proceed to the next step.
3. Creating the Bootable USB Drive
Now that we've formatted the USB drive let's create the bootable USB drive using the Windows Media Creation Tool:
- Download and install the Windows Media Creation Tool from the official Microsoft website.
- Launch the Windows Media Creation Tool and accept the terms and conditions.
- Select "Create installation media for another PC" and click "Next."
- Choose the language, edition, and architecture for Windows 10 and click "Next."
- Select "USB flash drive" as the media type and insert your formatted USB drive.
- Follow the on-screen instructions to create the bootable USB drive.
Once the process is complete, you'll have a bootable USB drive ready for Windows 10 installation.
4. Installing Windows 10
With the bootable USB drive prepared, it's time to install Windows 10:
- Insert the bootable USB drive into the computer where you want to install Windows 10.
- Restart the computer and access the BIOS or UEFI settings by pressing the designated key (usually F2 or Del) during startup.
- In the BIOS or UEFI settings, set the USB drive as the primary boot device.
- Save the changes and exit the BIOS or UEFI settings to restart the computer.
- Follow the on-screen instructions to complete the Windows 10 installation process.
Congratulations! You've successfully created a bootable USB drive for installing Windows 10.
How to create a bootable USB in Windows 10/8/7
In the last section, we have mentioned that AOMEI Partition Assistant provides can make a bootable USB drive. Here we will take how to make a bootable USB from ISO as an example.
Preparation work:
① Prepare an empty USB drive. To speed up the process, a USB 3.0 drive and computer with a USB3.0 port are recommended.
② Download the Windows ISO files from the Microsoft official site.
③ You can download the AOMEI Partition Assistant first and give it a try.
The Best Windows Disk Partition Manager and PC Optimizer
Step 1. Plug the prepared USB drive in your Windows 10 computer and verify it is detected successfully. Run AOMEI Partition Assistant Professional. Click “Tools” in the top toolbar, and choose “Windows To Go Creator”.

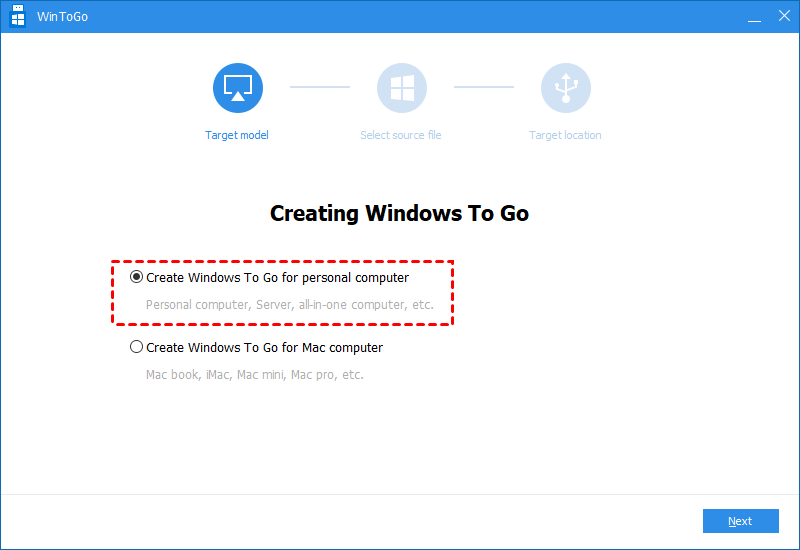
Step 2. Here we choose the first option "Create Windows ToGo for personal computer".
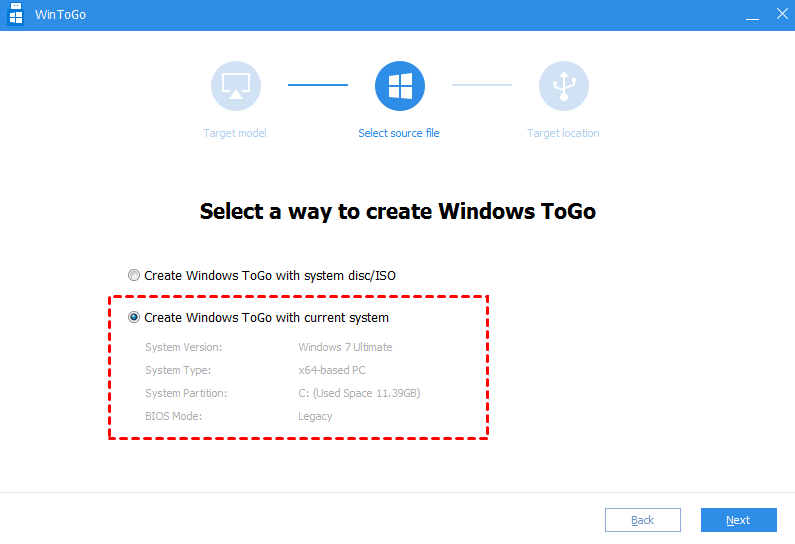
Step 3. Choose "Create Windows ToGo with system disc/ISO" and select the prepared ISO files, then hit on "Next".

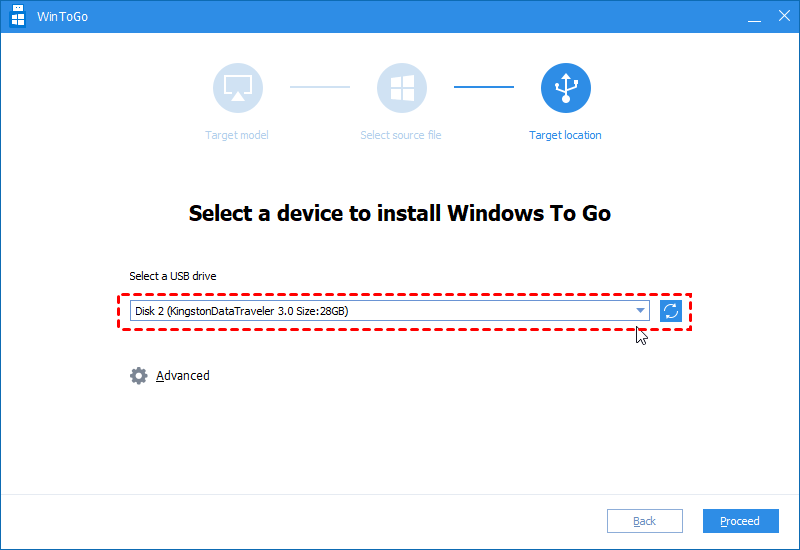
Step 4. In the subsequent window, choose the USB you plan to use. Then click the "Proceed" option to start making a bootable USB from ISO.
If you have don’t have prepared Windows ISO files, you can choose the second method in "Step 3" to create Windows bootable USB with current system.
Conclusion
Bootable USB drives are essential to modern computing due to their portability, mobility, and ability to boot from USB devices rather than CDs. Fixing machines, installing OSes properly, and transferring portable OS environments are their strengths. With AOMEI Partition Assistant, users may simply build bootable USB devices for a variety of tasks. Bootable USB devices make installing, maintaining, and recovering computers easier than ever for personal and business usage.
FAQs
-
What is a bootable USB drive?
- A bootable USB drive is a USB flash drive that contains an operating system or other software that can be run or installed on a computer, replacing the need for traditional boot drives like CDs or DVDs.
-
Why should I use a bootable USB drive instead of a traditional disk?
- Bootable USB drives are portable, easy to use, and faster, especially when using USB 3.0. They are also more durable and less prone to damage compared to traditional disks.
-
How do I create a bootable USB drive using AOMEI Partition Assistant?
- First, prepare an empty USB drive and download the Windows ISO file from the official Microsoft site. Then, plug the USB drive into your computer, open AOMEI Partition Assistant, and use the "Windows To Go Creator" tool to create the bootable USB drive.
-
What are the system requirements for creating a bootable USB drive?
- You need a USB drive (preferably USB 3.0), a computer with a USB 3.0 port, and the appropriate Windows ISO files. AOMEI Partition Assistant can run on Windows 11/10/8.1/8/7.
-
Can I create a bootable USB drive without an ISO file?
- Yes, AOMEI Partition Assistant allows you to create a bootable USB drive using your current system if you do not have a prepared ISO file. This option is available in the "Windows To Go Creator" tool.

