Make A Partition Size Larger than 2TB without Data Loss
How to make a partition size larger than 2TB? In this post, you'll learn why you need a partition larger than 2TB and how to break the 2TB limit with help of third-party software.
By Michael / Updated on May 12, 2023
How can I make a partition size larger than 2 TB?
“When I first get my Lenovo laptop, I set the partition style as MBR. Recently, I replace the PC hard disk to a new 4 TB SSD, and still set it as MBR. But when I want to make a partition larger than 2 TB, I found the disk space only shows 2 TB disk space, where is the remain space? Why can’t I see the whole 4 TB disk space? Thanks for your help.”
Why need a partition bigger than 2TB?
At the present, under the influence of information explosion, most people have a high requirement about storage capacity. Especially for those server, which need to deal with more and more data.
In the past, people may only configure a hardware RAID container. But now, they need more hard disks, and the size of these disks need to be as large as possible. With the advent of the hard drive larger than 2TB, many users prefer to create a partition larger than 2TB. Because software and apps become bigger and bigger, and they always eat up storage space fast.
How to make a partition size larger than 2TB?
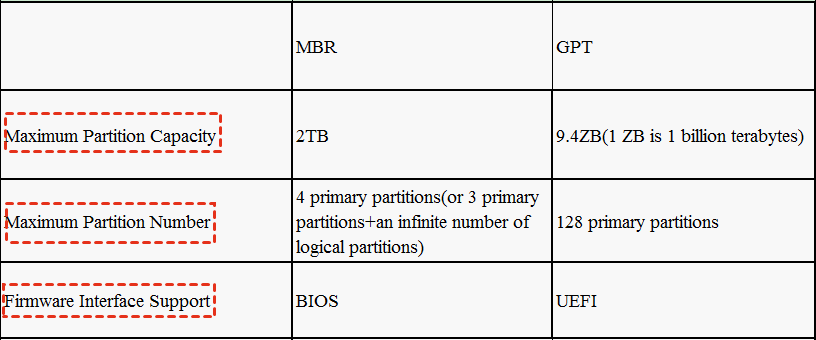
When people first get a PC, they would be asked to set the partition style. There are two partition styles: MBR and GPT, they are quite different in several aspects.
MBR is an old-style, it can record all information on the hard disk. When it is damaged, all information about the PC will lose. Then you need to rebuild it to regain the right to access stored data on your PC. MBR only allows for a partition size less than 2 TB and for only 4 primary partitions. It serves for BIOS firmware interface.
GPT is the new partition style, it is developed to overcome these limits you may meet in MBR. When you set the partition style as GPT, you can create the partitions larger than 2 TB. Besides, it supports you to create up to 128 primary partitions.
If there’s no size and amount limitation to create partitions, it can be a good thing. However, not all machines support a partition larger than 2TB at the beginning. Some changes must be made.
So, if you want to make your partition size larger than 2TB, the first thing you should change is converting MBR to GPT. Besides, according to the announcement of Microsoft, if you upgrade Windows 10 to Windows 11 with the "Check for Update" feature, GPT and UEFI is required.
If the disk you want to convert contains the installed system, please make sure that your system firmware is using UEFI (Unified Extensible Firmware Interface). The GPT boot function is available on your computer or server. When everything is ready, let’s turn to the next part to convert MBR to GPT.
3 basic methods to covert MBR to GPT
If you want to make a partition size larger than 2 TB, its important to convert the partition style from MBR to GPT. Here, you can try 3 Windows built-in tool to perform it.
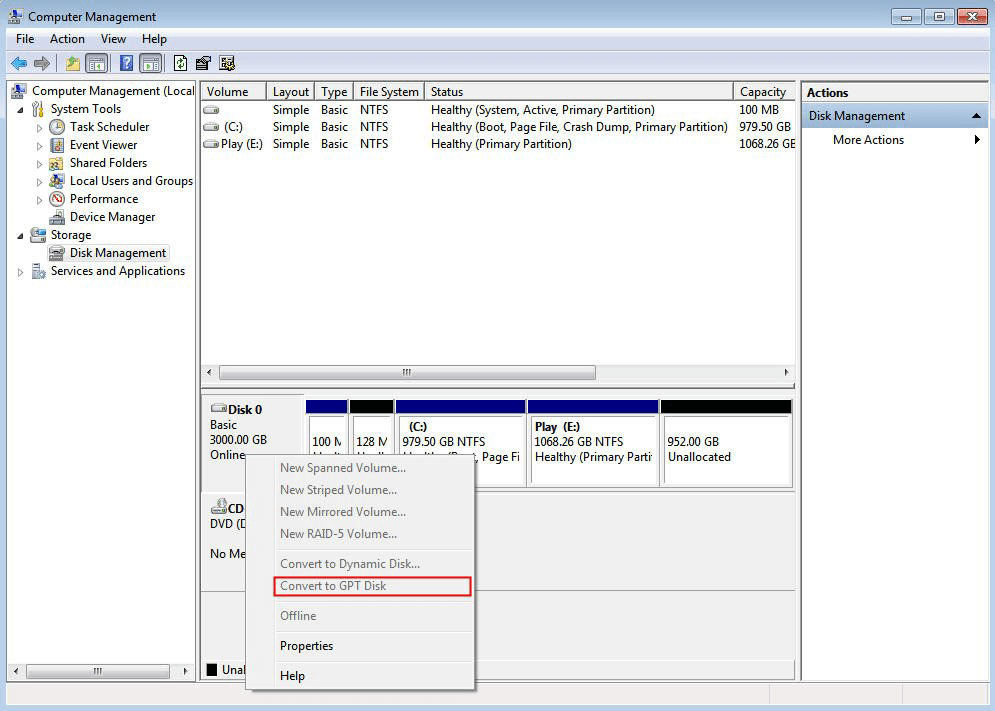
★ Method 1. Convert MBR to GPT with Disk Management
First, you can try Disk Management to covert your hard drive to GPR. Before the task, you’ll be asked to delete the partitions on your hard drive. Let’s see how it works.
Step 1. Open “This PC”, then click “Manage” and “Disk Management”. Right-click the partitions on your hard drive and select "Delete Volume" to delete the partitions one by one.

Step 2. When all partitions on your disk are deleted, right-click the hard disk and click "Convert to GPT Disk". Wait for a while, then the MBR to GPT conversion will be finished.
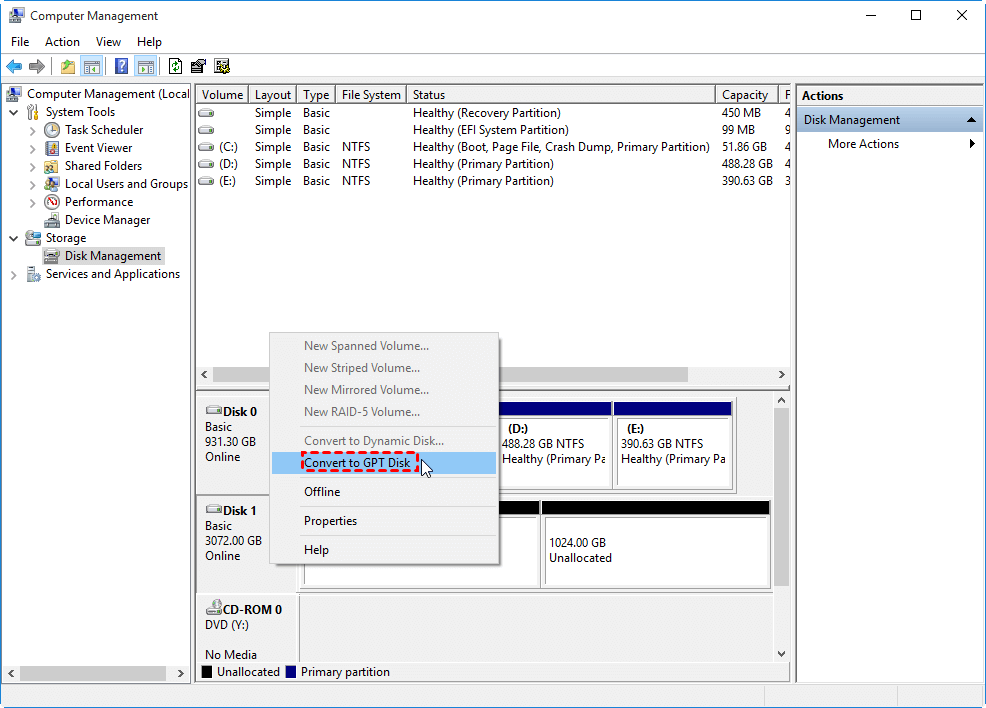
If “Convert to GPT Disk” is greyed out, you need to check whether have deleted all partitions on the target hard disk.
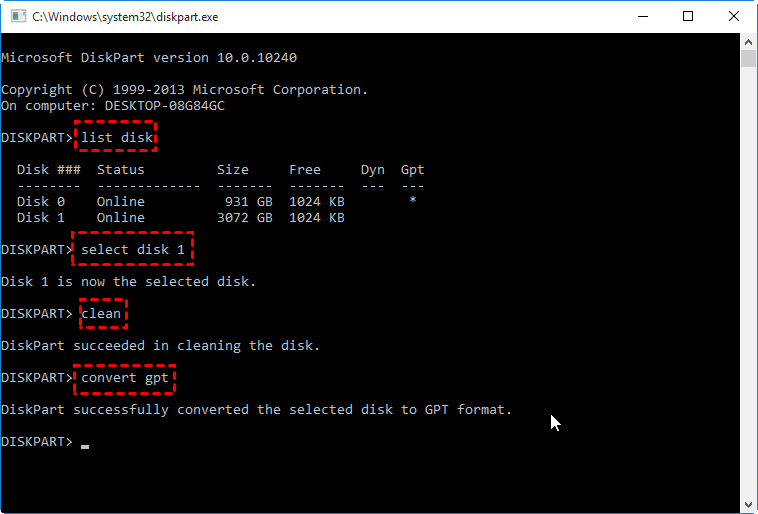
★ Method 2. Convert MBR to GPT with Diskpart
Being similar to Disk Management, Diskpart can also word as a disk manager. Besides, it can also convert MBR to GPT with the “convert gpt” command. The detailed steps are as follows.
Step 1. Press "Windows" button, then type "diskpart" and press “enter” to run the diskpart.exe program.
Step 2. When the Diskpart tool is turned on, input the commands below and hit “Enter” each time to convert MBR to GPR.
• list disk (Let the info of all hard disks appear.)
• disk * (Select the disk you want to convert. "*" represents the sequence number of the target disk.)
• clean (Delete all partitions on the hard disk.)
• convert gpt (Convert the MBR disk to GPT.)
★ Method 3. Convert MBR to GPT with MBR2GPT.exe
MBR2GPT.exe is another built-in tool, it can perform MBR to GPT conversion without causing any data lose. If you know well about PC, it can be a nice method. Here are the process of using it.
Note: The computer OS should be higher than Windows 10 version 1730, or this method will be useless.
Step 1. On the PC sign-in screen, click “Start” and “Power”, click “Restart” while holding the “Shift” key to open Advanced Startup.
Step 2. Select "Troubleshoot”, “Advanced options” and “Command Prompt” in order to run CMD program.
Step 3. In Command Prompt, input the commands below and press “Enter” each time.
• mbr2gpt /validate
• mbr2gpt /convert
Convert MBR to GPT without Losing Data
Apart from the Disk Management, Diskpart and MBR2GPT.exe mentioned before, you have a much easier choice to convert MBR to GPT: AOMEI Partition Assistant Professional. Since all existing partitions should be deleted when you convert with built-in tool, so there’ll be severe data loss. In this case, I recommend the AOMEI product.
With this AOMEI software, you can easily convert MBR to GPT or GPT to MBR in only a few clicks without any data loss. Meanwhile, other features like NTFS to FAT32 conversion, dynamic to basic disk conversion, and primary drive to logical drive conversion are also available.
How to create a partition larger than 2TB on Windows 11/10/8.1/8/7/Vista/XP? First, you should convert MBR to GPT. To get it done, please try the best disk manager on the market!
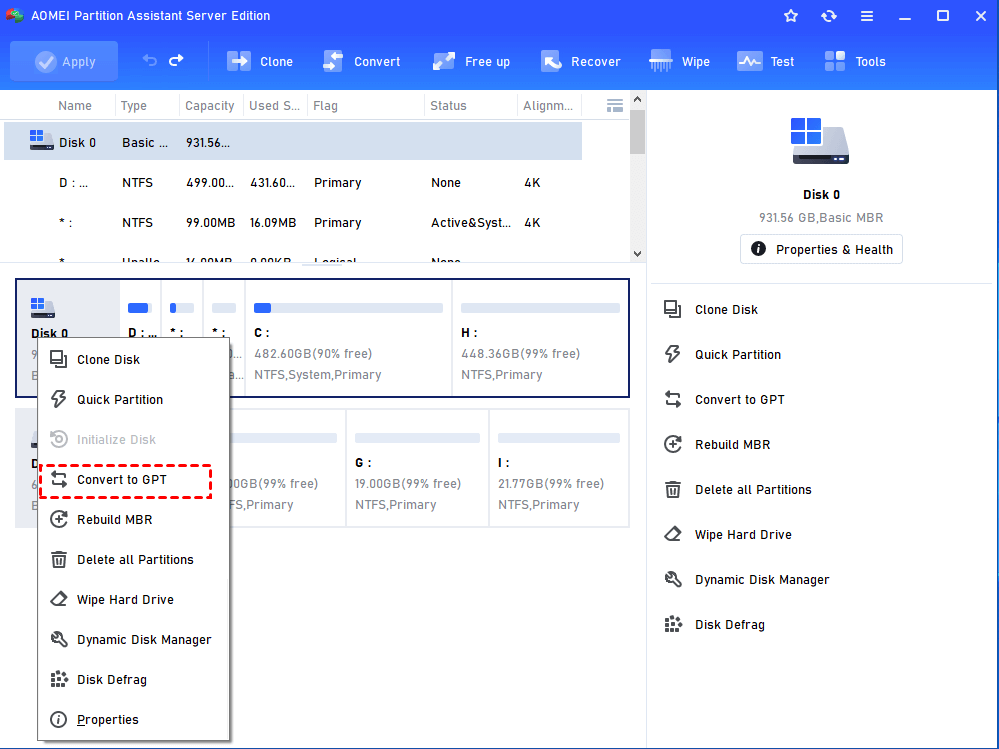
Step 1. Install and launch AOMEI Partition Assistant Server, click on the hard disk you want to convert and choose "Convert to GPT" from the right column or right-click the disk and select “Convert to GPT”.
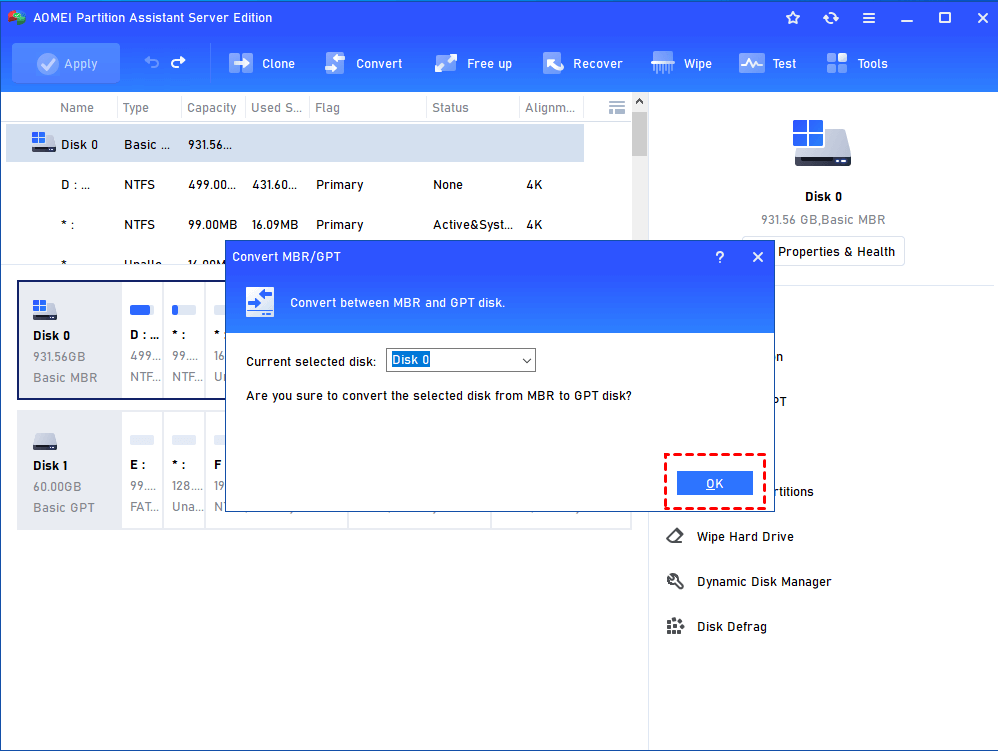
Step 2. Hit “OK” to confirm the next operation.
Step 3. Hit “Apply” where the screenshot shows to commit the pending operation.
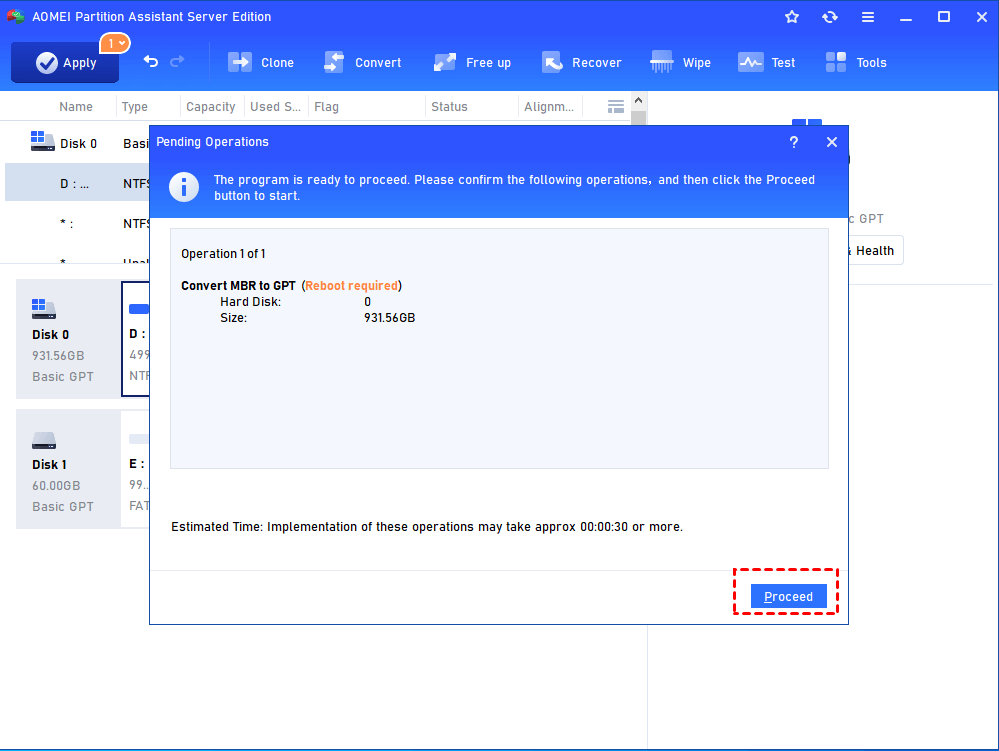
Wait a short while before it’s completed.
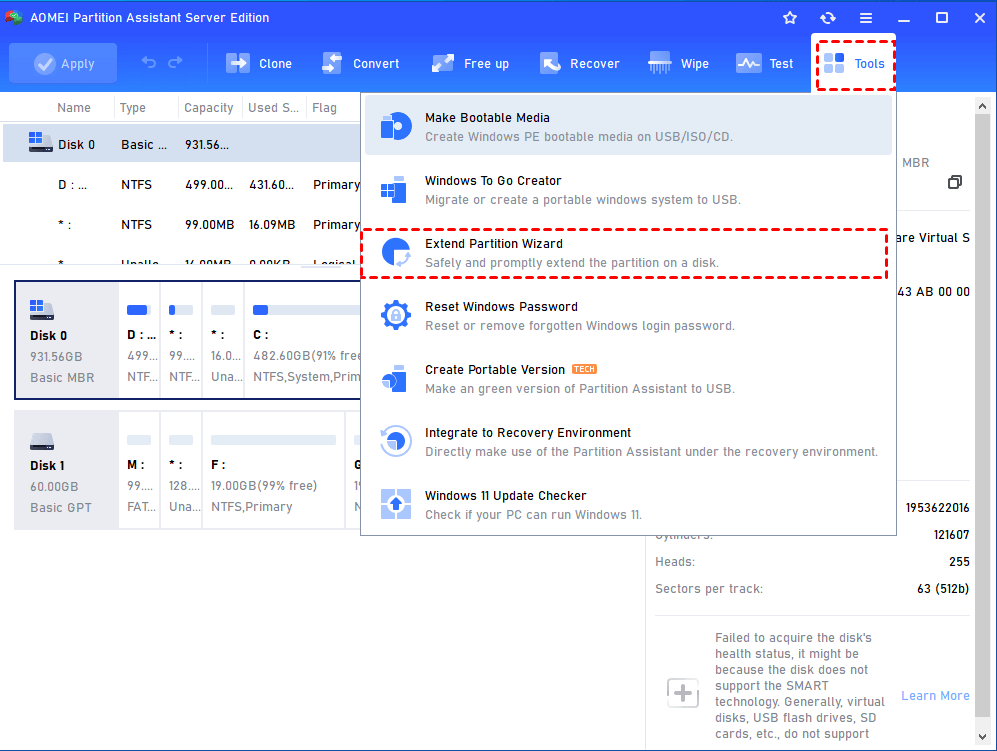
After you have converted your disk to GPT, you can extend your partition to larger than 2TB now. You can still use AOMEI Partition Assistant. The difference is using another function - “Extend Partition Wizard”.
Conclusion
How do I make my partition bigger than 2TB? In this post, you learned under what circumstance could you create a partition bigger than 2TB. We shared 4 methods for you to convert MBR to GPT. If you wish to convert MBR to GPT, you’d better try the Server Edition.