How to Change GPT Partition to NTFS without Data Loss?
When you install Windows, sometimes, you could be prompted that the selected disk is of the GPT partition style and Windows must be installed to a partition formatted as NTFS or you can’t finish the installation. How to change GPT partitions to NTFS? In this post, you’ll learn to get it done without data loss.
By Michael / Updated on May 12, 2023
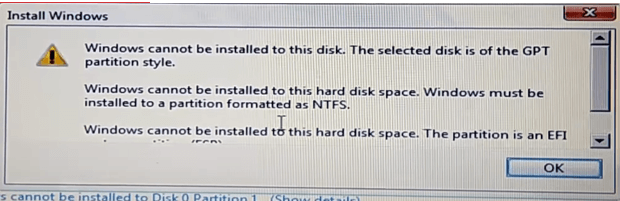
The GPT NTFS error in Windows installation
Windows installation can be complex without professional skills especially when some errors occur. For example, sometimes, you could be prompted that “Windows cannot be installed to this disk. The selected disk is of the GPT partition style and Windows must be installed to a partition formatted as NTFS” when you try installing OS. In this case, “How to change GPT partition to NTFS” becomes a core question for those users since they can’t proceed with the installation until the issue is resolved. So, in the following paragraphs, an easy way will be provided to help change the GPT partition to NTFS without data loss once for all.
Overview of GPT and NTFS
How to convert GPT partition to NTFS? This bothers most of the people who encounter the problem mentioned above. However, GPT and NTFS are 2 items that belong to 2 different categories. GPT is a partition style while NTFS is a file system and thus, you can’t make conversion between GPT and NTFS. A hard disk is usually partitioned in either MBR or GPT while a partition is often formatted as NTFS or FAT32. So, actually, to resolve the problem, what you need to do is not to change GPT to NTFS but to change GPT to MBR and convert FAT32 to NTFS.
How to change GPT partition style to NTFS in CMD?
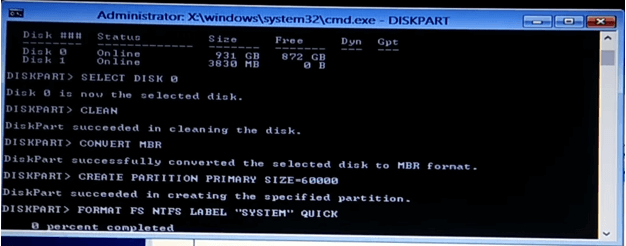
To resolve the GPT NTFS error when installation Windows, you need to convert the GPT disk to MBR first and then, format the partition as NTFS. But how when the operating system hasn’t been installed? Here, you can use DiskPart, which is a Windows built-in utility for disk management. DiskPart is able to perform many operations including partition deletion, partition creation, GPT MBR conversion, and partition formatting once you input corresponding commands.
1. When the GPT MBR error appears during Windows installation, press SHIFT+F10 simultaneously to bring up CMD.
2. In the CMD windows, type “diskpart” and hit “ENTER”.
3. Type “list” disk and hit “ENTER”.
4. Type “select disk *” and hit “ENTER”. “*” represents the sequence number of the disk you want to convert.
5. Type “clean” and hit “ENTER” to delete all existing partitions on the target disk.
6. Now, type “convert mbr” and hit “ENTER” to change GPT to MBR.
7. Type “CREATE PARTITION PRIMARY SIZE=nn”. Here, nn is the size in MB, you can create any size based on your own requirement. Here, I create 60000MB.
8. Type “FORMAT FS NTFS LABEL “SYSTEM” QUICK” and hit “ENTER” to format the partition as NTFS.
Wait a few minutes before a GPT disk and an NTFS partition get created.
How to change GPT partition style without data loss?
Previously, you’ve learnt that with CMD DiskPart, you can change GPT partition style to MBR via inputting corresponding command lines. However, to make this method work, you have to delete all partitions on the target disk beforehand which causes severe data loss. So, this time, I recommend another alternative to get it done without data loss.
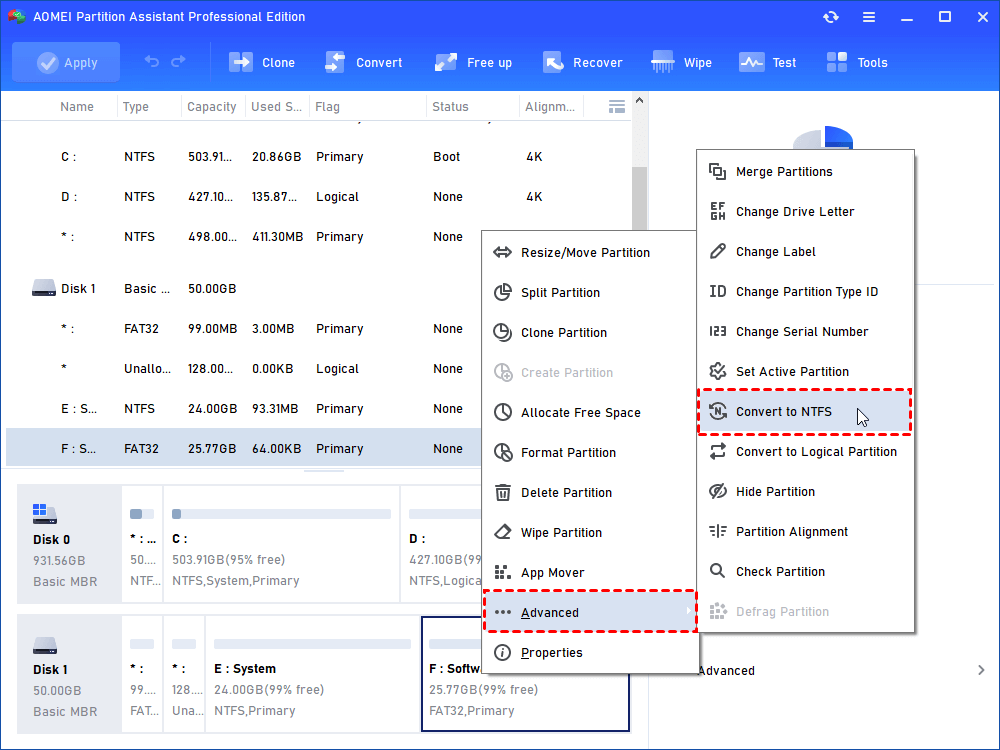
AOMEI Partition Assistant Professional is an all-in-one software utility that majors in disk management. Its built-in GPT-MBR converter helps convert between these 2 partition styles without the need to delete anything. Besides, there’re some more powerful features including primary disk to logical disk conversion and OS to SSD migration.
Free download the demo to have a try.
Step 1. Because Windows hasn’t been installed when you encounter the GPT NTFS error, you can’t normally use the software from the desktop as usual. In this case, you need to make a bootable USB for the software.

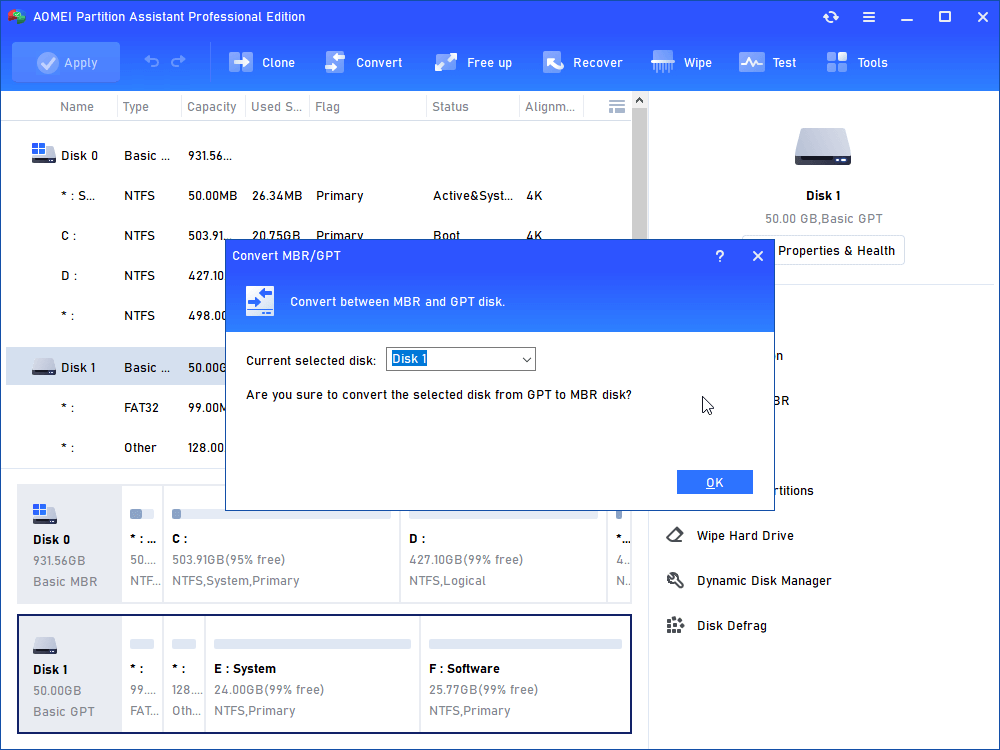
Step 2. Boot your PC from the bootable USB and run AOMEI Partition Assistant Professional. Right-click on the disk where Windows is going to be installed and select “Convert to MBR”.

Step 3. Confirm the operation by clicking on “OK”
Step 4. Click on “Apply” where the screenshot shows to commit the pending operation.
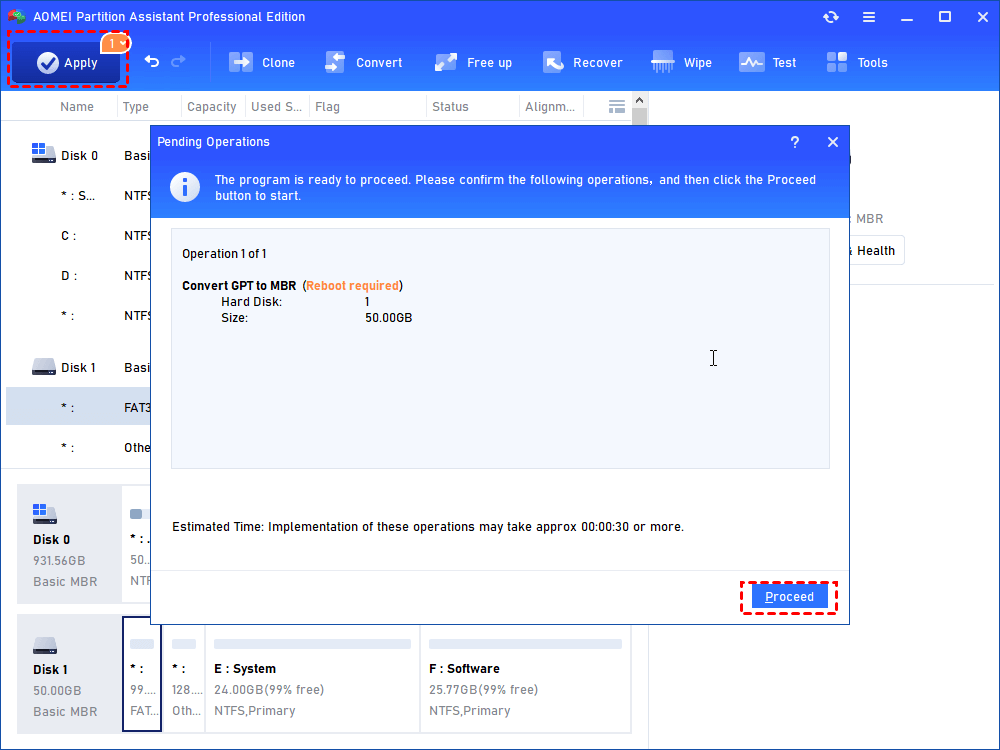
In a short while, the GPT disk will be converted to MBR and then, you can continue to use this program to convert the FAT32 partition to NTFS.
Conclusion
How to change GPT partition to NTFS without data loss? Traditionally, one can make the change with CMD DiskPart. However, in this way, you have to delete all existing partitions on the target disk beforehand which causes severe data loss. So, as an alternative, AOMEI Partition Assistant Professional comes. With it, you can convert GPT partition to NTFS in only a few clicks and you don’t need to delete anything during the process. If you want to use this software on Servers, you can try the Server edition.