[Easy Guide] Upgrade Windows 7 System Hard Drive Without Reinstalling
Need to upgrade Windows 7 system hard drive, but don't want to reinstall everything? Here the professional AOMEI Partition Assistant can help you to upgrade Windows 7 system disk to another HDD or SSD without a fresh clean reinstallation.
By Emily / Updated on August 1, 2024
When need to upgrade Windows 7 system hard drive?
"I suspect that the hard drive that contains my Windows 7 operating system is likely to fail soon. So now I am planning to upgrade Windows 7 system disk to a new hard drive in case that everything will get lost once the system disk completely fails someday. But I am not keen on reinstalling the OS onto the new disk, which requires much time and effort. So is there any way to transfer the current Windows 7 system hard drive to another one without reinstallation?"
The Windows 7 OS hard drive is about to fail and needs to be replaced with a new one? The current system disk is almost full and you plan to upgrade it to a larger one? Or the Windows 7 runs quite slowly on the traditional mechanical hard disk drive (HDD) and you desire to upgrade it to an SSD drive? In any situation, you can clean reinstall Win 7 on the new HDD or SSD. However, that will cost you lots of time and energy, especially for those who don’t have much computer knowledge.
Therefore, most users are searching for a method to upgrade Windows 7 system hard drive without reinstalling OS and applications. Luckily, you can achieve that by cloning the entire OS system disk to another one, which transfers everything from the source location to the destination one and ensure they can work as they did in the source disk. Then what’s the best software to upgrade Windows 7 hard drive by disk clone?
Upgrade Windows 7 system disk without reinstalling
If you have decided to upgrade Windows 7 boot hard disk to a new one by cloning the disk, you can try a partition manager called AOMEI Partition Assistant Standard Professional. This software comes with the “Disk Clone Wizard” to help Windows PC users clone hard disk drive, solid-state drive, USB flash drive, SD card, and other types of storage device to another one. So, it is a great choice to clone Windows 7 hard drive to another new one, no matter it is an SSD or HDD.
Besides, it allows you to upgrade Windows 7 boot hard drive to a smaller disk by only cloning the used sectors to the destination disk via “Clone Disk Quickly”, a bonus for users who wish to upgrade a larger Windows 7 hard drive to a smaller SSD. which can help you upgrade Windows hard drive and ensure the destination disk is bootable afterward. You can click the button below to download the software.
5 Steps to transfer Windows 7 to another drive for upgrade
Now you can check the following steps to learn how to upgrade Windows 7 system hard drive to another hard drive. The same method is also proper for upgrading Windows 8, Windows 10 or Windows 11 system disk. Before proceeding, please take a look at the below tips:
- You should back up anything required on the destination disk because all the data will be deleted in the process.
- If you are cloning Windows 7 system hard drive to a smaller hard drive, you can remove unnecessary apps or personal data on the source disk to make the used space much smaller to fit the destination disk.
Step 1. Install and launch AOMEI Partition Assistant, click "Clone" in the main interface, and select "Clone Disk".

Step 2. Choose the hard disk that you need to clone as the source disk and click "Next".

Step 3. Select another drive as the destination disk, and then click "Next".

Step 4. Then, you can check the source and destination disk in the next window or change to "Sector to Sector clone", and click the "Confirm" button to continue if there is no problem.

Here, you can also click the "Settings" button to adjust the partition size on the destination disk or tick "4k alignment" to improve the reading and writing speed of the SSD.

Step 6. You can preview the disk cloning operation by viewing the "Pending Operations". To commit the "Pending Operations", please click "Apply" and "Proceed".

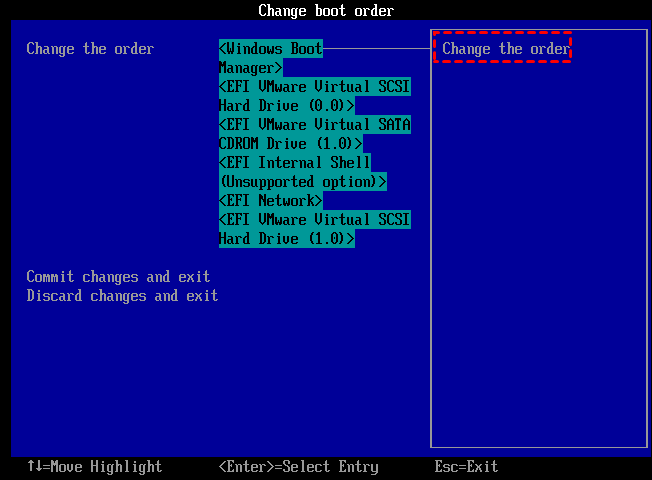
After the clone is done, you can remove the old Windows 7 system hard drive on your computer and insert the new disk. That’s the most direct way to check if the Windows system is bootable on the new disk. Or you can keep all those two disks connected to your computer, reboot it, press a specific key (usually F2, F8, DEL, ESC or others) to enter BIOS settings. Then you change the boot order from the previous Windows 7 system hard drive to the new disk. Save the changes and you should boot computer from the destination disk.
Summary
After reading this post, you will find it is very convenient and effective to upgrade Windows 7 system hard drive to SSD or HDD via cloning the whole disk. It saves you from the hassles of re-installing OS and other programs onto the new disk. Besides, this software also has many other wonderful functions like merging unallocated space into system drive, checking partitions for bad sectors, scheduling disk defrag, cloning a single partition to another drive, and more. If you are a Windows Server user, you can try AOMEI Partition Assistant Server.

