How to Use Disk Management to Delete Volume/Partition?
From this post, you can learn not only how to delete partition using Disk Management “Delete Volume” feature, but also how to solve when “Delete Volume” greyed out.
By Bryce / Updated on May 12, 2023
When need delete volume/partition in Disk Management?
Delete Volume feature in Disk Management can help you remove a partition from an internal hard drive or external hard drive. Usually, deleting partition is out of that motivation:
▶ Reducing the number of partitions on a hard drive
▶ Reclaiming unallocated space for increasing the size of another partition on the same disk
▶ Getting rid of all data on the partition
For example, you have created three partitions on your primary hard drive previously; now, you want to have only two partitions; then you can use delete the partition that you don’t need anymore in Disk Management.
[Step-by-step tutorial] Delete partition in Windows Disk Management
Since everything on the partition will be erased after deletion, you should confirm that there are no necessary files on the partition. Or you can back up important files in advance. Now, you can follow these steps to delete partition on disk using Disk Management in Windows 10, 8, 7, XP, or Vista.
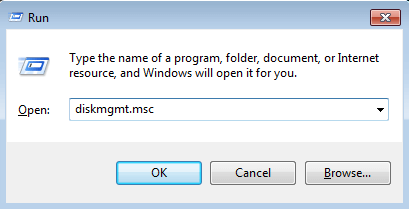
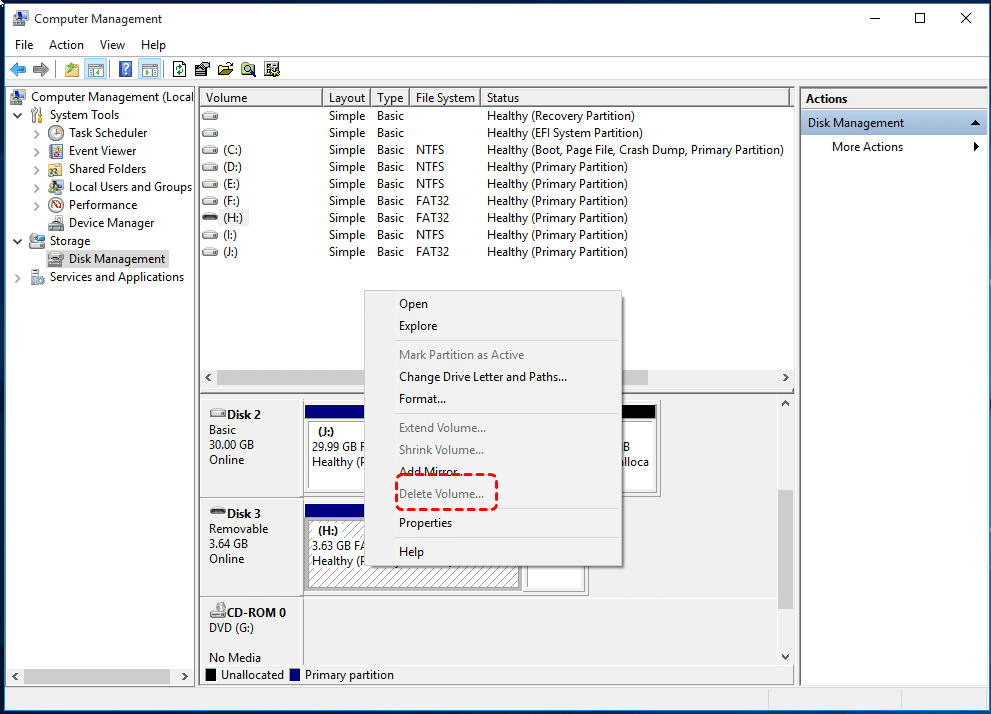
Step 1. Open Disk Management. (Press Windows + R simultaneously, input “diskmgmt.msc” and press Enter key.)
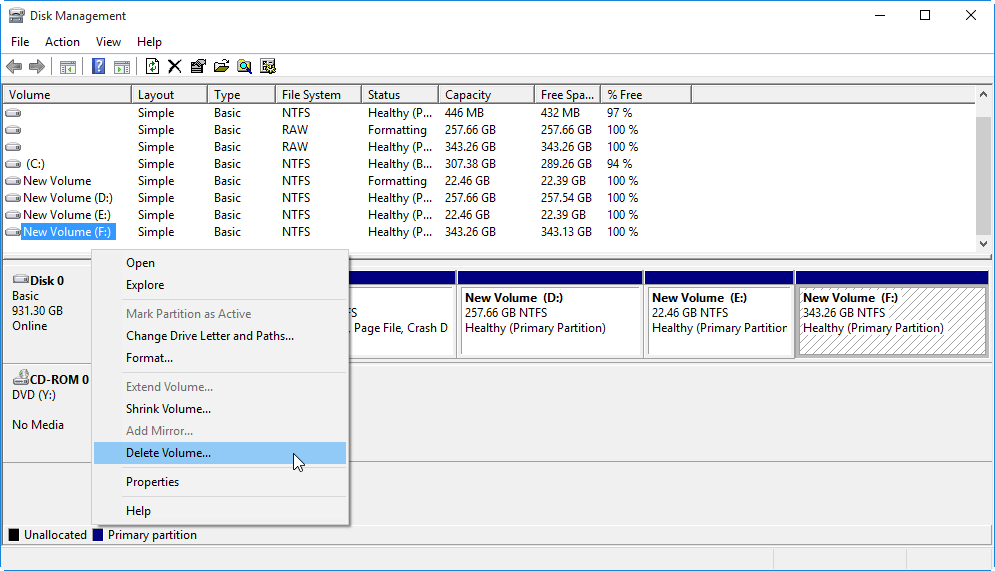
Step 2. In Disk Management interface, all connected disks will be listed. Locate the partition that you want to remove (here is F:), right-click it and choose “Delete Volume”.
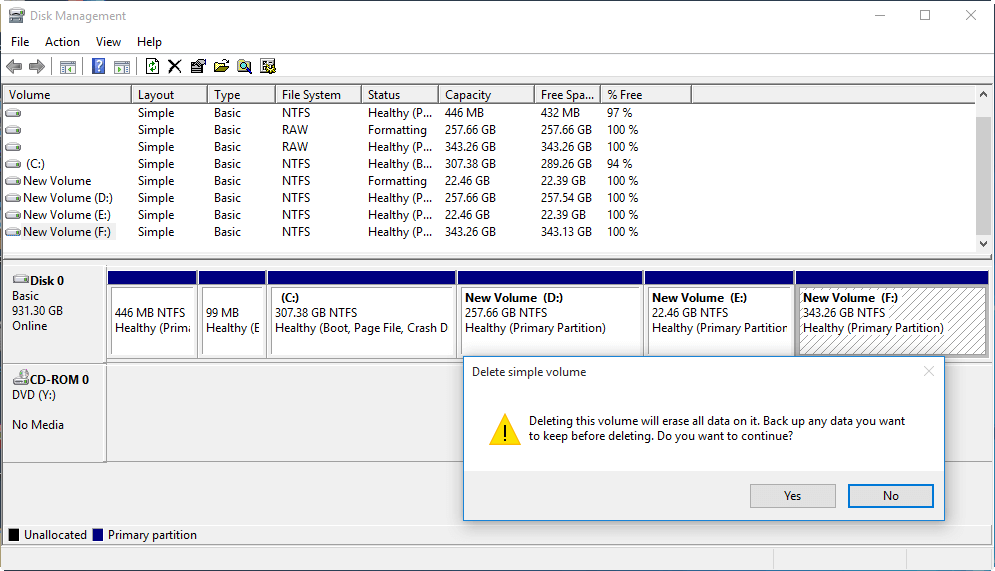
Step 3. Confirm that you’re going to delete the volume and realize what will happen after deletion. Then, click “Yes”.
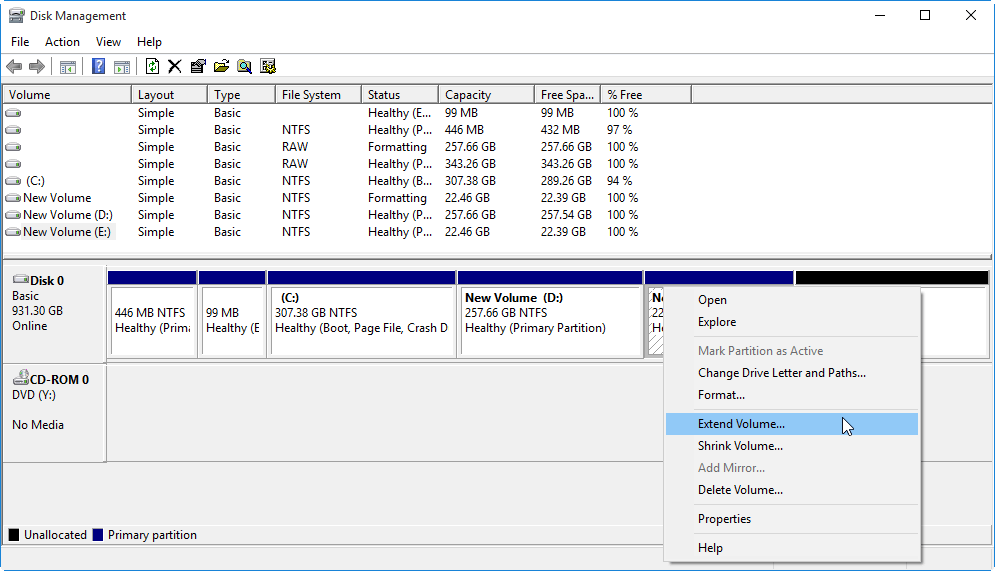
Step 4. After a while, the operation will be completed. And then you’ll see a block of unallocated space. You can use it to extend another partition or create a new partition on it.
Delete Volume greyed out in Disk Management
In most cases, you can delete partition from disk using “Delete Volume” feature in Disk Management. However, the option will be disabled under one of the following cases:
☞ The to-be-deleted partition is with OS installed: You can’t remove the operating system while it is running.
☞ The partition is an extended partition and there are logical partitions on it: You need to delete all logical partitions on it and then you can delete the extended partition.
☞ The partition is on a USB flash drive or SD card: On previous versions of Windows OS, it is not allowed to delete partition on a removable device in Disk Management.
☞ The partition contains page files or boot file.
Workarounds for Disk Management Delete Volume greyed out
Refer to the following two easy yet useful workarounds, if you can’t delete partition in Windows Disk Management
▌1. Using Diskpart utility to delete partition on USB flash drive
If you failed to remove partition from USB flash drive or SD card in DM, you can resort to Diskpart utility.
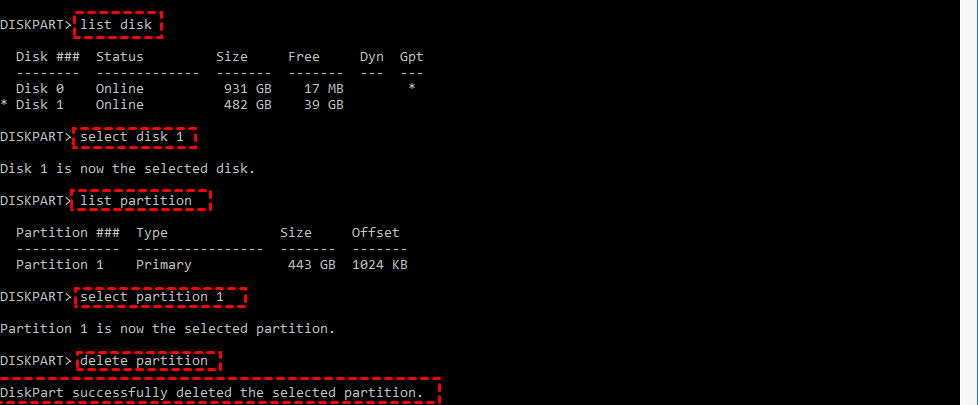
First of all, press Windows + R, input "diskpart" and click OK button to open Diskpart. Then, run these commands
▪ diskpart
▪ list disk to list all the drives on your computer.
▪ select disk n: n stands for the disk number of your USB (ex: disk 1)
▪ list partition: a list of all the partitions on the USB will appear.
▪ select partition n: n is the number of the partition you want to delete (ex: partition 1)
▪ delete partition
✍ Note: To delete a system-protected partition, like OEM partition, you can replace "delete partition" command with "delete partition override“ command. However, delete partition override won't work if you use it to delete system partition, boot partition, or a partition that contains page file, hibernation file or crash dump file.
If there are two or multiple partitions on the disk and you want to delete all partitions, run commands as follows:
▪ diskpart
▪ list disk to list all the drives on your computer
▪ select disk n: n stands for the disk number of your USB
▪ clean
▌2. Use an overall GUI software to delete partition in Windows
Whether you want to delete system partition, EFI partition, or partition on a USB flash drive, you can turn to a great tool for disk and partition management, AOMEI Partition Assistant Professional. It is an easy-to-use GUI tool and very suitable for a green hand in computer knowledge. Now, see how to use it to delete partition in Windows 10/8/7/XP and Vista.
Note: It's available to free download the demo version of PA Pro and have a try!
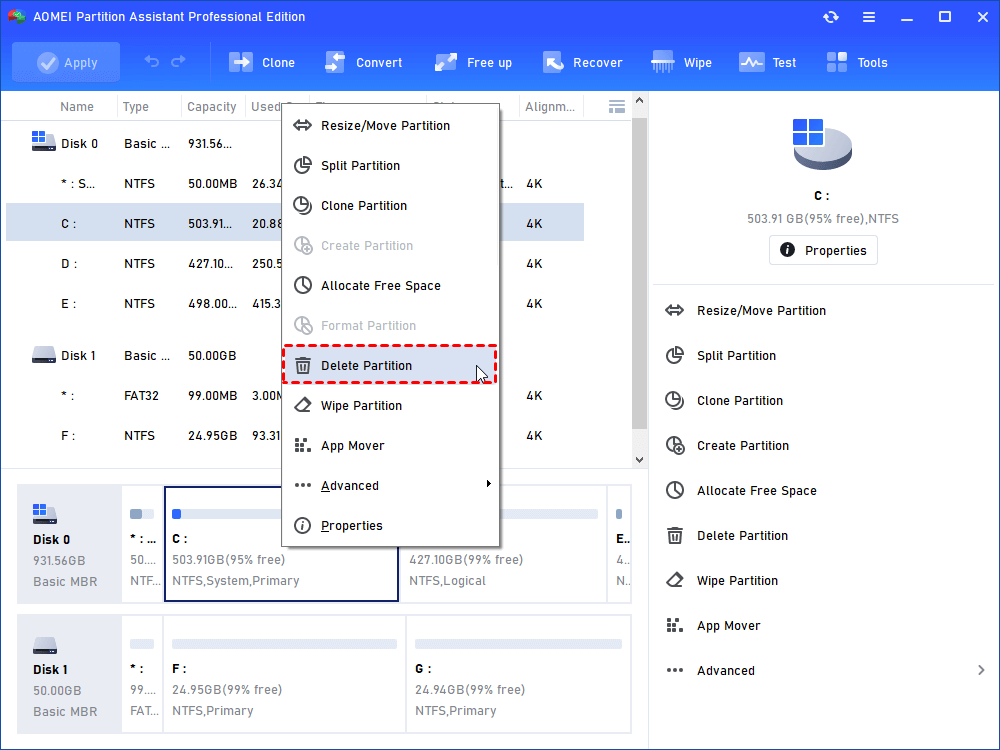
Step 1. Install and open the software. In the main tab. Right-click the partition you need to delete. Then click the “Delete Partition” button.
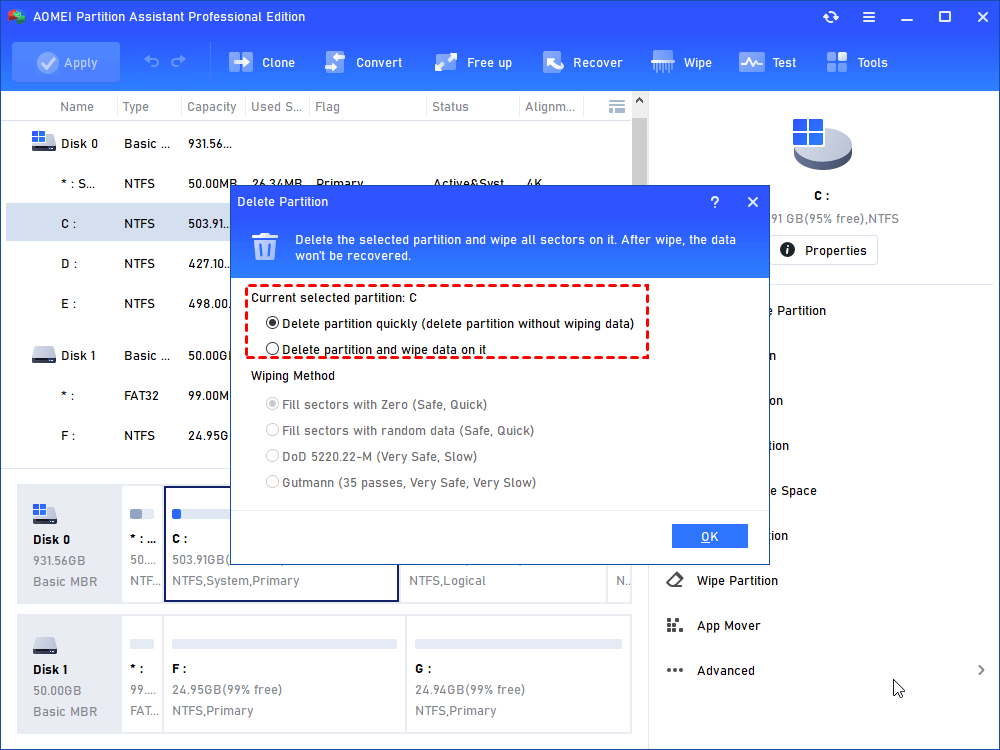
Step 2. In the pop-up window, choose “Delete partition quickly without wiping data” or “Delete partition and wipe data on it”. Then, click “OK”.
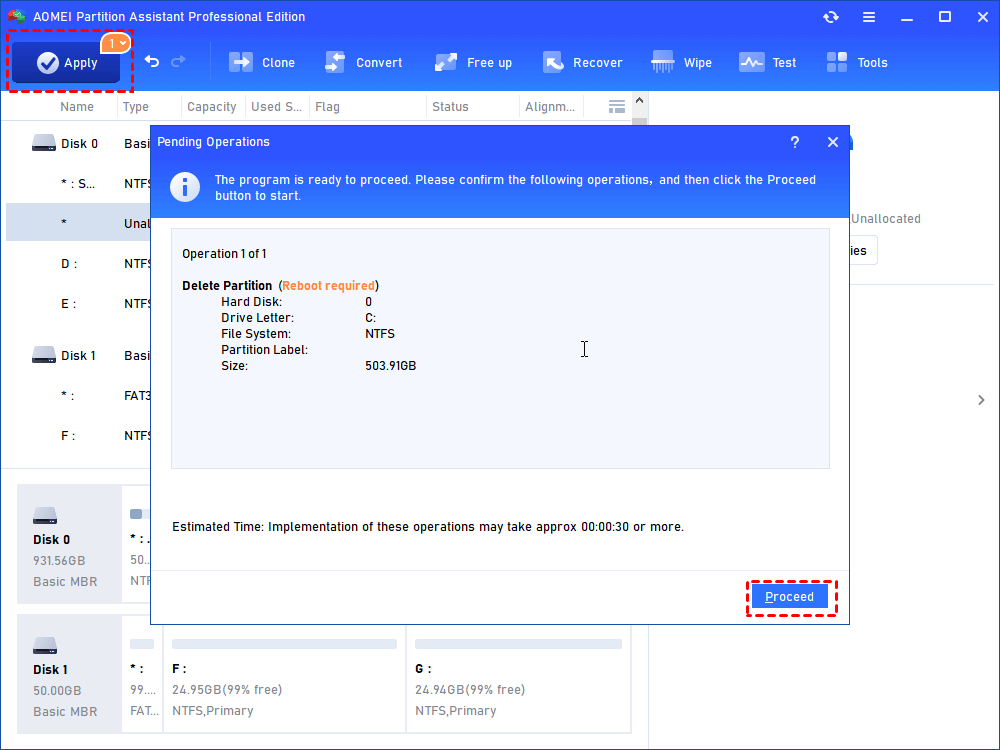
Step 3. Click “Apply” and “Proceed” to confirm the operation.
Step 4. Since the operation involves the system, you can enter WinPE or PreOS Mode to execute the operation.
- ★Tips:
- If you need to delete all partitions on a hard drive, you can right-click the hard drive and use “Delete All Partitions” feature in PA Pro.
- PA Pro is also featured with many other functions, covering allocating free space from one drive to another, extending system partition without rebooting, transfer programs between two drives, and so on.
- To manage disk and partition in Windows Server 2019/2016/2012 (R2)/2008 (R2), it’s recommended to use AOMEI Partition Assistant Server.