Fix Now: Cleaning up. Do Not Turn off Your Computer
After a Windows Update, have you found that Windows is stuck on the "Cleaning up. Do not turn off your computer" issue? Learn how to easily fix this issue with six methods on this page.
By Hedy / Updated on April 22, 2025
Error message: Cleaning up. Do not turn off your computer
After a round of Windows updates, it’s not uncommon for your PC to pause during boot with a message like “Cleaning up. Do Not Turn Off Your Computer.” Depending on your operating system version, the wording may vary slightly:
Windows 10: Cleaning up 0% / 100% complete. Do not turn off your computer
Windows 7: Cleaning up. Do not turn off your computer
This message usually appears as part of the update process and can hang longer than expected due to a few common issues:
🔎 Virus or malware infection: Malicious software can slow down or interfere with system updates.
🔎 Unnecessary programs: Bloatware or unused apps running in the background may drag down performance.
🔎 Weak or unstable internet connection: A poor network may disrupt download or installation processes, delaying completion.
Each of these can contribute to your system getting stuck on this screen longer than it should.
6 solutions to cleaning up do not turn off your computer
If your screen gets stuck on the “Cleaning up. Do not turn off your computer” message in Windows 10 or 7, there are several ways to troubleshoot and resolve the issue:
Solution 1. Wait until the cleaning process is finished
If your system has been stuck on the “Cleaning up. Do not turn off your computer” message for more than 15 minutes, it might indicate an issue, but not always. The actual duration depends on how cluttered your system is. If you haven’t done a Disk Cleanup in a while or your hard drive is nearly full, the process could take significantly longer.
In some cases, the update may pause at a certain percentage due to delays from Microsoft’s servers or a heavy load on your system. It’s not uncommon for the cleanup to need extra time, especially if your PC hasn’t been maintained regularly.
The best course of action is to wait. Give it several hours if needed. However, if nothing changes after a long period, it’s time to move on to some troubleshooting steps outlined below.
Solution 2. Run Windows Update from Safe Mode
If your PC is stuck on the “Cleaning up. Do Not Turn off Your Computer” screen, another effective solution is to run Windows Update in Safe Mode. This stripped-down mode loads only essential drivers and services, making it easier to troubleshoot update-related problems.
For Windows 7:
Step 1. Restart your computer and immediately press F8 repeatedly until the Advanced Boot Options menu appears.
Step 2. Use the arrow keys to highlight Safe Mode, then press Enter.
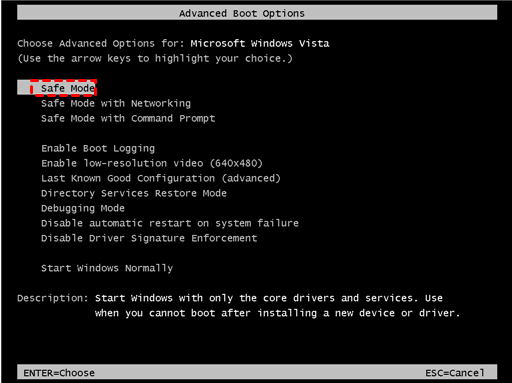
Step 3. Once Windows loads in Safe Mode, launch Windows Update and allow it to download and install any pending updates.
Step 4. After the updates are successfully installed, restart your PC. On the next boot, choose Start Windows Normally to return to regular mode.
For Windows 10:
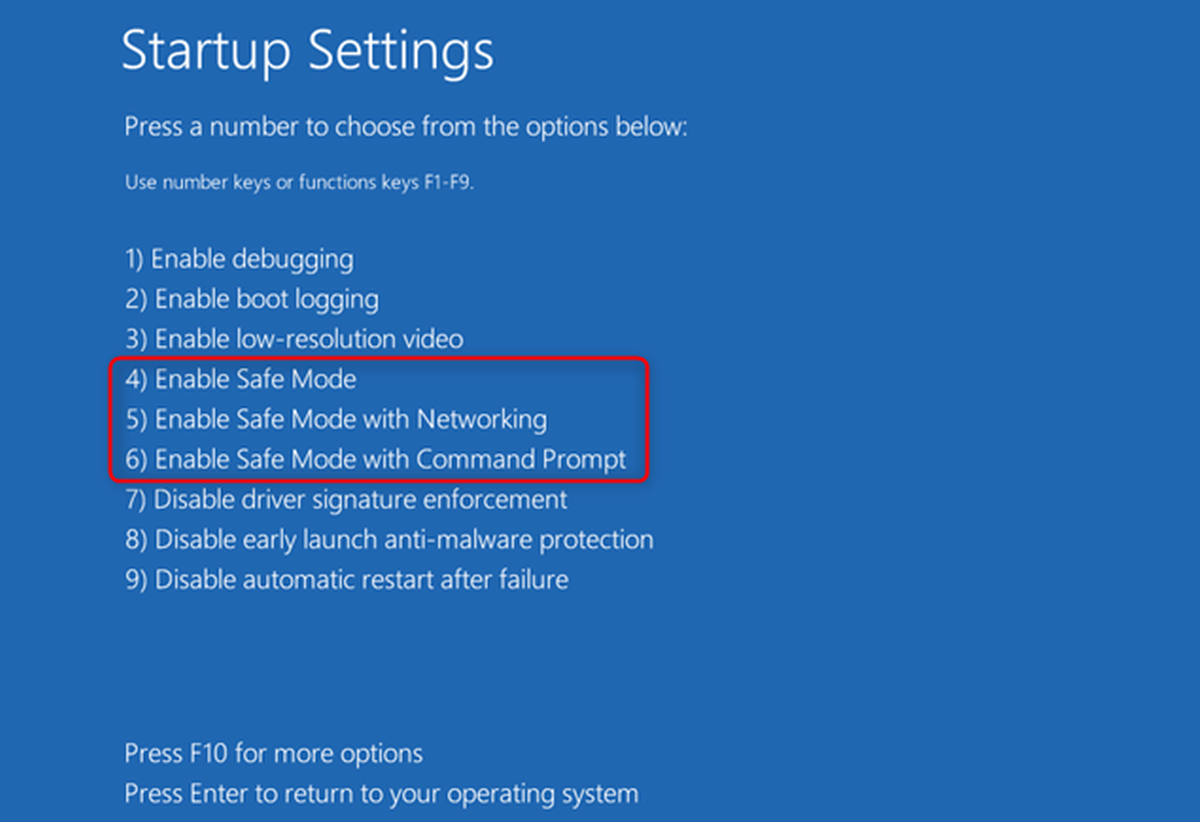
Step 1. Go to Choose an option > Troubleshoot > Advanced options to enter the Windows Recovery Environment (WinRE)
Step 2. Click Startup Settings, then hit Restart. When your PC reboots, select the option for Safe Mode with Networking (usually number 5 or 6).
Step 3. Press Windows key + I to open the Settings app.
Step 4. Go to Update & Security, then click Check for updates. Allow Windows to download and install the latest updates.
Once completed, restart your system normally. This method often resolves update-related glitches that cause the “cleaning up” message to hang.
Solution 3. Run Startup Repair to fix boot issues
If your PC remains stuck on the “Cleaning up. Do Not Turn off Your Computer” message, using Windows Startup Repair through the Windows Recovery Environment (WinRE) can help resolve the issue. This method requires a Windows installation disc or bootable USB drive.
For Windows 7:
Step 1. Get a Windows 7 ISO file from a reliable source and use it to create a bootable USB or DVD.
Step 2. Plug in the disc or USB, reboot your computer, and enter the BIOS settings. Set the boot order so the system starts from your installation media.
Step 3. Choose your preferred language, time, and keyboard layout. Click Next.
Step 4. On the next screen, click Repair your computer.
Step 5. Select your Windows installation when prompted.
Step 6. From the recovery options, choose Startup Repair. The system will begin scanning and repairing any startup issues.

This process may take several minutes and could require a system restart. Just let it complete.
For Windows 10:
Step 1. Plug in the USB drive or insert the DVD with the Windows 10 installer. Restart your computer and enter the BIOS (usually by pressing F2, Del, or a similar key). Change the boot sequence to prioritize the USB/DVD.
Step 2. On the setup screen, pick your language and input method, then click Repair your computer to enter WinRE.
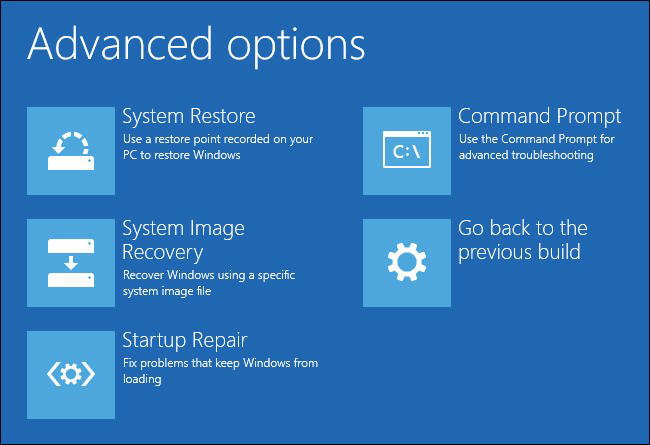
Step 3. Go to Choose an option > Troubleshoot > Advanced options, then click Startup Repair.
Solution 4. Perform a System Restore
If you previously created a system restore point or a system image backup using Windows built-in tools, restoring your system to a previous state can help resolve the persistent “Cleaning up. Do Not Turn off Your Computer” error.
Step 1. Hold down the Shift key while restarting your computer to access recovery options.
Step 2. Once the recovery menu appears, select Troubleshoot, then click on Advanced options.
Step 3. Go to Startup Settings, click Restart, and then choose Enable Safe Mode with Command Prompt when prompted.
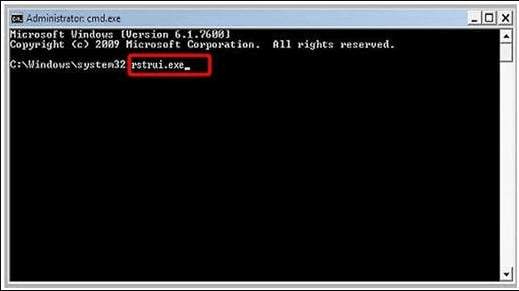
Step 4. In the command prompt window, type rstrui.exe and press Enter to launch the System Restore utility.
Step 5. In the System Restore window, click Next.
Step 6. Choose a restore point that was created before the error appeared. Click Next to continue.
Step 7. Review your selection, click Finish, and let Windows begin the restoration process.
Once completed, your system will be rolled back to the chosen state. Restart your PC and check if the issue has been resolved.
Solution 5. Run SFC and DISM to fix corrupted files
Corrupted Windows system files can trigger the “Cleaning up. Do Not Turn off Your Computer” error. To resolve this, you can run two powerful built-in utilities: SFC (System File Checker) and DISM (Deployment Image Servicing and Management).
Option 1: Run SFC (System File Checker)
SFC scans your system for corrupt or missing files and attempts to repair them automatically.
Step 1. Open the Start menu, type Command Prompt, and select Run as administrator.
Step 2. In the Command Prompt window, enter the following command and press Enter:
sfc /scannow
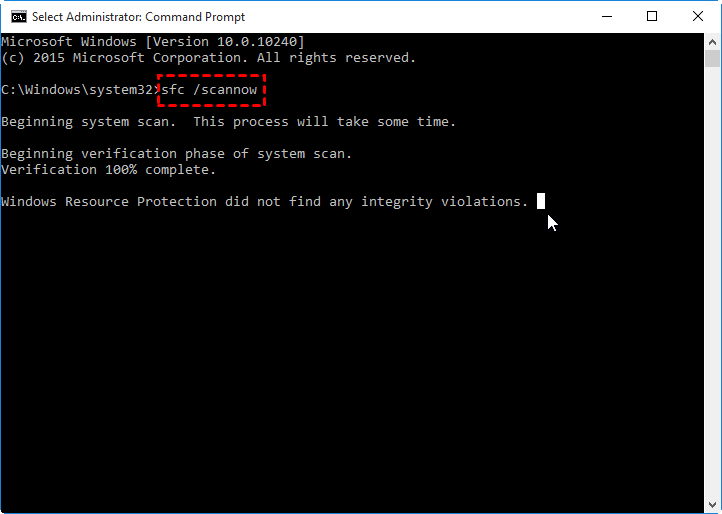
Step 3. Wait until the scan reaches 100%. Once complete, review the results to see if any integrity violations were detected and fixed.
Option 2: Run DISM (if SFC can’t resolve all issues)
If SFC can't fix everything, use DISM to repair the system image:
Step 1. In the same Command Prompt window, enter these commands one at a time, pressing Enter after each:
Dism /Online /Cleanup-Image /CheckHealth
Dism /Online /Cleanup-Image /ScanHealth
Dism /Online /Cleanup-Image /RestoreHealth

Step 2. DISM will analyze the health of your Windows image and repair any damage it finds. This process may take some time, so allow it to complete fully.
After the scans are done, restart your computer and check if the problem has been resolved.
Solution 6. Factory reset your computer
If all other methods fail to resolve the “Cleaning up. Do Not Turn off Your Computer” error, resetting your Windows system is the last resort. This process acts as a system refresh, giving you a clean slate without a complete reinstall—and you can choose to keep your personal files intact.
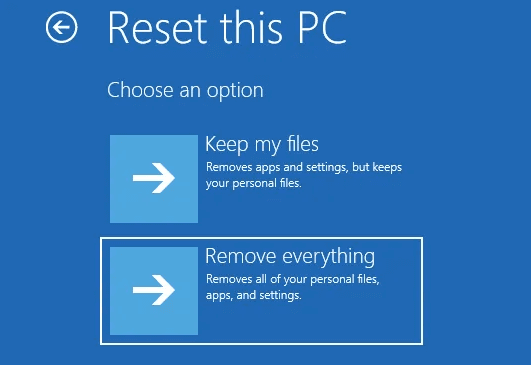
Step 1. Restart your PC and navigate to Choose an option > Troubleshoot > Reset this PC.
Step 2. Select Keep my files when prompted. This will reinstall Windows while preserving your personal data.
Step 3. Follow the on-screen instructions. Continue through the setup steps to complete the reset.
Once finished, your system will be restored to its default state, free from the issues that caused the error. This step often resolves even the most stubborn system problems.
Bonus tip: Recover lost data from the screen error
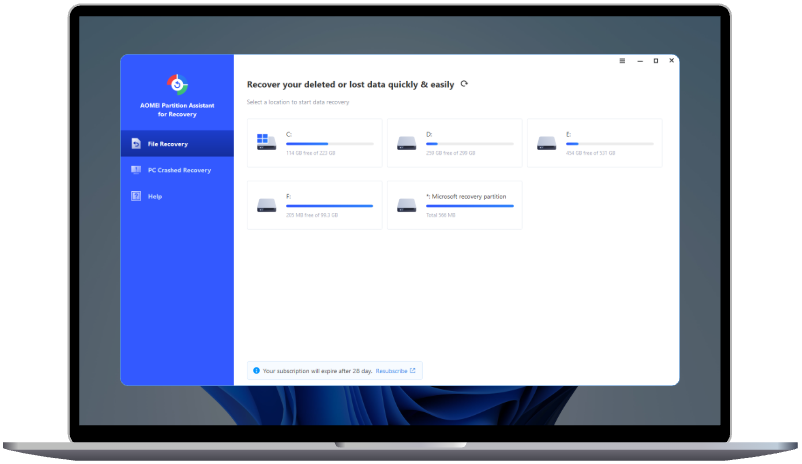
If you’ve ever encountered the dreaded message, “Cleaning up. Do not turn off your computer,” during a Windows update or system cleanup, you know how frustrating it can be, especially when it leads to missing or lost data. That’s where AOMEI Partition Assistant for recovery comes to the rescue.
It is an all-in-one disk management and recovery solution that not only helps optimize and manage partitions but also features powerful tools for data recovery. If you’ve lost personal files, documents, or system data due to a stuck cleanup process, AOMEI can help you get them back quickly and safely.
Step 1. Install and launch AOMEI Partition Assistant for Recovery. Choose the exact partition or disk where your data is lost and click Scan.

Step 2. Then, the recovery tool starts to scan and search. It will execute the “Quickly Scan" first for finding your deleted data fast, and then execute the “Deep Scan" for searching for other lost data.
Step 3. Once the scan is completed, all deleted files, recycle bins and other missing files will be displayed. Please select the file you would like to recover and then click "Recover".
Step 4. Then, select a folder path to save your recovered files.
Step 5. Wait patiently for this process of recovery to end.
Conclusion
The “Cleaning up. Do Not Turn off Your Computer” message can appear for various reasons, ranging from corrupted system files and failed updates to limited disk space or malware. This guide has outlined multiple methods to help you troubleshoot and resolve the issue, including using Safe Mode, performing Startup Repair, running System Restore, executing SFC and DISM scans, and resetting your PC as a last resort.If you are unlucky enough to lose data during this process, don’t worry, AOMEI Partition Assistant for recovery is always there to help you.