Top 5 Best SSD Cloning Software for Windows in 2025
There are many different reasons for users that need to clone to SSD, such as migrate data from one SSD to another SSD, or upgrade HDD with an SSD.
By Lucas / Updated on March 25, 2025
Why you need SSD cloning software for Windows
Cloning SSD can be the quickest and easiest way to copy all contents including system files, applications, preferences, emails and all partitions from the SSD to another disk (HDD or SSD). And, you might need to clone HDD/SSD to SSD for different situations:
①Upgrade to a faster/larger SSD
When your OS runs slow on a traditional hard disk drive, and you need to upgrade to a faster SSD, or when your old SSD is almost full and you need to migrate to a larger SSD, you can clone the HDD/SSD to a faster/larger SSD to make computer work better with keeping everything intact.
②Replace failing HDD or SSD
If your old HDD or SSD is about to die, it is a great idea to clone hard disk to a new SSD drive before it won’t work anymore in consideration of data security.
③Transfer mass data from HDD/SSD to SSD
Besides, using SSD cloning software is also an effective way to transfer mass data from HDD to SSD or SSD to SSD as“Ctrl+C” and “Ctrl+V” is not recommended for moving a large amount of data, especially boot or directory files, between different hard drives, which will make the boot files invalid.
Top 5 best SSD cloning software for Windows
For above purposes, you may want to find a way to easily and effortlessly manage the job. Here we’ve picked 5 best SSD cloning software for Windows users:
AOMEI Partition Assistant
AOMEI Partition Assistant is one of the best SSD cloning software and disk partition manager, that can not only clone hard drive from one to another, but also resize partitions on the destination drive during or after cloning.
AOMEI Partition Assistant has a flexible cloning options. It supports cloning of entire hard drives or individual partitions, which is helpful if you want to migrate your operating system or copy only specific data.
Pros:
User-Friendly Interface: AOMEI Partition Assistant offers an intuitive, easy-to-use interface, making it accessible to both beginners and advanced users when cloning drives or partitions.
Resize Partitions Automatically: When cloning to a larger disk, AOMEI Partition Assistant can automatically resize the partitions to make better use of the space on the target drive, saving you time.
Support for Different Storage Devices: It supports cloning between various types of storage devices such as HDDs, SSDs, and external drives. This ensures compatibility with a wide range of hardware.
Cons:
Free Version Limitations: While AOMEI Partition Assistant offers a free version, it comes with some limitations, such as clone system disk, clone disks with dynamic partitions, are only available in Professional edition.
No Incremental Cloning: AOMEI Partition Assistant doesn’t support incremental cloning (i.e., cloning only the changes since the last clone), so if you need to update a previous clone, you’ll have to perform a full clone again.
The best SSD cloning software for Windows that allows you to clone HDD/SSD to another HDD/SSD without any data loss.
Macrium
Macrium is one of the best software for disk imaging and cloning.
It offers a fast imaging feature that significantly shortens backup times. Its Delta Detection technology identifies changes at the block level, optimizing incremental backups. The tool also includes Macrium Reflect, a versatile solution that combines both disk imaging and cloning.
In terms of integrations, Macrium is compatible with Windows OS and supports various file systems such as NTFS and FAT32. Additionally, it works seamlessly with Windows Task Scheduler for automated backup tasks.
Pros:
Time-Saving: The cloning process is fast, especially with Macrium's optimized algorithms that reduce the time needed to transfer data compared to some traditional backup methods.
Supports Large Storage Devices: It can handle large hard drives, even those over 2TB, and easily clone them to new drives of equal or greater size.
Simple and Efficient Cloning Process: Macrium Clone allows for an easy-to-use process to copy entire drives or partitions, making it convenient for upgrading or replacing hard drives.
Cons:
Disk Size Limitation: While Macrium Clone can clone to larger drives, if the target drive is smaller than the source drive, the cloning process will fail unless you manually adjust partitions or reduce the data size on the source disk.
Complex for Novice Users: While the cloning process is straightforward for experienced users, those unfamiliar with disk management may find it complicated or intimidating, especially when dealing with partitioning or selecting the correct drives.
DiskGenius
DiskGenius is another popular SSD cloning software that also provides a reliable cloning feature for disk upgrades and data migration. Here are the pros and cons of using DiskGenius for cloning HDD/SSD to another HDD/SSD:
Pros:
Data Recovery Integration: DiskGenius has a built-in data recovery feature, which allows users to recover lost or deleted files from the source or target disk if something goes wrong during the cloning process.
Partition Resizing During Cloning: Like AOMEI Partition Assistant, DiskGenius allows you to resize partitions when cloning, which is particularly useful if you’re cloning to a drive that is larger or smaller than the source disk.
Support for Various File Systems: It supports cloning for a wide range of file systems, including NTFS, FAT32, exFAT, ext2/ext3/ext4, and more.
Cons:
Complex User Interface: DiskGenius has a more complex interface than some other SSD cloning tools. This might be overwhelming for beginners or users who prefer a simple, more streamlined experience.
Limited Cloning Features in Free Version: The free version of DiskGenius includes basic cloning features, but some advanced options, such as the ability to clone dynamic disks or support for encrypted partitions, are only available in the paid version.
Clonezilla
Clonezilla is a free and open-source disk cloning and disk imaging tool for backing up and migrating data. Here are the pros and cons of using Clonezilla for cloning:
Pros:
Free and Open-Source: Clonezilla is a free and open-source disk cloning tool, that is completely free, which makes it a great choice for personal or professional use without any licensing costs. It’s open-source, so you have access to its source code and can modify it if needed.
Supports a Variety of File Systems: Clonezilla supports many file systems, including NTFS, FAT32, ext2/ext3/ext4, HFS+, and more. This makes it versatile across various operating systems (Linux, Windows, macOS, etc.).
No Installation Required (Live Environment): Clonezilla is run from a live CD/USB environment, meaning it does not need to be installed on the operating system. This can be advantageous for users who need to clone a system drive that is actively in use.
Cons:
Complex Interface: Clonezilla’s interface is text-based and can be difficult for non-technical users to navigate. The process of setting up cloning can feel intimidating, especially for beginners. It's not as user-friendly as some of the graphical alternatives.
No GUI (Graphical User Interface): Unlike other cloning tools, Clonezilla does not have a GUI. The entire process is done through a command-line interface with menus, which can be confusing for users who prefer point-and-click interfaces.
Limited to Basic Cloning Tasks: While Clonezilla is great for cloning, it lacks some of the more advanced disk management features found in other tools (e.g., resizing partitions during cloning, merging partitions, or advanced disk repairs).
Windows Built-in Tool
Windows comes with some built-in tools for disk management and backup, but it doesn’t have a direct "cloning" tool. However, you can use Windows Backup and Restore, System Image Backup, and Disk Management to achieve similar results to disk cloning. Here's an overview of the pros and cons of using these built-in Windows tools for cloning:
Pros:
Free and built-in: As a Windows built-in tool, there’s no need to download or install third-party software, and you do not need to pay for it. This is useful for users who want a straightforward solution without extra tools.
System Image Backup: This tool allows you to create a full image of your system, which is the closest built in tool for cloning a drive. And the system image backups can be restored to a new hard drive, making it possible to recover from a drive failure or migrate to a new drive.
Simple partitioning: Windows built-in tool Windows Disk Management allows you to manage your hard disks.
Cons:
It doesn’t have a direct "cloning" tool: Windows does not have a built-in tool that directly clones a disk. If you would like to duplicate a disk of your SSD, an SSD cloning software should be the best choice.
How to choose the best SSD cloning software for Windows
To choose the best SSD cloning software for Windows, you should consider these factors:
- Compatibility: Ensure whether it supports for your SSD type (SATA, NVMe, M.2) and Windows version.
- Partition flexibility: if this SSD cloning tool offers partition resizing, it is convenient for managing hard disk partitions after cloning.
- Bootability: After cloning, the cloned SSD should be bootable.
Thus, here we highly recommend AOMEI Partition Assistant, which is friendly to beginners. The concise interface and step-by-step guide makes cloning easy.
How to clone SSD with AOMEI Partition Assistant
As one of the best SSD cloning software for Windows 11, 10, 8, 7, AOMEI Partition Assistant provides two different cloning methods: “sector-by-sector”clone, and intelligent clone.
- Sector-by-sector clone: This cloning method will clone every byte on the source disk, which requires the target disk must be at least as large as the source disk.
- Intelligent clone: This cloning method is faster than “Sector-by-sector”clone, and it allows you to clone larger drive to smaller drive.
Preparatory work before cloning SSD
In order to clone SSD or HDD successfully, it is advised to get the following work done.
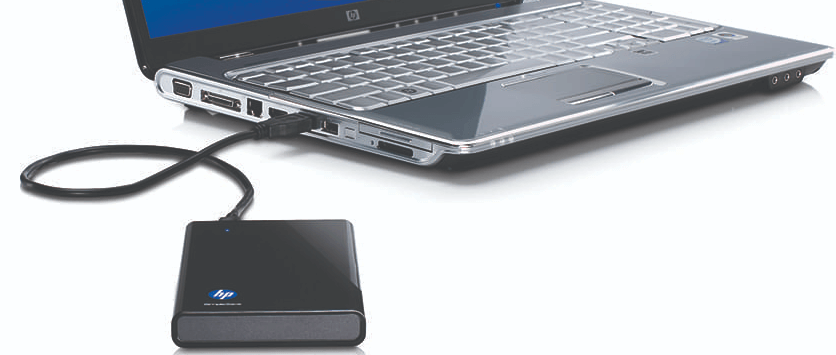
1. Connect the destination disk to your computer
To clone SSD, obviously, you will need a secondary disk as the destination hard drive. Then you have to connect it to your computer as well. If you are using a desktop, you can usually just install your new hard drive alongside your source SSD drive to clone it. If you’re using a laptop, however, that usually isn’t possible, so you’ll need something like a SATA-to-USB cable.
2. Back up any important data to an external drive
If you have any especially important data on your destination drive that you plan to clone, back it up to an external drive first, because all of them will be overwritten during the cloning process.
3. Check out the destination disk's storage
Make sure the hard drive you’re cloning to has enough space to store all your data from the source disk. If the source disk's total space is larger than the destination disk, but the used space is smaller than the destination drive, you can go with the "Clone Disk Quickly" method in the cloning process to clone only used space. Or you might need to free up space on the source disk first of all to make it as small as possible to fit the destination disk.
Start cloning with the best SSD cloning software for Windows
Now we will take cloning a disk with AOMEI Partition Assistant, one of the best SSD cloning software for Windows, as an example to show you how to clone HDD or SSD drive in Windows 11/10/8/7 step by step.
- ★Tip:
- The free edition only supports cloning the MBR data disk to another MBR disk.
- If you need to copy the system from MBR to MBR, MBR to GPT, GPT to MBR, or GPT to GPT, please upgrade to the Professional edition.
Step 1. Install and launch AOMEI Partition Assistant, click "Clone" in the main interface and select "Clone Disk".

Step 2. Choose the hard disk that you need to clone as the source disk and click "Next".

Step 3. Select the destination disk to store the data on the source disk, and then click "Next".

Step 4. Then, you can check the source and destination disk in the next window or change to “Sector to Sector clone”, and click the "Confirm" button to continue if there is no problem.

Here, you can also click the "Settings" button to adjust the partition size on the destination disk or tick "4k alignment" to improve the reading and writing speed of SSD if the target disk is an SSD drive.

Step 5. At last, click "Apply" and "Proceed" in the main interface to start cloning the hard drive.

Follow-up work when SSD clone is finished successfully
After you have successfully cloned the SSD drive via the recommended best SSD cloning software for Windows PC, you may also have the following work to do.
1. Replace the old hard drive with the new one
First of all, you might need to manually replace your new hard drive: open up your laptop or desktop via a screwdriver and then place the new drive into the hard drive slot in the device.
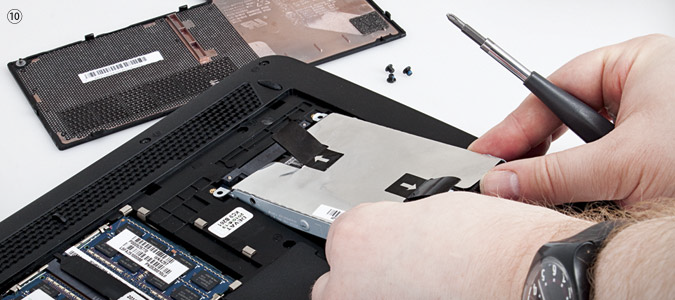
- ★Pro Tip:
- To make it much easier: you can take a photo of what your current hard drive looks like inside your computer before you remove it. This will help you know where the wires go when connecting your new drive.
2. Boot from the cloned disk
Secondly, you can change the boot priority of the hard drive to make your Windows and other programs load directly from your newly cloned hard drive. Following is how to get it done specifically.
1. Restart your computer. During the initialization process, long press ESC, delete, F2 or other specific keys to enter BIOS environment.
2. Use the arrow key to access to Boot tab. System devices will appear in order of priority.
3. To boot computer from cloned SSD drive, move it to the top of boot sequence list.
4. Save and exit the BIOS setup utility. Then your computer will restart with the changed settings.
If the cloned SSD drive won’t boot, it may be because of bad sectors on source disk, loose SSD connection, partition style and boot mode conflict and some boot related drives missing out during the cloning process. You can refer to the solutions in the given link.
3. Wipe everything on the old hard drive for privacy protection
If everything works well and correctly on the cloned hard drive, and you plan to resell or donate the old one, you can wipe it completely so that no one can recover your privacy information. To do this, AOMEI Partition Assistant also provides a feature called “Wipe Hard Drive”. If it is an SSD drive, please switch to "SSD Secure Erase" of Pro edition.
Bottom line
So, whether you want to upgrade your hard drive from an HDD to an SSD, or you just need to replace the current SSD with a new SSD, AOMEI Partition Assistant can be the best SSD cloning software for Windows 11/10/8/7. With it, you can quickly create a 1-to-1 copy of your old hard drive. Besides that, it allows you to copy partition to another hard drive.
More importantly, the AOMEI Partition Assistant Professional has more amazing functions, such as cloning MBR or GPT hard drive to GPT SSD, converting system disk to GPT without deleting partition, converting dynamic disk to basic disk without data loss, etc. To perform HDD or SSD clone in Windows Server 2019/2016/2012/2008/2003, you can try AOMEI Partition Assistant Server.
FAQs about SSD cloning
1. Why should I clone my HDD to an SSD?Cloning an HDD to an SSD is done to improve system performance, reduce boot and load times, increase reliability, and lower power consumption. SSDs offer faster data access speeds and are more durable than traditional HDDs.
2. What do I need to clone my HDD to an SSD (Windows users)?To clone your HDD to an SSD, you need:
- A best SSD cloning software for Windows like AOMEI Partition Assistant.
- The SSD connected to your computer (via SATA, USB, or another interface).
- Adequate storage space on the SSD to accommodate all data from the HDD.
No, cloning is different from simply copying files. Cloning creates a replica of the entire drive, including the operating system, system files, boot sector, and all partitions, ensuring the cloned drive is bootable and fully functional as a system drive.
4. What should I do if my SSD doesn’t boot after cloning?If your SSD doesn’t boot after cloning:
- Ensure the SSD is set as the primary boot device in BIOS/UEFI.
- Use the Windows installation media to repair the boot loader by selecting “Repair your computer” > “Troubleshoot” > “Startup Repair”.
- Verify the cloning process included all necessary boot partitions.
It’s recommended to avoid using your computer for other tasks during the cloning process to ensure data integrity and avoid potential errors. The cloning software often requires exclusive access to the drives being cloned.

