How to Fix “Your Computer Was Unable to Start” on Windows 11, 10, 8, 7
When “your computer was unable to start” issue comes up, try these methods offered in this post to fix it effectively.
-
Symptom: "Windows unable to start/startup repair is checking for problems"
-
How to fix "your computer was unable to start" in Windows 10/8/7
Symptom: “Windows unable to start/startup repair is checking for problems”
Causes: Your Computer was unable to start
Did you ever run into a similar issue? When you need to restart your computer, the Startup program will be automatically launched, and it says “Your computer was unable to start, and Startup Repair is checking your system for problems”. Even if you force it to restart again and again, your computer would be stuck in startup repair loop. How can we solve this problem?
To fix a computer unable to start, we need to figure out what is the cause of it. There are some most common reasons listed below for your reference, then we can find a correct way to fix it.
- Incorrect update or configuration
- BDC error
- MBR corruption
- File system error
How to fix “your computer was unable to start" on Windows 11/10/8/7
Based on the reasons, you can try the following 4 fixes to one by one until the “your computer was unable to start” issue gets resolved.
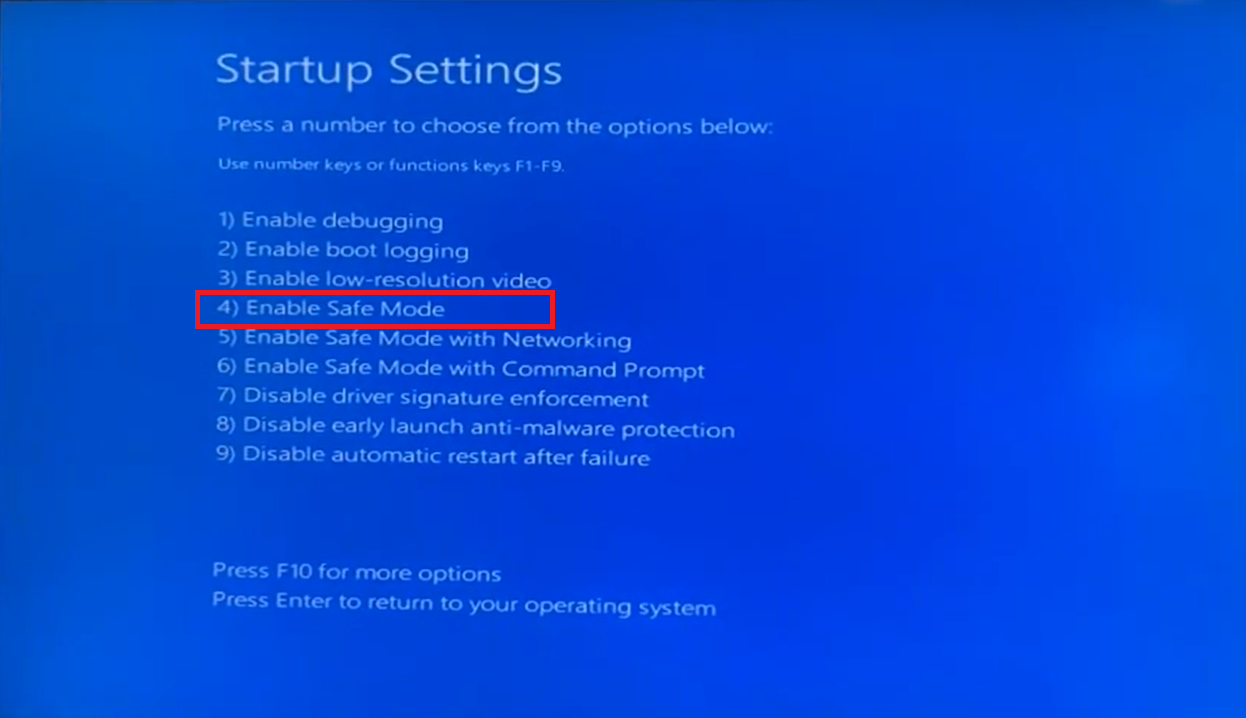
Method 1. Enable Safe Mode
In Windows OS, Safe Mode only allows essential programs, applications, and software to start at the boot process. In this way, you can troubleshoot the problem.
If the existing issue does not reappear when your computer is in safe mode, it means the system and basic device settings are not the cause of it. And you can start all the programs one by one on your computer, and find out the reason why your computer was unable to start by using the process of elimination.
1. Restart your computer, and tap “F8” or “Shift + F8” immediately.
2. And go to “Troubleshoot” > “Advanced Option” > “Startup Settings” > “Restart”
3. Then, you will see the “Startup Settings” interface, and choose “Enable Safe Mode”
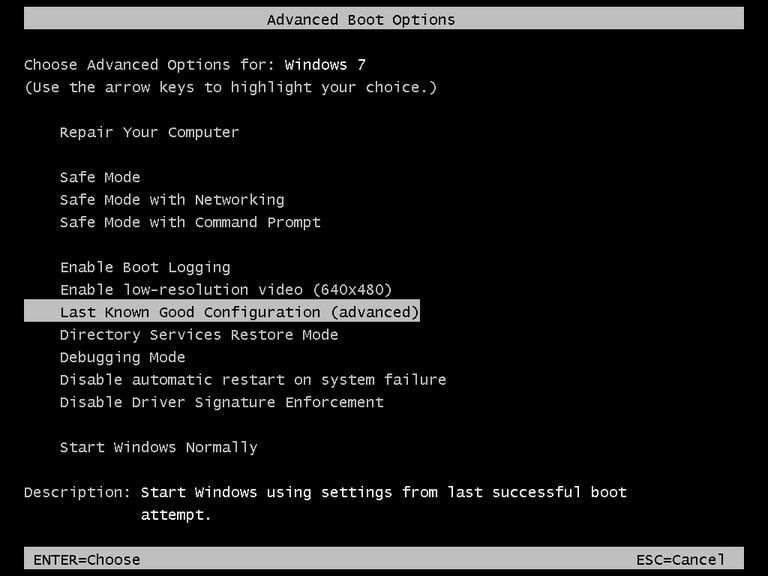
✎Note: In different systems, the interface and steps are a little different. For example, in Windows 7, just tap "F8" or "shift + F8" and you will enter "Advanced Boot Options" and choose "Safe Mode".
Method 2. Launch “Last Known Good Configuration”
Last Known Good Configuration is a way of loading the OS configuration that booted computer successfully last time. If the boot issue is caused by driver and software update or installation, the Last Known Good Configuration should be considered.
Step 1. Power on the computer, and tap “F8” + “Shift + F8” when the logo shows up.
Step 2. Navigate to “Repair your computer” > “Troubleshoot” > “Advanced Boot Options”.
Step 3. Use the arrow keys to choose “Last Known Good Configuration”.
Method 3. Fix the BCD
BCD(Boot Configuration Data) corruption can be the cause of Windows fails to start. If the Safe Mode and Last Known Good Configuration can’t troubleshoot your problem, you can try to fix the BCD.
▲ Using installation CD
Step 1. Insert a Windows Installation CD, and boot from it.
Step 2. Go “Repair your computer” > “Advanced Options” > “Command Prompt”
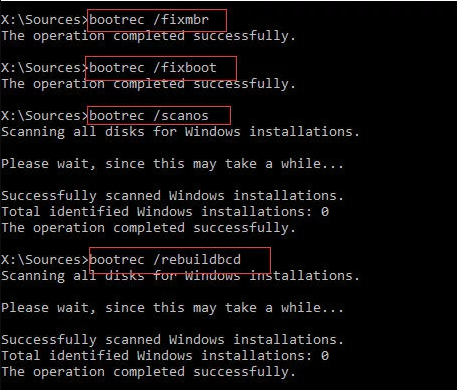
Step 3. In the Command Prompt, just type following commands and press Enter to execute them.
-
bootrec.exe /fixmbr
-
bootrec.exe /fixboot
-
bootrec.exe /scanos
-
bootrec.exe /rebuildbcd
▲ Fix BCD via AOMEI Partition Assistant
If you don’t have installation CD, you can turn to the reliable and powerful repairing freeware-AOMEI Partition Assistant Standard, which enables you to create a PE bootable USB to start up your computer, and rebuild BCD via its “Rebuild MBR” feature in Windows systems. Here are the steps given below:
Before you do:
-
Attach external drive, like a USB flash drive, a blank CD to your computer.
-
Download AOMEI Partition Assistant to another working computer.
Step 1. Install and open AOMEI Partition Assistant to another computer that can boot up properly. And click “Tools” in the top toolbar, and choose “Make Bootable Media”.
Step 2. Choose a way to make the desired bootable media, and click “Proceed” to start.
✎Warning: this operation will format the USB flash drive, if it has some data on it, please back up USB firstly.
Step 3. Boot from the PE Bootable USB:
1. Insert the bootable PE USB to the computer that is unable to start. And power on the computer, and press the function key when the first screen appears.
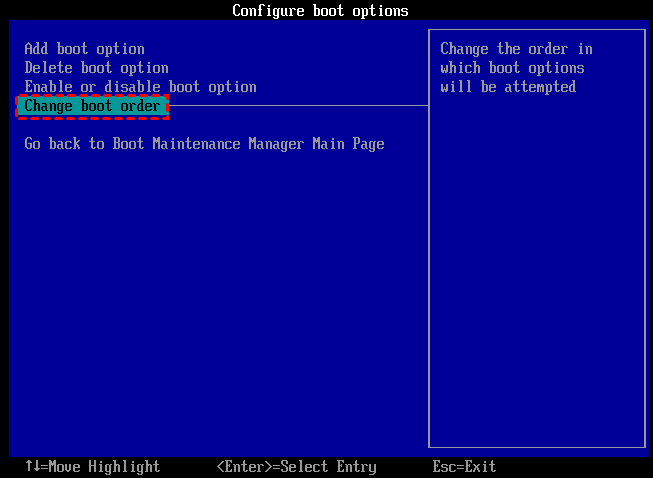
2. Then choose “BIOS setup” and select “Change boot order” to set the USB to the first boot device. and save the change.
Step 4. After a whole, you will see the main interface of AOMEI Partition Assistant, and right-click on the system disk, and choose “Rebuild MBR”.
Step 5. Choose an MBR type in the small window, and click “OK”.
Step 6. Then click “Apply” > “Proceed” to start BCD rebuilding.
Method 4. Format system partition and reinstall OS
If the file system of system disk gets corrupted, the system information cannot be recognized, sometimes, the C drive might become RAW. And your computer wouldn’t start. So you can also use AOMEI Partition Assistant to format the C drive to FAT32/NTFS or other file systems and reinstall the system.
Step 1. Create a bootable USB with another computer, and insert it to the computer that unable to start.
Step 2. Boot up the faulty compute with the bootable USB, and when you see the AOMEI Partition Assistant, right-click on the system partition, and choose “Format Partition”.
Step 2. Choose a file system for the C drive. And click “OK”.
Step 3. At last, click “Apply” > “Proceed” to start the formatting program.
Step 4. When the formatting gets finished, insert an installation CD to reinstall the Windows system.
Conclusion
If your computer was unable to start, you can try these methods according to the cause of it. They can solve most of boot issues. In addition, AOMEI Partition Assistant is a great disk manager, it can also help you to solve other issues, like SSD write-protected. And you can upgrade it to Professional Edition to gain more advanced functions like permanently wipe a hard drive without CD.


