5 Ways to Fix Windows Cannot Run Disk Check Write Protected
If you're encountering the error message: "Windows cannot run disk checking on this volume because it is write protected", this page will guide you on how to remove the write protection from your PC hard drive, SD card, or USB drive and get CHKDSK working correctly in Windows 11, 10, 8, or 7.
By Hedy / Updated on April 25, 2025
Why Windows cannot run disk check write protected?
Chkdsk is a built-in Windows utility designed to help you fix disk errors or resolve startup issues. However, if you run 'chkdsk /r' via Command Prompt and encounter the error message: "Startup Repair cannot repair this computer automatically" or "Windows cannot run disk checking on this volume because it is write protected", it can be frustrating.
There are typically two common causes:
◉ The disk volume attribute is set to read-only.
◉ The file system of the partition is corrupted or damaged.
If you find yourself unable to run CHKDSK due to this error, don't worry! There are effective ways to resolve the issue. To get CHKDSK working again, you need to remove the write protection from your hard drive and eliminate the "Windows cannot run disk checking on this volume because it is write protected" error.
How to fix Windows cannot run disk check write protected
If you're encountering the error message "Windows cannot run disk checking on this volume because it is write protected", don't worry—there are several effective ways to fix it. Let’s go through them step by step:
Fix 1. Remove write protection via CMD
Step 1. Press "Windows + X" to open the power users menu.
Step 2. From the menu, select "Command Prompt (Admin)".
Step 3. Click "Yes" when the UAC prompt appears, asking for permission to launch Command Prompt as Administrator.
Step 4. In the Command Prompt window, type chkdsk C: /f /r and press Enter. Make sure to replace "C" with the appropriate drive letter for your hard drive, SD card, or USB drive.

This command will unmount the disk, SD card, or USB drive and remove the write protection, allowing CHKDSK to run without showing the "Windows cannot run disk checking on this volume because it is write protected" error.
If this solution doesn't work, don't worry! There are other methods available to remove the write protection.
Fix 2. Remove write protection via Diskpart
To remove the read-only attribute from your hard drive using diskpart, follow these steps:
Step 1. Run Command Prompt as an administrator.
Step 2. Type diskpart and press Enter. Click Yes when the prompt asks for permission.
Step 3. Enter the following commands in order:
list disk
select disk 1(Replace "1" with the number of your write-protected hard drive.)
attributes disk clear readonly
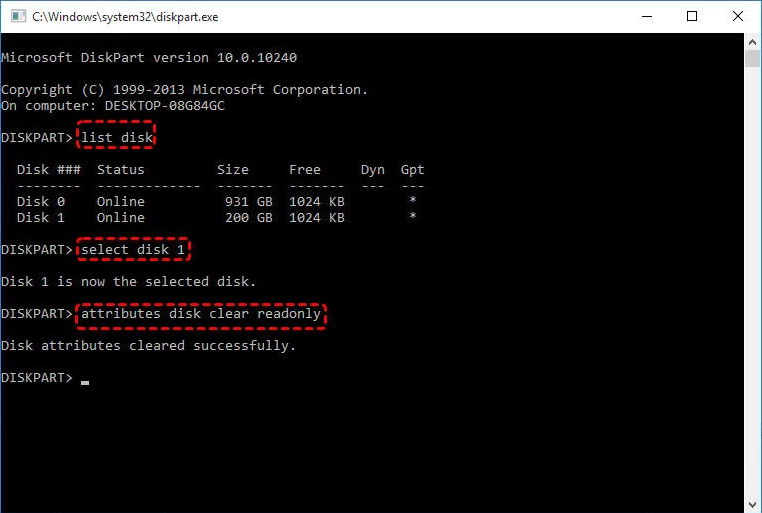
If you see the message "Disk attributes cleared successfully", type exit to close diskpart. Then, return to the Command Prompt and run the chkdsk command again. This time, the disk should be checked and repaired without the write protection issue.
Fix 3. Clear read-only in Registry Editor
If Method 2 didn’t work, don't worry! Here’s another solution you can try using the Registry Editor:
Step 1. Press "Windows + R" to open the Run dialog, type regedit, and press Enter. Click Yes when asked for permission.
Step 2. In Registry Editor, navigate to:
HKEY_LOCAL_MACHINE\SYSTEM\CurrentControlSet\Control\StorageDevicePolicies.
Step 3. Find the "WriteProtect" key, right-click it, and set the value to 0.
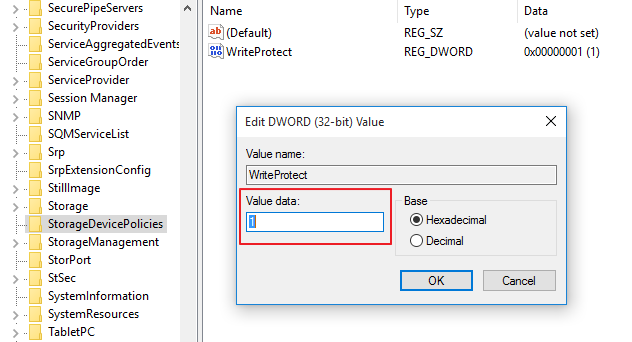
Step 4. If you don’t see "StorageDevicePolicies" in the specified path, go to HKEY_LOCAL_MACHINE\SYSTEM\CurrentControlSet\Control.
Step 5. In the right pane, right-click in the space and select New > Key. Name it StorageDevicePolicies.
Step 6. Select the StorageDevicePolicies key. In the right pane, right-click and choose New > DWORD (32-bit) Value.
Step 7. Name the new value WriteProtect and set its value to 0.
This should disable the write protection and allow you to run disk checks without encountering the "Windows cannot run disk checking on this volume because it is write protected" error.
Fix 4. Format the volume
If none of the previous methods have resolved the issue, another effective way to remove write protection and fix the "Windows cannot run disk checking on this volume" error is by formatting the partition. You can do this either using Windows Disk Management or a third-party tool like AOMEI Partition Assistant. Below are the steps for both methods:
Option1: Format partition with Disk Management
Disk Management is a built-in utility in Windows that allows you to manage partitions. Here's how to format your partition using Disk Management:
Step 1. Right-click the Start menu and select Disk Management. Or press Win + R, type diskmgmt.msc, and press Enter.
Step 2. Locate and select the target partition you want to format.
Step 3. Right-click it and choose Format.
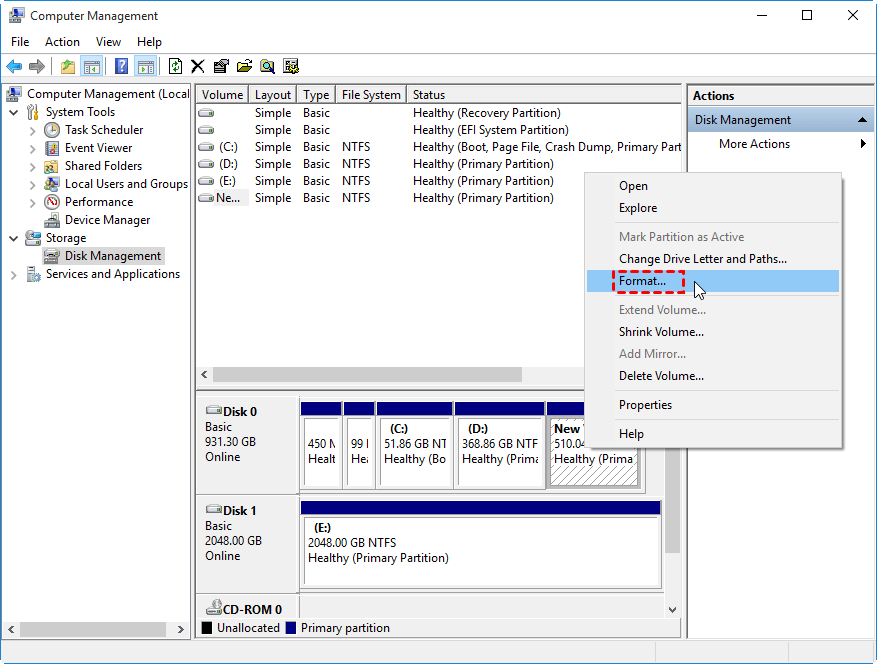
Step 4. In the Format window, set the volume label, file system, and allocation unit size. Click OK.

Step 5. Ensure that a quick format is performed to avoid data being irrecoverable.
Step 6. Confirm the warning by clicking OK.
Option 2: Format partition with AOMEI Partition Assistant
If you prefer a third-party tool, AOMEI Partition Assistant is an excellent option. This free tool offers advanced partition management features. Here’s how to use it:
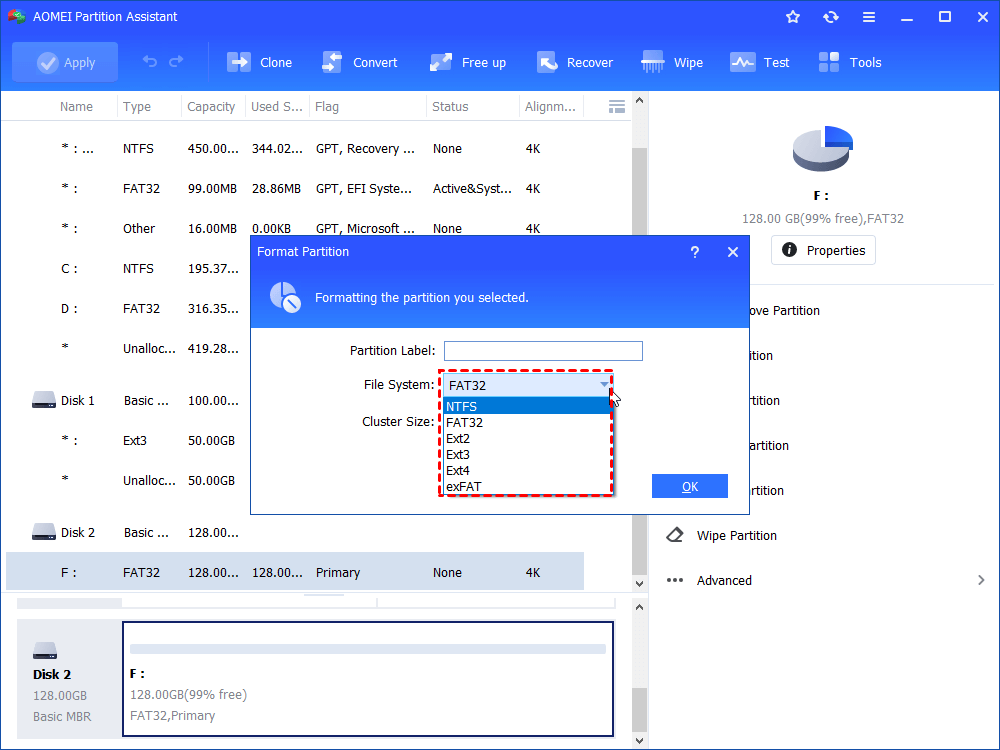
Step 1. Install and launch AOMEI Partition Assistant. Right-click the drive with read-only attribute and select “Format Partition”.
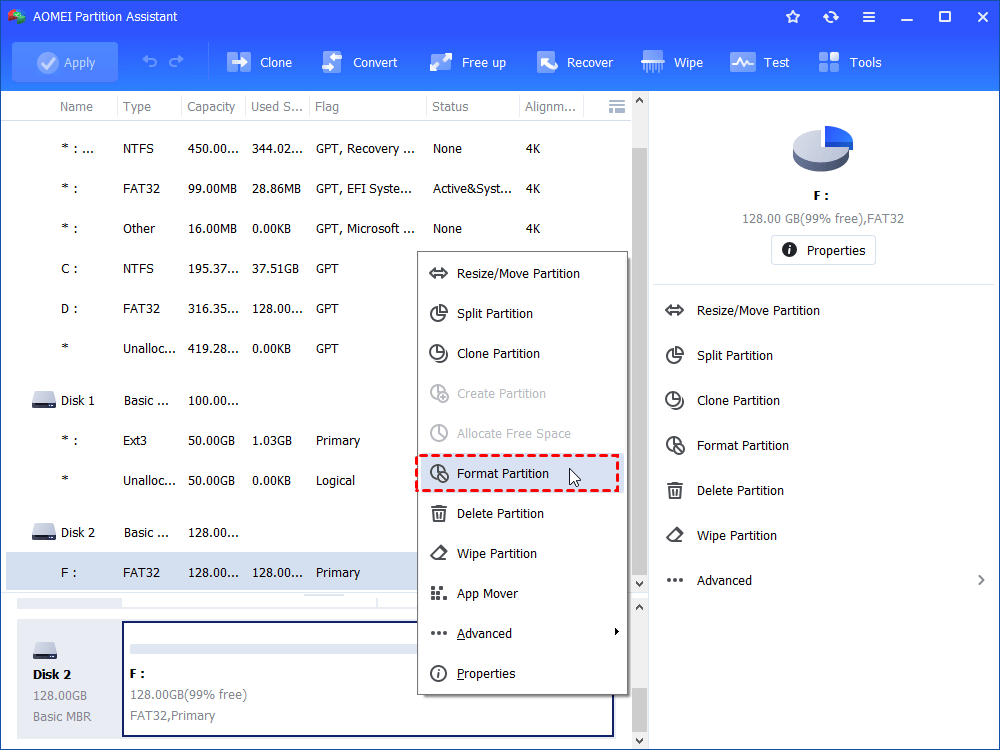
Step 2. Select a desirable file system from the given list, then click “OK” to continue.
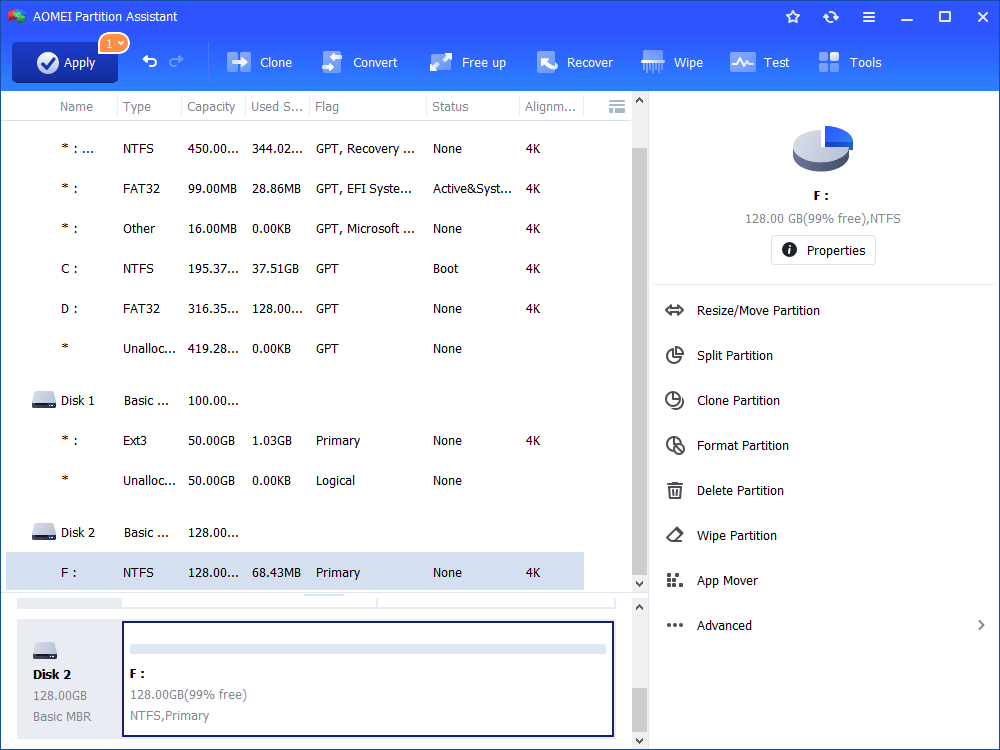
Step 3. In the main interface, click “Apply” and then “Proceed” to execute the formatting operation.
This method provides a more robust solution for partition management, and it’s trusted by millions of users. You can download the software and start formatting your drive to resolve the error.
Fix 5. Check and fix hard drive error
If you're unable to run CHKDSK via Command Prompt due to the error "Windows cannot run disk checking on this volume because it is write protected", you can try using alternative methods to check and fix your file system.
AOMEI Partition Assistant offers a reliable Check Partition feature, which acts as an alternative to CHKDSK. This tool allows you to scan and fix file system errors on your hard drive.
Here’s how to use AOMEI Partition Assistant to check the disk error:
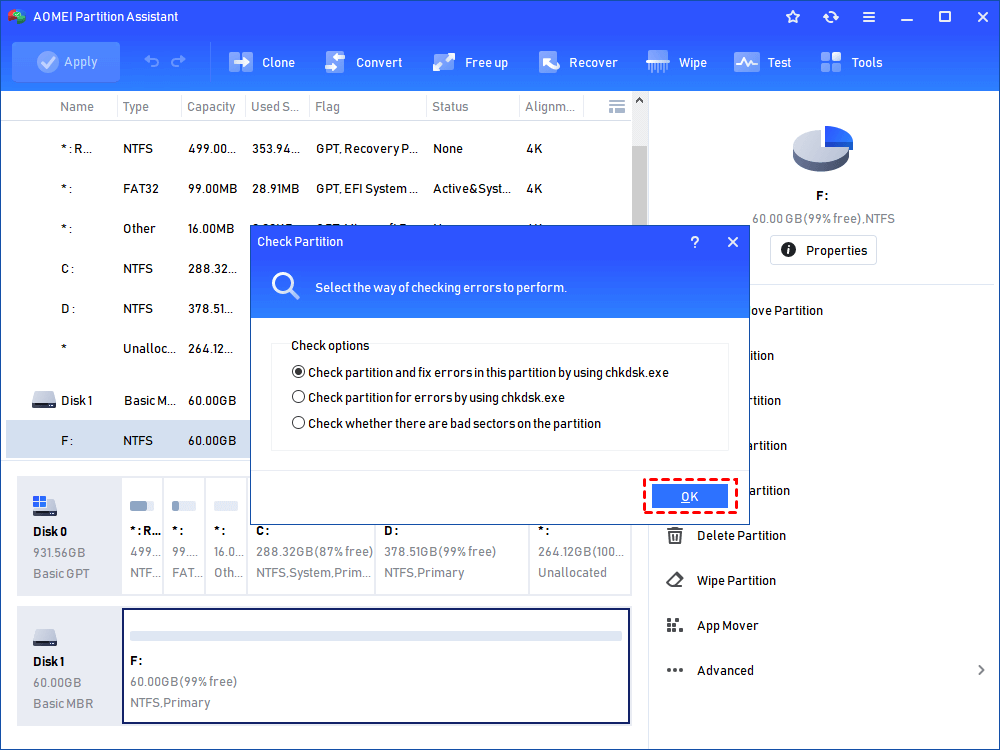
Step 1. Run AOMEI Partition Assistant. Right-click the read-only drive and choose "Advanced" > "Check Partition".

Step 2. Choose the first method to check and fix found error and click "OK".
Step 3. Then wait for the process to be completed.
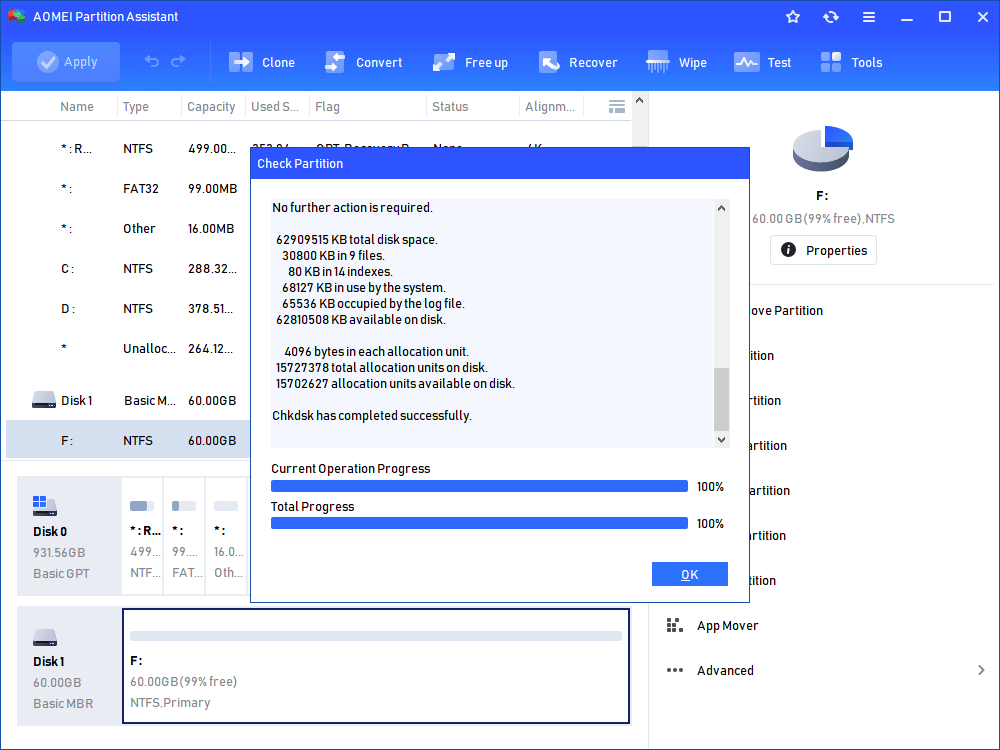
Using this method can help bypass the write protection error and allow you to fix any issues with the disk.
Conclusion
The error "Windows cannot run disk check write protected" typically arises from two main causes: write protection on the disk or file system errors. Fortunately, the solutions to fix this issue are straightforward—either by removing the write protection or resolving file system errors. Hopefully, one of the methods outlined above will help you effectively resolve the issue and restore your hard drive’s functionality.