Simple Steps to Upgrade PS4 500GB to 1TB without Reinstalling Games
If your PS4 500GB hard drive just leaves little space to install new games, you can upgrade the PS4 500GB to 1TB hard drive to get more storage space. Here you will learn the easiest way to finish the disk upgrade without installing current games again.
By Emily / Updated on September 14, 2024
Can we upgrade PS4 500GB to 1TB?
“I though 500GB PS4 hard drive is enough for downloading and installing a lot of games. But I am wrong, the 500GB storage is not enough for all my games, I though it will last me much longer but this is not the case. So, I decided to upgrade this PS4 500GB hard drive to an 1TB disk, then I can enjoy more games. But how to complete this task? Need help!”
Due to the growing library of games on your new PlayStattion4, you might need more space to save them all. Under this situation, you might wonder if you can upgrade the PS4 500GB hard drive to an 1TB hard drive. Luckily, you can upgrade it to a larger disk and the process can be quite easy as long as you employ the right method.
Traditional way to upgrade PS4 hard drive to 1TB hard drive (Backup&Restore)
To finish the PS4 500GB hard drive to 1TB hard drive upgrade, for most game lovers, the traditional way is to directly remove the old one and install the new one. Swapping the PS4 console’s drive is simple and all you need is a screwdrive. However, you will need back up all your data first, reinstall the PS4 operating system on the new drive, and finally restore your games. This can be a bit complex and you have to prepare one or two USB drives. Now, let’t walk through the detailed steps:
- Preparation work:
- PS4 full-size system
- Phillips screwdriver
- A computer connected to the Internet
- External storage device with at least 1GB of free space
- Officially supported replacement 1TB hard drive. Only the 2.5-inch internal type (9.5mm or slimmer)* and Serial ATA (Parallel ATA is not supported) internal hard drives are officially supported with the PS4 system.
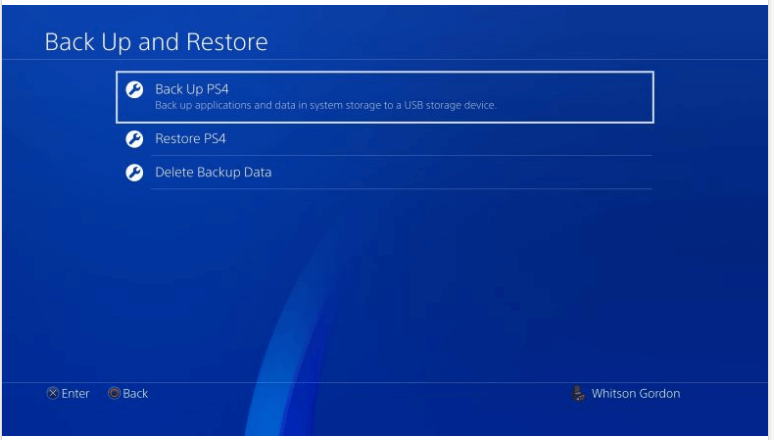
Step 1. Insert an empty USB drive to your PS4 game console and head to “Settings” >”System” > “Back Up and Restore” in the home screen. Select the “Back Up PS4” option to selectivly back up what you need.
Note: If you subscribe to PS Plus, you can instead head to ”Settings” > “Application Saved Data Management” > “Saved Data” in System Storage and select “Upload to Online Storage”
Step 2. Once the backup is done, please go to “Power” > “Power Options” > “Turn Off PS4” to shut down your PS4 completely. Wait for the light until it stops blinking and unplug the power cable.
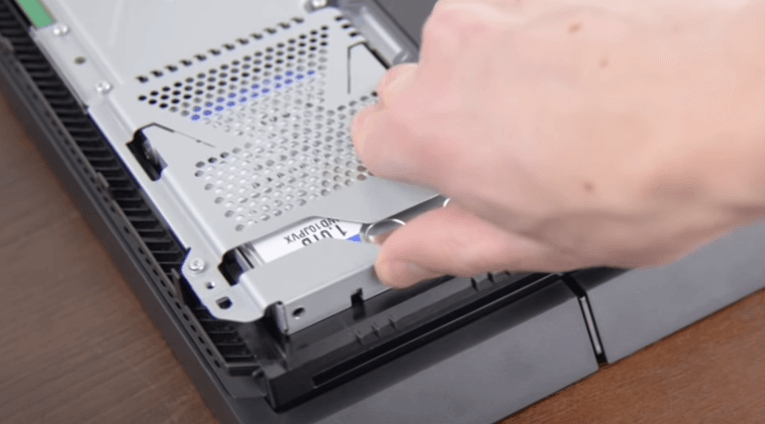
Step 3. Turn the PS4 console around and look for the hard drive cover to the right of the ports. Find the notch on the side and use your finder to swing it open.
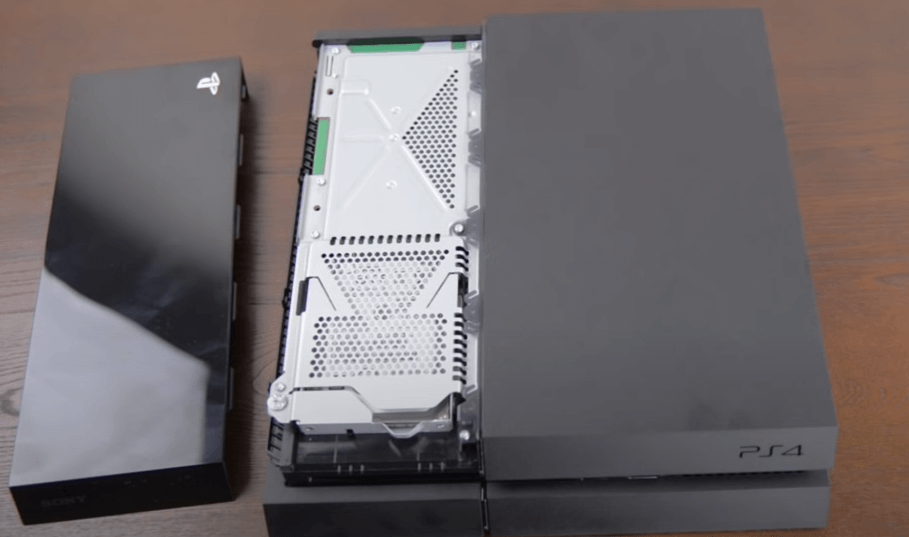
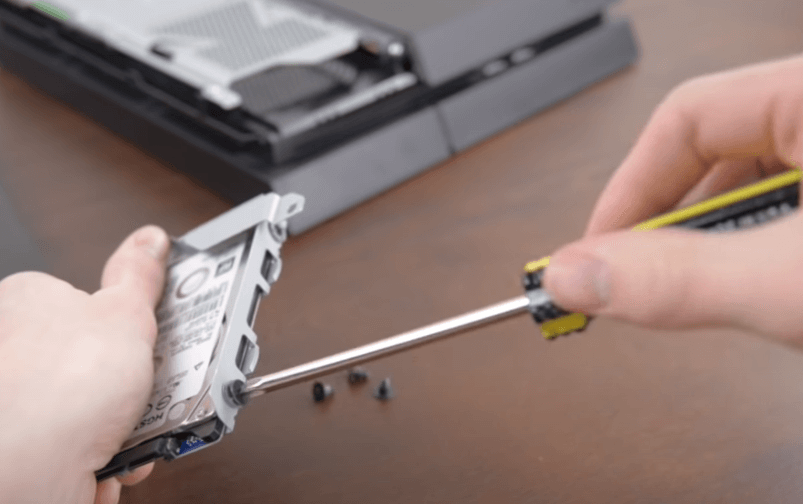
Step 4. Unscrew the screws and then pull the hard drive cage toward you. And remove screws holding the 500GB drive in place and replace it with the 1TB hard drive.
Step 5. Insert another USB drive (not the one used to back up PS4 data in the first step) to your computer. Format the USB to FAT32 file system to make sure it is compatile with PS4. Then create a folder on the drive named PS4 and inside the PS4 folder create another folder named UPDATE.
Step 6. Visit the PS4 System Software Update site, download and install the system update files in the UPDATE folder you just created in the PS4 folder.
Step 7. Eject the USB flash drive with system update and plug into your PS4 USB port. Press and hold the power button until you hear the second beep. Then you can get into Safe Mode.
Step 8. Choose “Initialize PS4”, and press “X” button on the console .
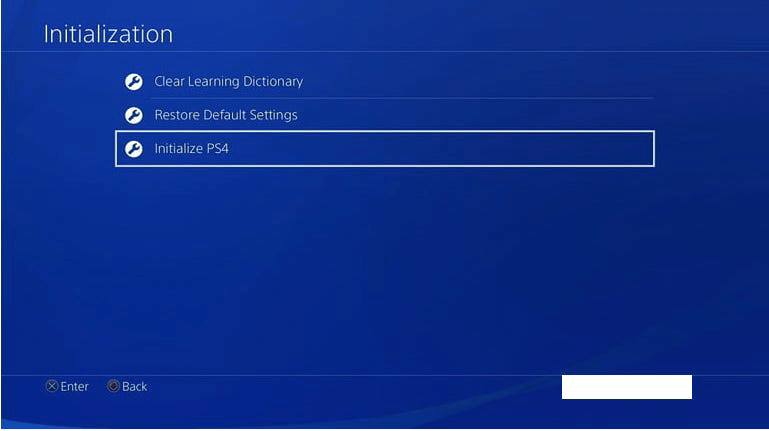
Step 9. Press “OK” and choose “Next” to install the PS4 update files on your PS4. Once done, read the System Software License Agreement, select "Accept", and press the "X" button. The system software will start to install onto the PS4.
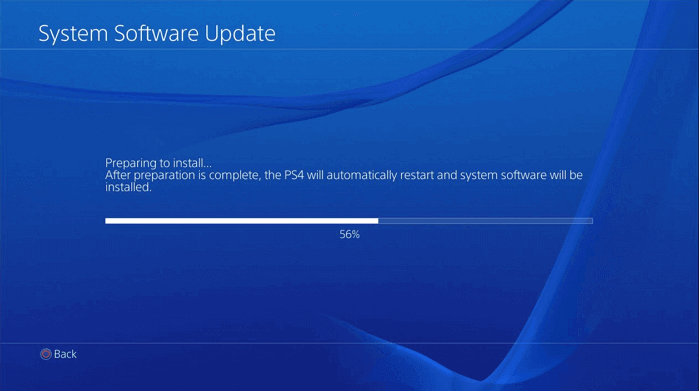
Step 10. After the update is completed, the PS4 will restart. Then, press the PlayStation button on your controller and log into your PS4 account.
Step 11. Insert the USB drive with backup and go to “Settings” > “System” > “Back Up and Restore” > “Restore PS4”.
Note: If you backed up via PS Plus, head to ”Settings” > “Application Saved Data Management” > “Saved Data in Online Storage” > “Download to System Storage” instead.
Your PS4 data is now successfully restored on your 1TB hard drive.
Easier way to upgrade PS4 500GB hard drive without reinstalling games
On the whole, the first traditional way is a process of backing up PS4 data, replacing the 500GB with the 1TB hard drive, restoring the backup to the 1TB hard drive. Quite time-consuming! So, today we share an easier way to upgrade PS4 500GB hard drive with 1TB one without reinstalling all games. That is to transfer all data from the 500GB hard drive to the 1TB hard drive by disk clone method. In this way, all games can be moved to the new disk and work as normal in the old one.
To complete the cloning task, you can make use of the software: AOMEI Partition Assistant Professional. This partition manager comes with “Disk Clone Wizard”, allowing you to clone either every sector or only used sectors from one disk to another one. Moreover, everything including OS, programs, applications, games, etc can boot and load successfully after clone. Now, you can download this powerful software and take the following steps.
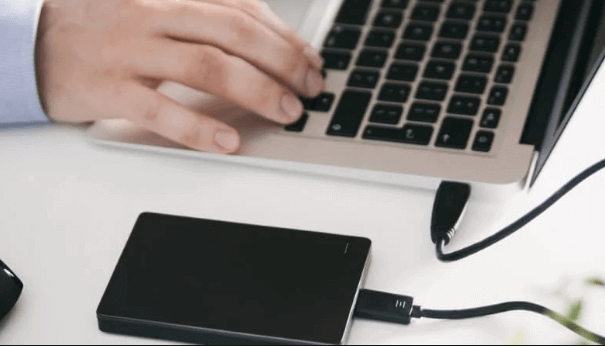
Step 1. Take out the 500GB hard drive from the PS4 console as the first method instructed. Then connect it and the 1TB hard drive to a Windows computer via a USB connection. Connect the USB cable to the hard drive and the other end to a USB port on the computer. Make sure both are recognized by your computer's operating system.
Step 2. Install and launch AOMEI Partition Assistant, click "Clone" in the main interface, and select "Clone Disk".

Step 3. Choose the hard disk that you need to clone as the source disk and click "Next".

Step 4. Select another drive as the destination disk, and then click "Next".

Step 5. Then, you can check the source and destination disk in the next window or change to "Sector to Sector clone", and click the "Confirm" button to continue if there is no problem.

Here, you can also click the "Settings" button to adjust the partition size on the destination disk or tick "4k alignment" to improve the reading and writing speed of the SSD.

Step 6. You can preview the disk cloning operation by viewing the "Pending Operations". To commit the "Pending Operations", please click "Apply" and "Proceed".

Once the clone process is finished, you can install the 1TB hard drive into your PS4 game console to replace the old 500GB hard drive.
Summary
So, generally, there are at least two ways to upgrade PS4 500GB drive to 1TB drive. If you want to finish the upgrade without reinstalling everything, the AOMEI Partition Assistant Professional can satisfy you well. Besides, it comes with other features: migrate OS to SSD drive, convert MBR and GPT without deleting partitions, split partition, convert dynamic disk to basic one without data loss, and more.

