How to Unboot USB Drive to Normal in Windows 11/10/8/7(3 methods)?
Need to unboot USB stick? This article will illustrate 3 methods to unboot USB flash drive to normal status.
Scenario
Why unboot USB pen drive to normal?
Sometimes, you create a bootable USB or SD card to access your computer and fix the boot issue and do other operations. After that, the bootable USB maybe not necessary any longer, and you may want to unboot the USB stick so that you can reuse it as a storage device to store or backup data and files again.
Compared with a normal USB pen drive, a bootable USB stick contains a starting program and a pre-stalled Windows environment. Thus, you just need to delete the starting program and Windows environment by formatting and your USB will be converted to its normal state.
Now, let’s see how to unboot your bootable USB/SD/disk to normal.
3 methods to unboot USB pen drive to normal in Windows 11/10/8/7
Here we are going to provide you with 3 methods to help you to restore USB pen drive to the normal state in Windows 11/10/8/7.
Method 1. Unboot USB with Disk Management
Plugin the bootable USB stick. And follow the steps to format USB with disk management.
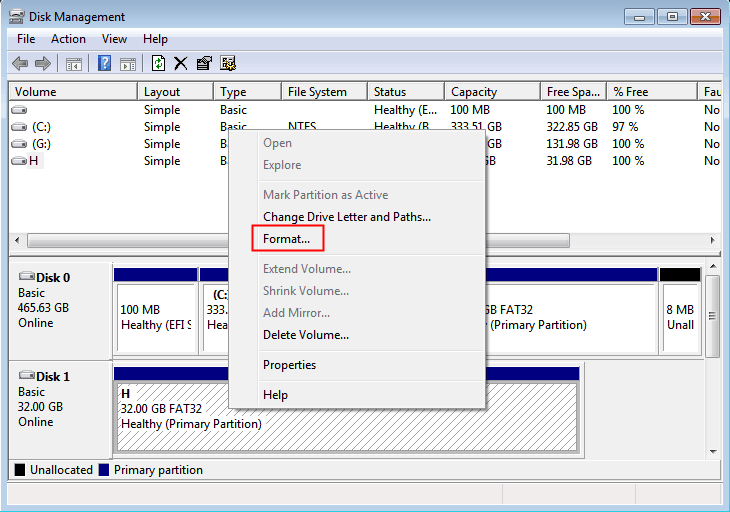
Step 1. Press “Win + R” to open “Run” box, and type “diskmgmt.msc” to open Disk Management.
Step 2. Right-click the bootable USB drive, and select “Format”.
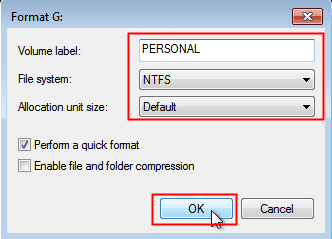
Step 3. Fill in the volume label and select a correct file system, default the allocation unit size. Then click “OK”.
Method 2. Unboot USB using diskpart
Besides Disk Management, you can also use diskpart to unboot bootable USB.
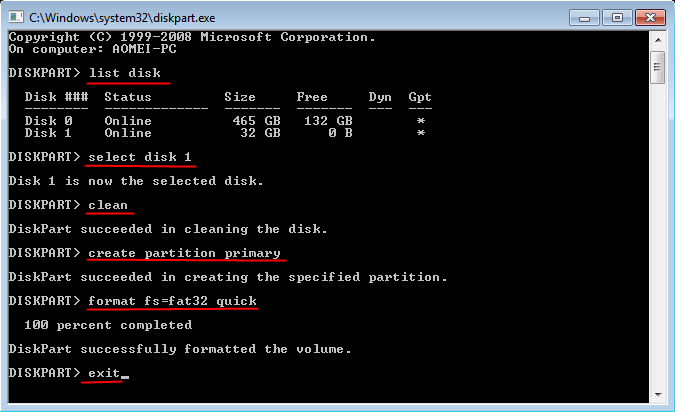
Step 1. Type “diskpart” in the Run box to launch the diskpart.exe utility window.
Step 2. Input the following commands one by one, and press Enter after typing each one to execute it.
-
list disk
-
select disk n (n is the disk number of your bootable USB)
-
clean
-
create partition primary
-
format fs=fat32 quick or format fs=ntfs quick (select one file system based on your own needs)
-
exit
You can unboot USB with the 2 Windows build-in tool mentioned above, but success is not guaranteed every time. And the Diskpart cannot format a USB that larger than 32GB to the FAT32 file system. Moreover, if you make mistakes during the operation, you can’t undo any steps immediately. Thus, you’d better choose a professional USB formatting tool for unbooting USB.
Method 3. Unboot USB via AOMEI Partition Assistant
Here, we recommend a reliable and professional USB formatting tool-AOMEI Partition Assistant Professional. This utility allows you to easily format USB, HDD, SSD, SD and other storage devices in Windows 11/10/8/7, XP, and Vista. And you can format hard drive larger than 32GB into FAT32, NTFS, Ext 2, Ext 3 and other file systems.
You can download a Demo version to have a try. And let me walk you the specific steps to unboot USB with AOMEI Partition Assistant.
Step 1. Open AOMEI Partition Assistant Professional, and right-click the USB stick in the main interface, and select “Format Partition”.
Step 2. Select a file system and click “OK”.
Step 3. You will go back to the main interface, and click “Apply” and “Proceed” in the interface. Then wait for the formatting to be completed.
✍Note:
1. If you need to make a bootable media again, you can try the “Make Bootable Media” provided by AOMEI Partition Assistant to start your computer and fix boot issue, format hard drive without booting into Windows.
2. Actually formatting a USB cannot erase all data on it totally, but with AOMEI Partition Assistant, you can also completely wipe data on your USB flash drive.
Conclusion
With the 3 methods above, I hope you can unboot USB pen drive to normal state. By contrast, the AOMEI Partition Assistant is much more convenient and efficient than the first 2 methods.
Moreover, AOMEI Partition Assistant Professional is more than a formatting tool. It can assist you in converting file system from FAT32 to NTFS, Migrating OS from GPT disk to GPT/MBR SSD or HDD, recovering lost data, etc.
If your computer is running with Windows Server system, you can try AOMEI Partition Assistant Server Edition.


