How to Reset Only C Drive in Windows 10 or 11
When your computer is facing major issues, resetting the C drive can often be the most effective solution, which helps eliminate system errors while preserving data on other partitions. Read on to learn how to reset only the C drive in Windows 10 without affecting the rest of your storage.
By Hedy / Updated on April 25, 2025
Why need to reset C drive in Windows 10?
Resetting the C drive in Windows 10 usually refers to resetting the system to its default state or reinstalling Windows on the main partition (C: drive). There are several reasons why someone might need to do this. Here are the most common ones:
1. System performance issues
Over time, your system may become sluggish due to cluttered files, background apps, and corrupted system settings. Resetting the C drive can bring your computer back to a clean, fast state.
2. System file corruption
Critical system files can become corrupted due to unexpected shutdowns, failed updates, or software conflicts. A reset will reinstall Windows and replace those corrupted files.
3. Blue screen errors (BSOD)
Frequent crashes or blue screen errors can indicate deep system-level issues. Resetting the system can often resolve these issues if they are caused by software or system conflicts.
4. Forgotten admin password
If you're locked out of your PC and can’t reset your password, a full reset of the C drive (reinstalling Windows) may be the only solution to regain access.
5. Preparing for sale or transfer
Before giving away or selling a PC, resetting the C drive ensures that all your personal files, settings, and apps are removed, protecting your privacy.
Note: Resetting the C drive will remove all installed programs and system settings. Depending on your option, it may or may not keep your personal files, so it’s always a good idea to back up your data before performing a reset.
Preparation for resetting C drive on a Windows PC
Before wiping your C drive, it's essential to take a few critical precautions. Since resetting or erasing the C drive will remove all system files and personal data, creating a full backup is a necessary first step. Whether you're planning to reset your system or upgrade your drive, backing up or cloning the C drive ensures you don’t lose important information.
In this situation, using professional disk cloning software is highly recommended. AOMEI Partition Assistant is one of the most reliable tools available for Windows 11, 10, 8, and 7. This all-in-one solution supports disk and system cloning.
Additionally, AOMEI Partition Assistant lets you clone only the C drive to another hard drive. Follow the steps below to begin your disk cloning process.
Step 1. Install and launch AOMEI Partition Assistant, click the "Clone" main tab and select "Clone Disk". (You can also right-click the Disk you want to clone and select the "Clone Disk" tool to run disk clone.)

Step 2. Choose the hard disk that you need to clone as the source disk and click "Next".

Tips: To make a bootable disk clone, please select the system drive of the current computer with Partition Assistant installed as the source drive.
Step 3. Select the destination disk to put the data of the source disk on, and then click "Next".

Step 4. Then, you will enter the Confirm interface where you can check the source and destination disks. After all is set, you can click the "Confirm" button to continue.

After finishing the adjustment, please click "Save".

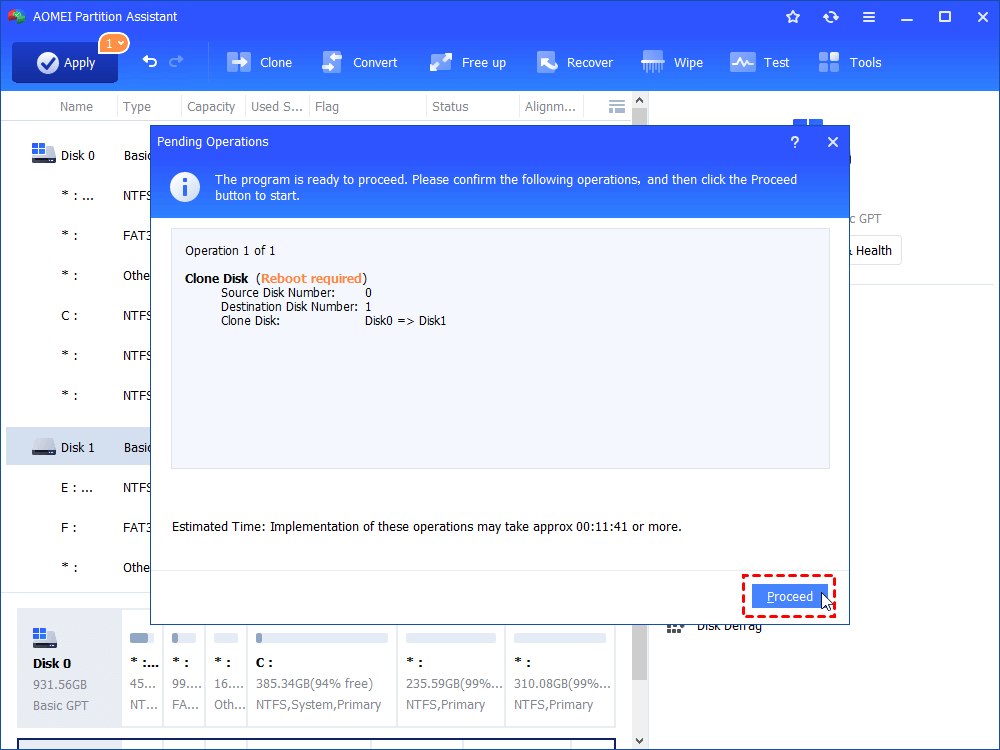
Step 5. You can preview the disk cloning operating by viewing the "Pending Operations". To commit the "Pending Operations", please click "Apply" and "Proceed".

Step 6. The cloning process will start and you can check the cloning process.
2 ways to wipe C drive on Windows 10 computer
This section outlines two reliable methods to reset only your C drive. Before moving forward, it’s crucial to back up all important files, as these processes will erase everything stored on the C drive.
With that in mind, here are the two most effective ways to wipe the C drive on a Windows 10 system:
Way 1. Resetting C drive by resetting this PC in Windows 10
The first method involves using Windows 10’s built-in reset feature, a trusted and straightforward way to restore your system. This process removes system configurations and third-party applications while giving you control over how thoroughly the C drive is wiped. Follow these steps:
Step 1. Click the start button and then click "Settings" on the menu popped.
Step 2. Select "Update and recovery" and click on "Recovery" in the left taskbar.
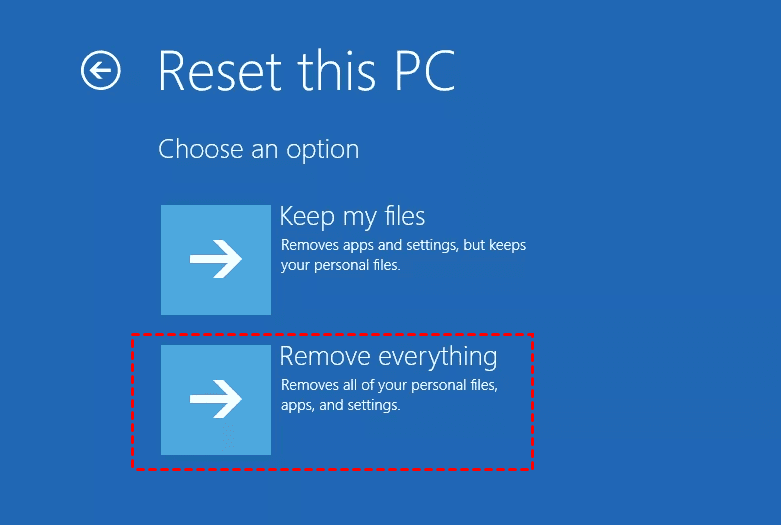
Step 3. Click on "Get Started" under the "Reset this PC" option, then click "Remove everything".
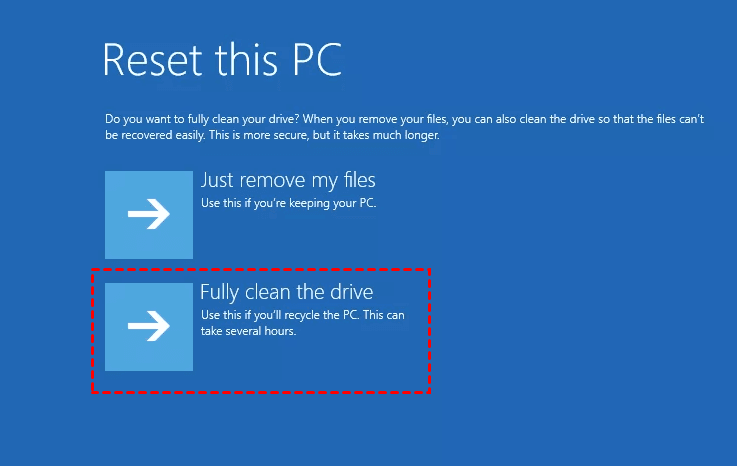
Step 4. Select "Fully clean the drive" option.
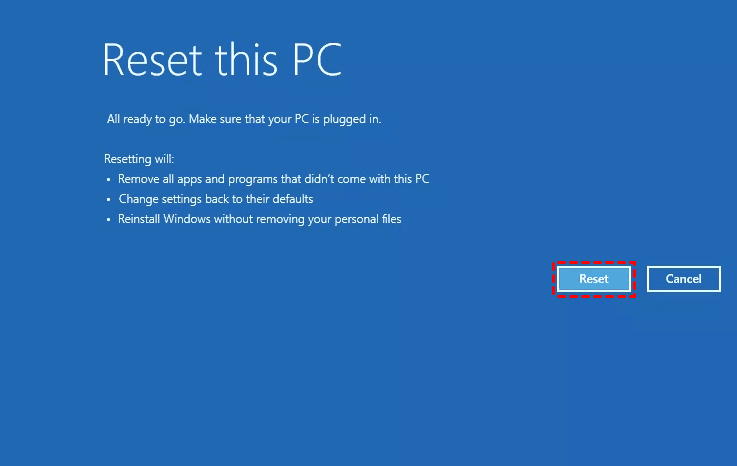
Step 5. Check the whole operation and click "Reset".
Once finished, your system will return to a clean state with the C drive wiped according to the option you selected.
Way 2. Wiping the only C drive via Diskpart
This method walks you through wiping the C drive using Diskpart, a powerful command-line tool built into Windows. Be warned: this process will erase all data on the C drive.
Step 1. Press "Windows" and type "cmd", then select "Run as administrator".
Step 2. Type the command that the picture shows (replace "f" with the drive which you want to wipe) and press "Enter".
Step 3. Type "y" and press "Enter" to wipe the data.
Step 4. You'll be prompted to enter a Volume label, then you should type the name of the drive or you can press "Enter" to skip it.
Step 5. Wait until "Creating file system structures" appears on the screen.
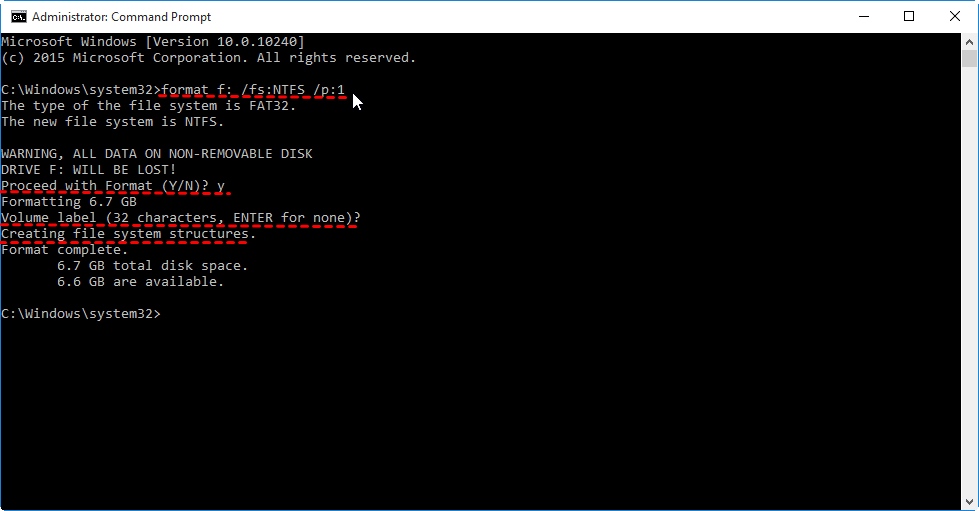
Step 5. Input "exit" and press "Enter" to close the window after you wipe this hard drive.
-
Double-check the disk number before executing the clean all command to avoid wiping the wrong drive. If possible, disconnect all other internal drives before starting to prevent accidental deletion.
Once the process completes, your C drive will be fully wiped and ready for a clean Windows installation.
Conclusion
That’s how to reset only C drive in Windows 10. These two primary methods give you full control over wiping your C drive and erasing all data from it. Keep in mind, this is a permanent action. Once initiated, everything on the C drive will be deleted.
That’s why it’s critical to create a complete backup using a trusted tool like AOMEI Partition Assistant before starting. Follow each step carefully, double-check your drive selections, and proceed only when you're confident you're wiping the correct drive- your C drive on Windows 10.