How to Reformat Alienware Laptop in Windows 10, 8, 7 [Two Ways]?
This post will show you how to reformat Dell Alienware laptop in Windows 10, 8.1, 8, 7 with Windows installation CD/DVD or via a bootable USB drive.
Need to reformat my Alienware laptop
“My Dell Alienware M11x laptop, with Windows 10 installed, has been running slowly for a long time; and now it is even stuck at loading Windows screen. To restore the performance of it, I plan to reformat the laptop but don’t know how to do it? Thanks for your help!”
If you are in the situation aforementioned, it’s not a bad choice to reformat your laptop. However, you should know that reformat the laptop hard drive will erase all data, including operating system. And you need to reinstall OS for using it again.
Format/reformat Dell Alienware from Command Prompt
When you have Windows installation CD/DVD, you can format your Dell Alienware laptop hard drive from Command Prompt.
Step 1. Insert Windows installation CD/DVD into your Dell laptop and restart it.
Step 2. Enter BIOS and boot from the installation disc.
Step 3. In the Windows Setup screen, press shift + F10 to access Command Prompt.
Step 4. Run commands listed below:
◆ diskpart
◆ list disk
◆ select disk n (“n” is the disk number of the hard drive that you intend to format)
◆ clean
◆ exit
Format/reformat Alienware with USB drive
If you are unable to access Command Prompt to format your Dell laptop. You can achieve your goal under the help of a third-party partition manager, AOMEI Partition Assistant Standard.
It enables you to create a bootable USB drive and then format or wipe laptop hard drive in Windows 10/8.1/8/7. Free download it and have a look at how it works:
Part 1. Create a bootable USB drive via the tool
Warning: All data saved on the USB drive will be erased, back up necessary files in advance.
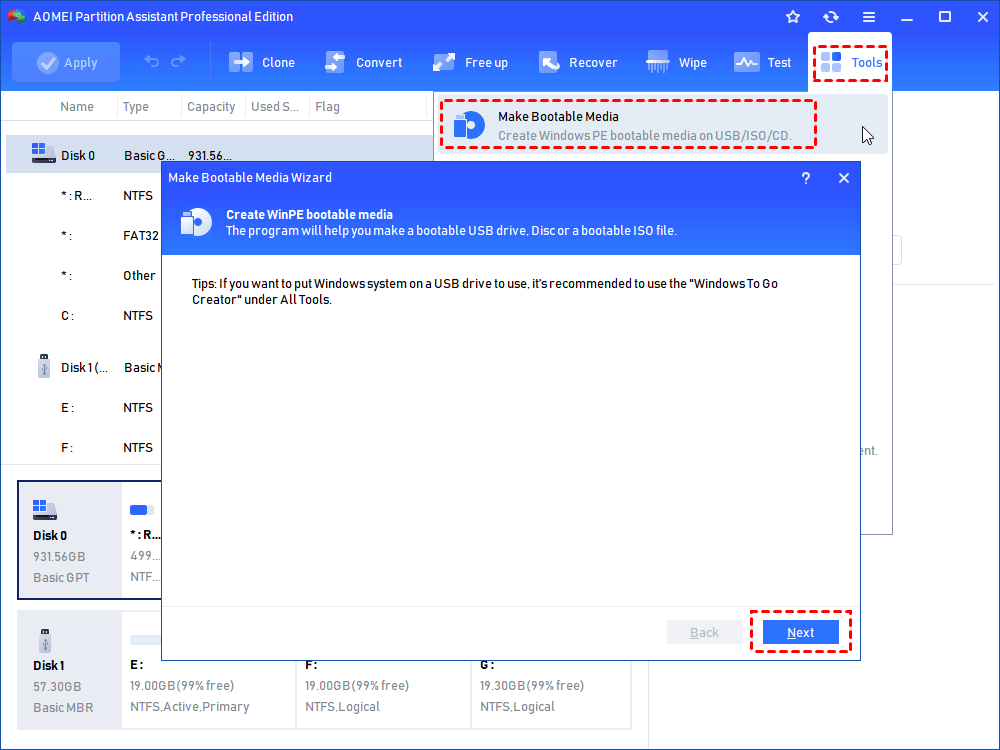
Step 1. Connect a USB drive to a working PC. Install and run AOMEI Partition Assistant Standard on the computer. In the top toolbar, click “Tools” > “Make Bootable Media”.
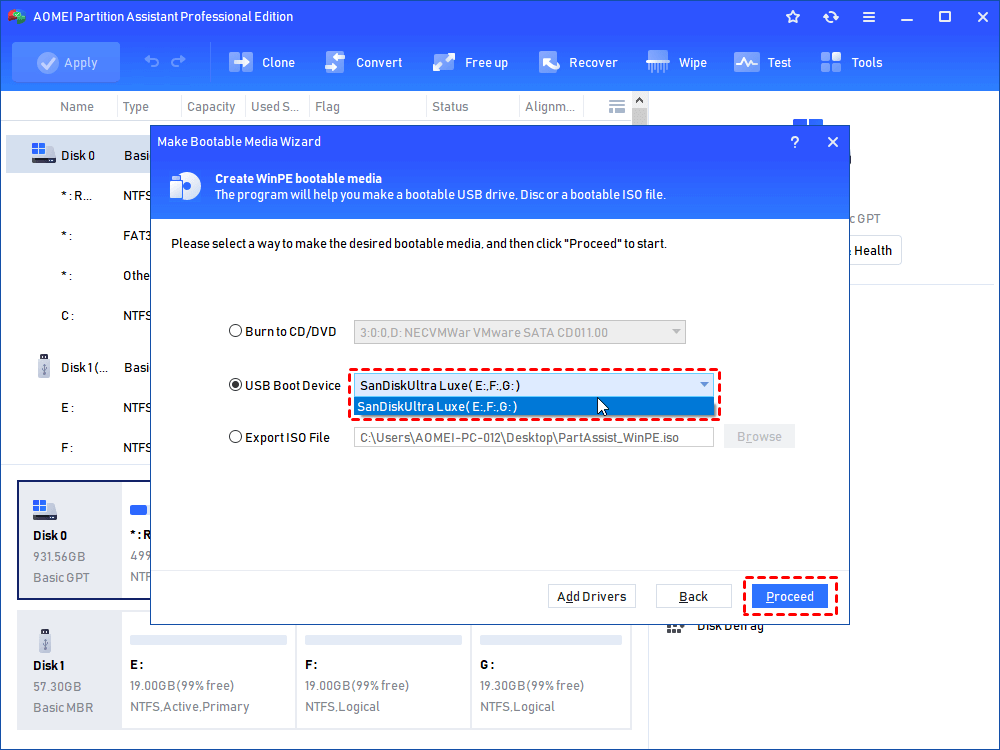
Step 2.Choose “USB Boot Device” and click “Proceed”.
Step 3. Click “Yes” to perform this operation.
Part 2. Boot your Dell Alienware laptop from the USB drive
After creating a bootable USB drive via AOMEI Partition Assistant Standard, insert the drive to the Alienware laptop that you want to format. Reboot Alienware laptop, constantly press F2 to enter BIOS and boot from the bootable USB drive.
Part 3. Format/Reformat the Alineware laptop hard drive
After booting successfully from the USB drive, you’ll in the main interface of AOMEI Partition Assistant Standard.
Step 1. In the main interface, right-click the hard drive and choose “Delete all partitions”.
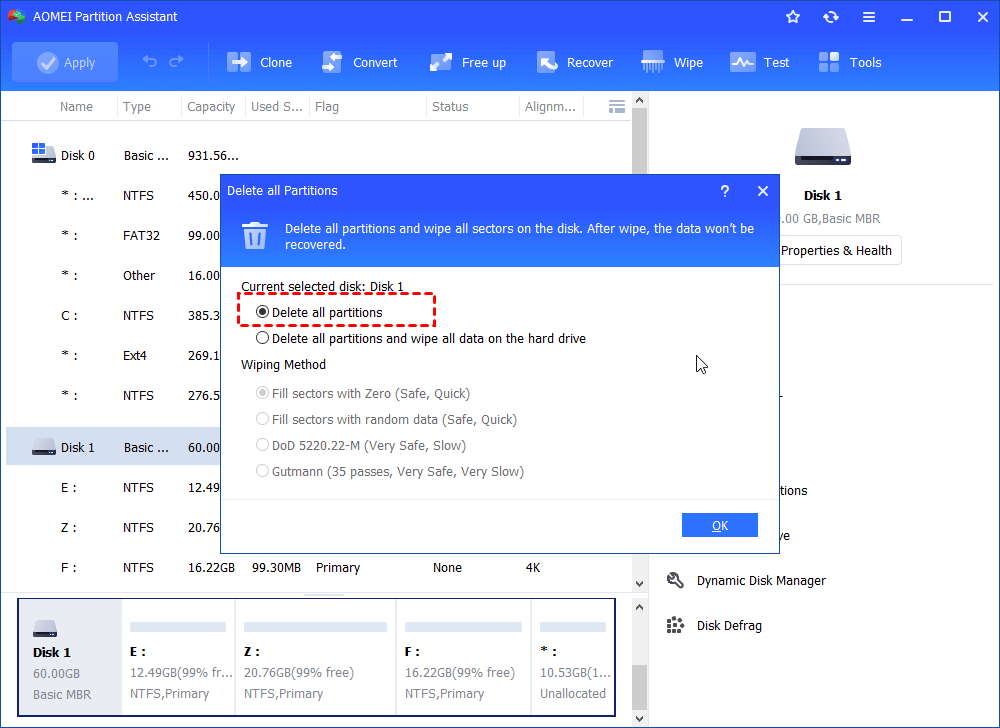
Step 2. Choose “Delete all partitions” and click “OK”.
Note: If you want to destroy data on hard disk drive completely, you can choose “Delete all partitions and wipe all data on the hard drive”.
Step 3. Click “Apply” and “Proceed” to commit the operation.
✍ Notes:
✔ If you want to only format a creation partition on the hard drive like partition C, right-click the partition, select “Format Partition” and follow the pop-up prompts.
✔ To get more advanced functions, such as migrating OS to GPT disk without reinstalling and cloning GPT system disk, you can employ AOMEI Partition Assistant Professional.
Further reading: factory reset Dell Alienware laptop
If you can normally boot your Alienware laptop that holds Windows 10, you can choose to factory reset it through those steps:
Step 1. Input “reset” in the Search box.
Step 2. Click "Get Started" under “Reset this PC”.
Step 3. Select “Keep my files” or “Remove everything” based on your own situation.
Step 4. Click “Reset” to start Alienware factory reset in Windows 10.


