4 Fixes: The File Is Too Large for the Destination USB Error in Windows
You will receive “The File Is Too Large for the Destination file system” if you want to handle files more than 4GB. In this passage, we will guide you to fix the file is too large for the destination file system by converting FAT32 to NTFS.
By Michael / Updated on July 30, 2024
User case: The file is too large for the destination file system
Recently I bought a new USB drive to save some important files on my PC. However, when I tried to transfer my files to it the notification “The File Is Too Large for the Destination file system” popped up. My USB is in 500GB while the files are only 10GB. Why did this happen? Could someone help?
- Question from Jason
When you transfer files, you may receive an error message like "The file is too large for the destination file system". In this passage, we will tell you the cause of it and how to fix that in 4 ways.
Why Do You Encounter “The File Is Too Large for the Destination USB”?
Sometimes, when you try transferring a large file, especially that larger than 4GB to your USB, a notification “The file is too large for the destination file system” may pop up. You spare no effort to reduce the size of the file but the result still fails you. Why does this bothering issue come out? To understand the cause, we must talk about file system first.
What is file system? File system usually controls the way files are stored, identified, and organized in a drive. On Windows-based computers, the commonest file systems are exFAT, FAT32 and NTFS. NTFS allows the maximum size of a file to be 16TB while its counterpart FAT32 only supports 4GB file size. So, now you should understand why the notification mentioned above always pops up on your screen – your USB drive’s partition is formatted in FAT32 while your transferred single file is beyond 4GB. In the help-seek post, he wants to transfer files with 10GB, so the notice "The file is too large for destination file system" shows up.

Which File System Should you use for fixing "file too large for USB"?
There are several file systems that break the 4GB file size limit of FAT32. The commonest are NTFS and exFAT. The former one supports up to 16TB large files while the latter one supports 16EB files.
As for NTFS, it performs better in data security and has higher reading and writing speed than exFAT. In compatibility, NTFS is totally supported by Windows XP and its later versions as well as Xbox One; As for exFAT, it is renowned for its good compatibility. It can be used on almost every version of Windows, Mac OS X, Xbox One, and PS4. Formatting the USB to either of them can fix the “file is too large for the destination file system” issue.
| exFAT (also named Extended File Allocation Table) | It is designed by Microsoft and was introduced in 2006, which is a file system optimized for flash memory like USB flash drives, SD cards. It has been adopted by SD Card Association as the default file system for SDXC cards larger than 32GB. |
| FAT32 | This is the oldest of the three file systems so that its compatibility across not just modern computers, but also other older devices. But it has some limitations that the maximum individual file size is 4GB, and a FAT32 partition must also be less than 8TB. It’s used in removable drives typically. |
| NTFS | NTFS is the modern file system that Windows likes to use by default, it breaks the restrictions of FAT32, this NTFS format usually used in internal hard drive. But, NTFS has the lowest compatibility of the three formats. |
4 Solutions to “File Is Too Large for Destination USB”
To deal with the issue “The file is too large for the destination USB”, here are the 4 solutions below that are thought to be the easiest and most pragmatic.
Solution 1. Change File System without Reformatting with Freeware
As we explained before, the most common cause of the file is too large for the destination file system can be the file larger than 4GB. To fix it, you need to convert it to NTFS or exFAT. To do so without unexpected accident and risk of data loss, it is recommended to use a professional FAT32 converter like AOMEI Partition Assistant. This can be a safe, effective, and straight solution for fixing "The file is too large for the destination USB" problem.
With this software, you can execute both FAT32 to NTFS and NTFS to FAT32 conversion with no hurdle. Besides, other features including disk clone and partition clone are also available.
The Best Windows Disk Partition Manager and PC Optimizer
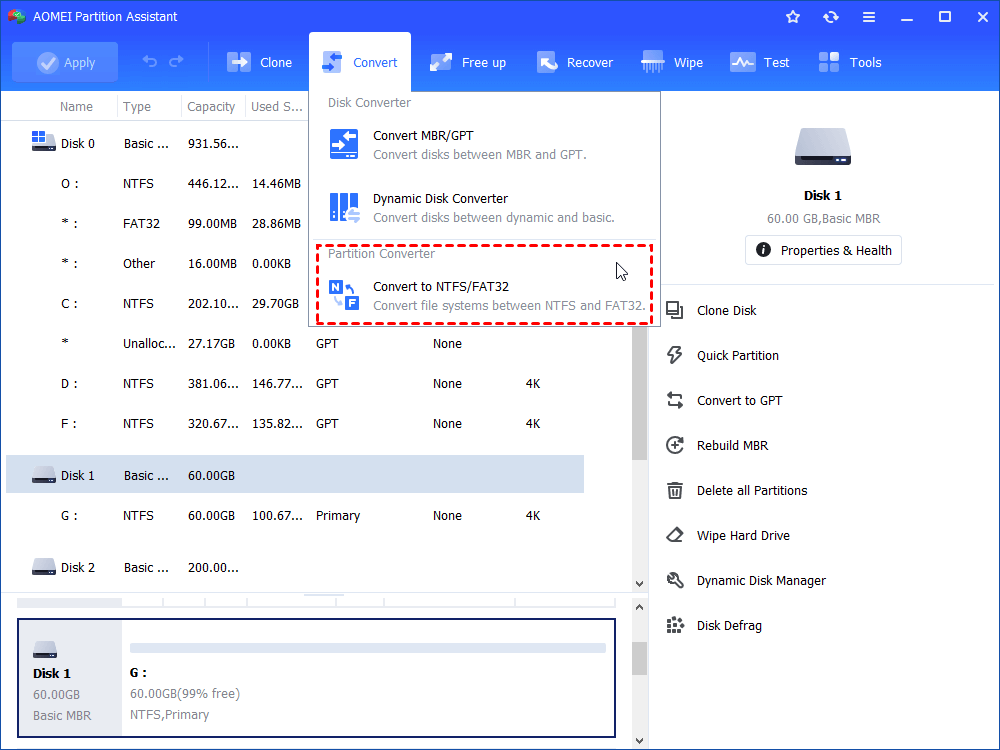
Step 1. Install and launch AOMEI Partition Assistant Standard and you’ll see all disks and partitions on the interface.
Step 2. Select “Convert” on the top and then, hit “Convert to NTFS/FAT32”.
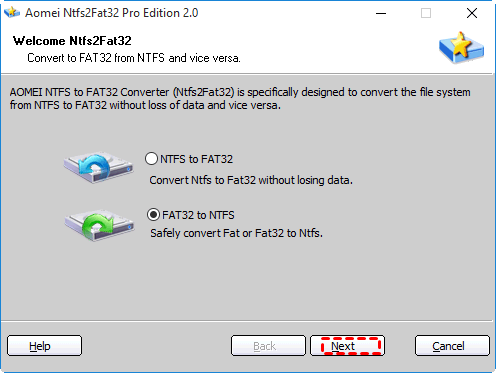
Step 3. Select “FAT32 to NTFS” and click on “Next”.
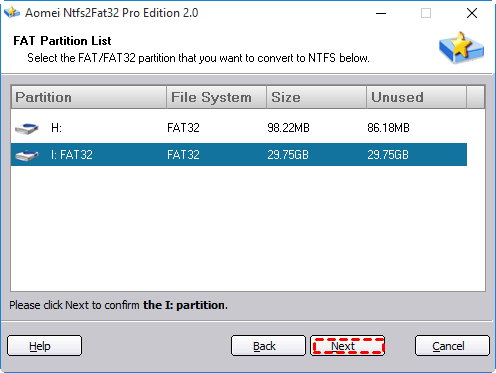
Step 4. Choose the partition you hope to convert to NTFS and click on “Next”.
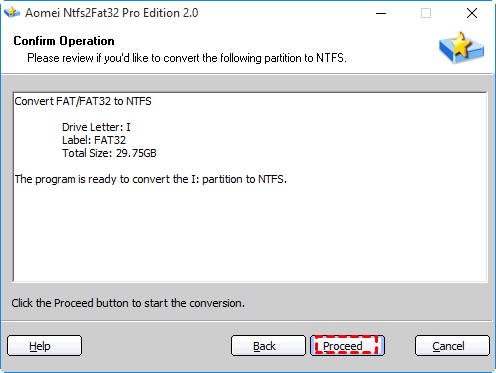
Step 5. Then, confirm the operation and click on “Proceed” to start the process.
Step 6. After finished, click on “Finish” to return to the main interface and now, you’ll find the FAT32 partition has been turned into NTFS.

Solution 2. Compress Files to Smaller Ones
Compression makes files smaller and easier to transfer. In Windows, the inbuilt way to compress files is to turn them into ZIP files, which reduces the files’ size without any data loss. Here, let’s see how to conduct it.
Step 1. Locate the file you want to compress and right click on it.
Step 2. Move your cursor over “Send to” and select “Compressed Folder” to begin the compressing process.
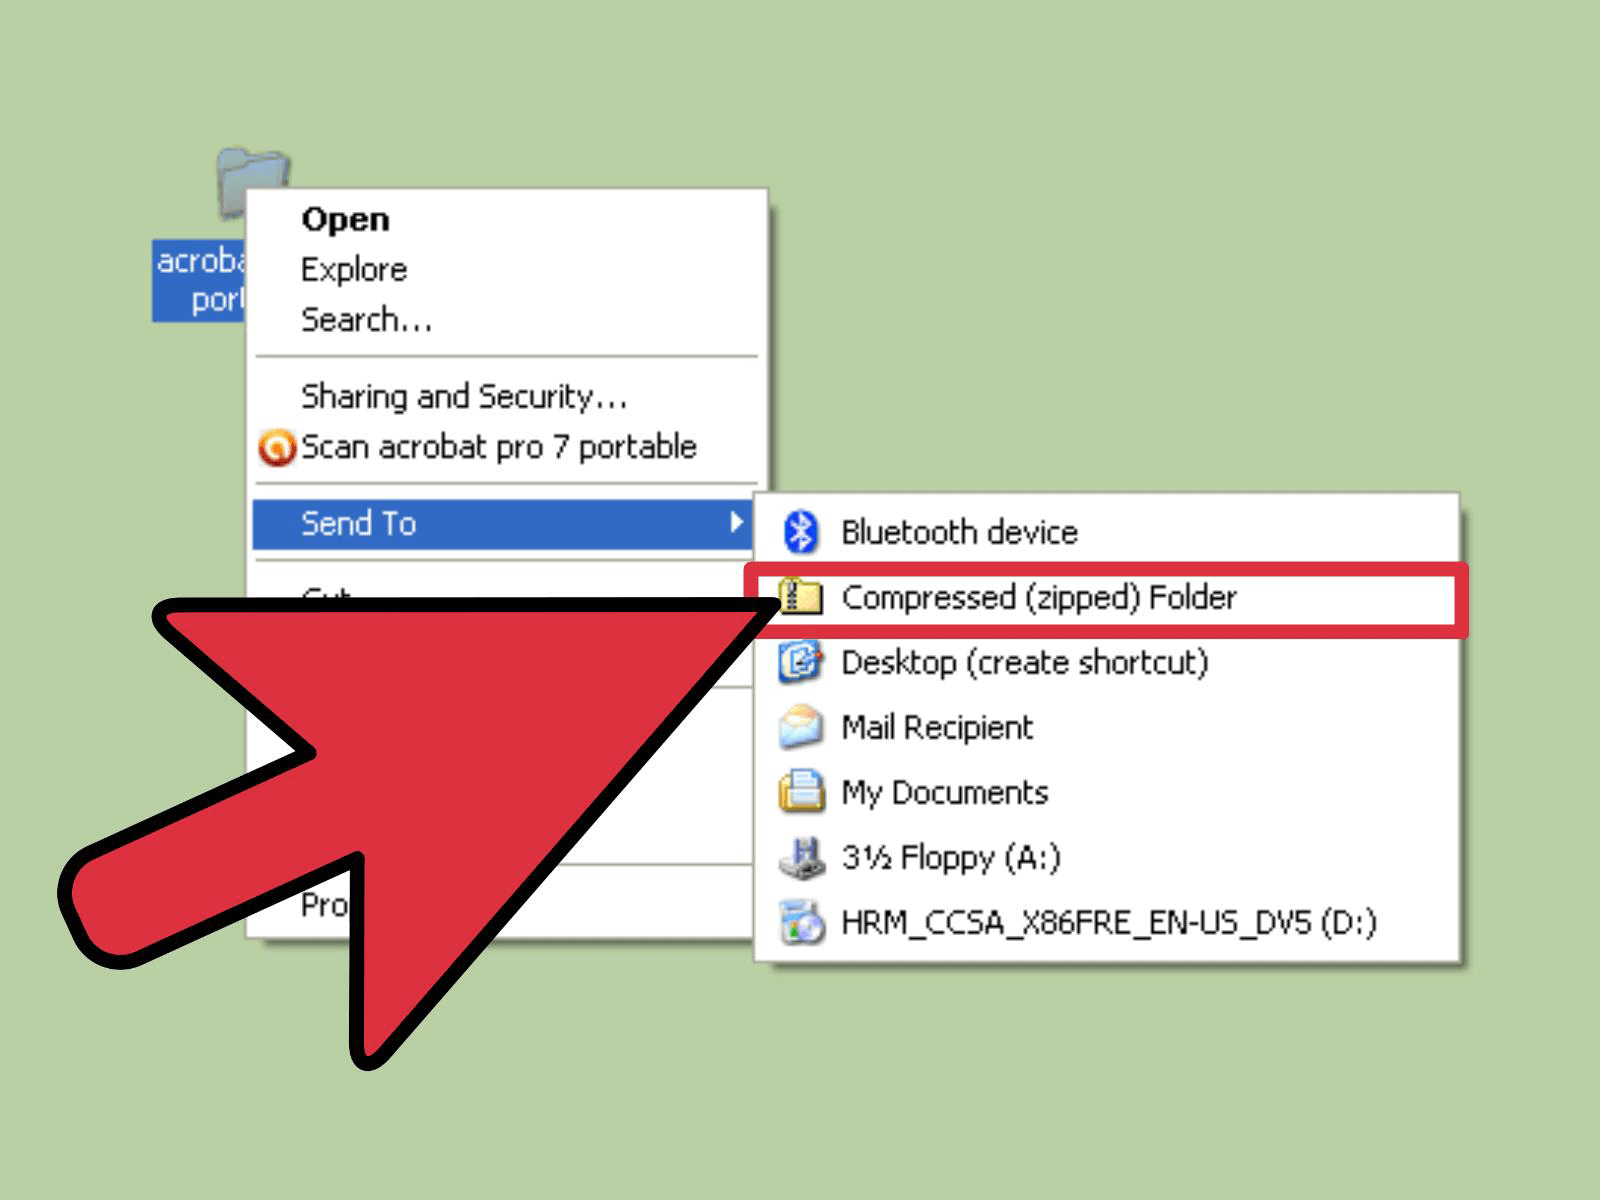
Step 3. The compressed zip file will automatically appear on your desktop. The next thing you may do is to rename it.
Note: Compression is an easy way to deal with the issue “The File Is Too Large for the Destination USB”. However, the amount of file size reduction varies by file type.
Solution 3. Reformat the FAT32 USB to NTFS/exFAT via Windows’ Inbuilt Feature
If the file compression above does not satisfy you, the most effective method is to reformat the USB drive from FAT32 to NTFS or exFAT. This can be easily done using Windows Explorer.
Step 1. First of all, right click on “This Computer”
Step 2. Then, locate and select the destination drive in Windows Explorer.
Step 3. Next, right click on the drive and choose “Format” from the dropdown menu.
Step 4. Preset NTFS as the output file system.
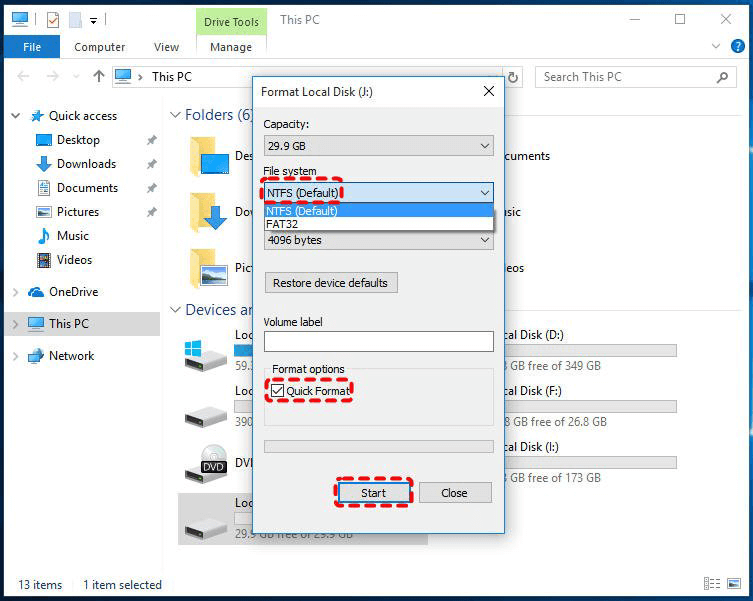
Step 5. Lastly, click on “Start” button.
Another Windows’ inbuilt tool for reformatting USB is Disk Management with which you can manage disks and partitions via many basic features such as formatting partition, shrinking partition and reszing partitions.
Solution 4. Convert File System without reformatting Using Command Prompt
Command Prompt, logically, is a command line interpreter application provided by most Windows OS. It’s used to execute entered commands. This time, you’re going to change file system by inputting some command. If you have any questions on “the file is too large for the destination file system without formatting”. It can finish file system (FAT32 to NTFS) conversion without formatting this drive again.
However, by using it, you can only convert FAT32 to NTFS but can’t convert NTFS back to FAT32. So, if you need a file system conversion, third-party disk management software– – AOMEI Partition Assistant is more recommended.
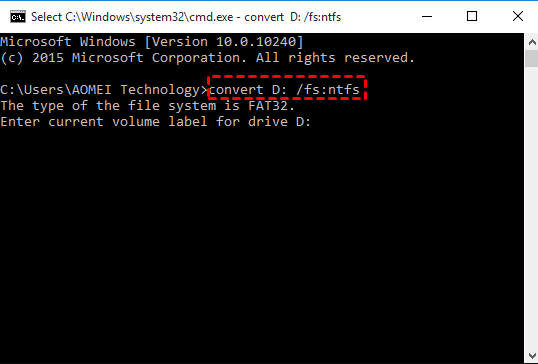
Step 1. Press “Win+R” to launch “Run” dialog box. Then, input “cmd” and press the button of “Enter”.
Step 2. Then, in the appeared Command Prompt window, type the following line:
convert drive letter: /fs: file system
For example, if you want to convert Driver D to NTFS, you can use:
convert D: /fs: ntfs
Step 3. Lastly, hit “Enter” button and wait for the process to be finished.
Conclusion
The file is too large for destination USB? 4 methods have been given and each of them has its own distinctions. As for me, I prefer AOMEI Partition Assistant. It seems to be a combination of the other 3 but more powerful and there are still many other useful features that haven’t been talked about such as “Resize Partition”, “MBR and GPT Conversion without Deleting Partitions”, and “Format Partition”. Moreover, to discover more features like migrating OS from MBR Disk to GPT SSD or HDD, and recovering lost partitions, etc, please upgrade this software to pro version.