CHKDSK: Use Command Prompt to Check & Fix Hard Drive
How to run Command Prompt check disk for errors scanning and repairing? This passage will share you 3 methods for running CHKDSK.exe with explanation about what does CHKDSK /f /r /x mean.
By Irene / Updated on April 17, 2025
Command Prompt to check disk: What is CHKDSK?
Check Disk, also known as "CHKDSK," is a built-in tool in Windows XP, Vista, 7, 8/8.1, 10, and 11. It is mainly used when your computer freezes, shows a blue screen, or when files and folders become inaccessible. CHKDSK checks the health of your hard drive and can find errors in file systems like FAT16, FAT32, and NTFS.
Besides checking the file system, CHKDSK can also find problems like bad sectors and lost clusters. This helps keep your system running smoothly and may prevent data loss or crashes. However, CHKDSK is a powerful tool, and using it the wrong way can make things worse. It may cause system instability, crashes like Windows blue screens, or even data loss if not handled properly.
For this reason, CHKDSK is best used by people with some technical knowledge. If you're not confident using it, a safer and easier option is to use third-party software like AOMEI Partition Assistant, which offers a more user-friendly way to check and repair your disk. If you want to run Command Prompt to scan and repair disk errors via chkdsk /f, /r, /x, please continue to the next section for step-by-step instructions.
How to run Check Disk tool for disk repair? [3 Ways]
In this section, we'll show you three ways to run a disk check. If you're familiar with checking disk with Command Prompt, you can follow the below step-by-step guide. However, for a simpler and safer option, we recommend trying the second method. For those who just want to see basic disk health and status, we also provide a third option to choose from. Based on your needs, you can directly go to the part you need from the left Table of Contents.
Way 1. Run Check Disk from Command Prompt
The easiest way to use CHKDSK in Windows is through the Command Prompt with admin rights. You can run simple commands to check and fix errors on the selected drive. Here is the disk checking command that can help you detect the hard drive errors.
Step 1. To use command prompt check disk, you need to open the Command Prompt as administrator. Next, follow the example of how to use the disk check cmd on Windows 10:
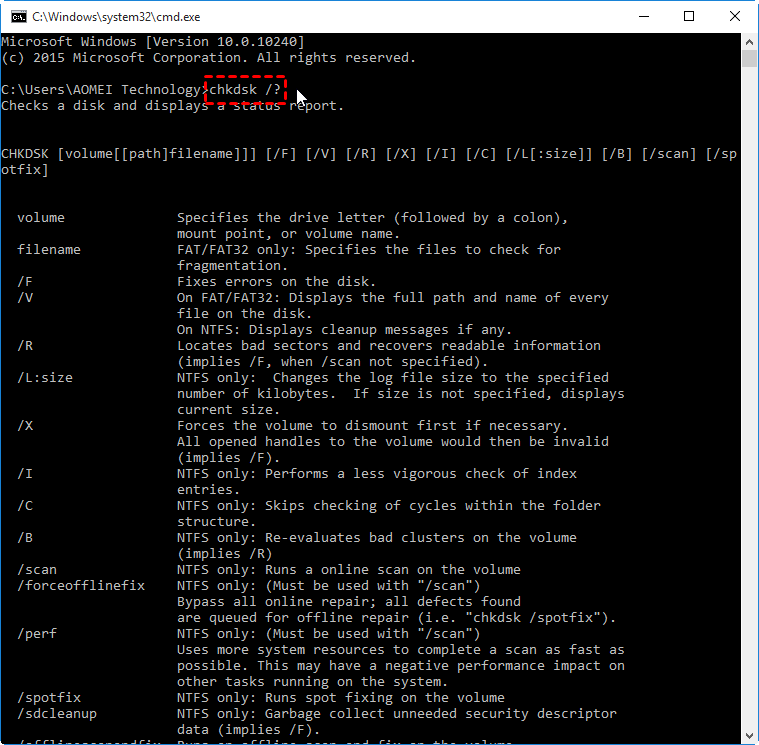
Step 2. Press Windows + R simultaneously, type cmd, and press Enter. Then, you will get into a command prompt and you can start to check disk with the command line. If you do not know how to use it, you can type chkdsk /? and hit Enter, which will give you its parameters or switches.
If you cannot boot your computer, you can run cmd for check disk either by booting the operating system into the recovery mode or by using the original installation disc to run the command prompt.
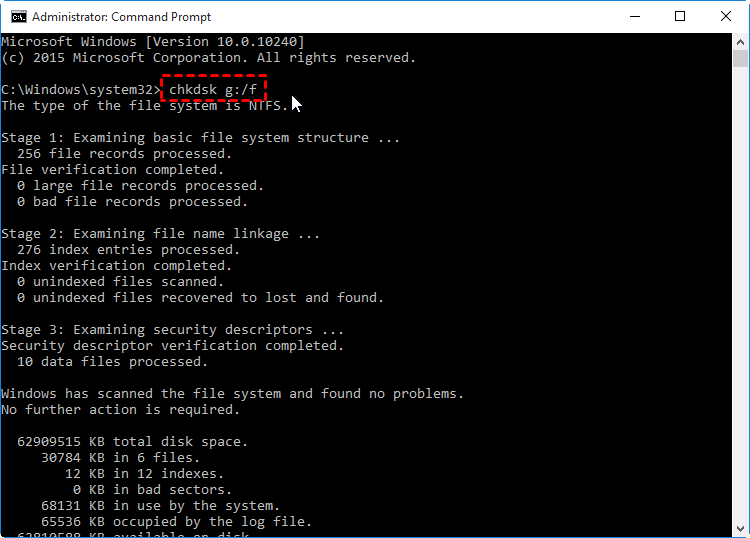
For example, if you want to test the integrity of the G: drive, you can type the command in the prompt: "chkdsk g:", To find and repair any errors that are found in G: drive, type "chkdsk g: /f" instead.
About the different CHKDSK parameters, here the simply explain what does CHKDSK /f /r /x means:
- What does CHKDSK /f /r /x mean?
- /f: Fixes disk errors. Without this, CHKDSK only reports errors without fixing them. (The /f command will lock the selected drive for checking. If it can't lock it, you'll be asked to schedule a check for the next restart. On Windows 10, scanning for errors will prompt you to do this at the next system boot.)
- /r: Finds bad sectors and recovers readable data. This is a detailed check that may take more time, especially on big or busy drives.
- /x: Dismounts the disk before scanning to ensure CHKDSK has exclusive access for repairs, closing any open files to prevent data corruption.
★★★Notice: Check Disk can't repair volumes that are in use. If the volume is in use, it will display a prompt that asks if you want to schedule the volume to be checked the next time you restart the system. Click Yes.
🔥Way 2. Launch a handy chkdsk.exe tool with free partition software
As we previously introduced, although using cmd to check disk is useful, it is has risks of causing errors or losing data permanently once you misuse any commands. So, if you want to safely and easily check disk, using a third-party tool is a good idea.
It is recommended to use the AOMEI Partition Assistant. This multifunctional free disk partition manager can help you check and fix errors on disk partitions along with testing disk speed. It supports Windows 11, 10, 8.1, 8, 7, both 32-bit and 64-bit. You can use it with a straightforward interface that even a computer novice can operate to fix problems. Here we will show how to check for and fix errors on disk partitions with the free AOMEI Partition Assistant.
The Best Windows Disk Partition Manager and PC Optimizer
★★★Notice: If you are a Windows Server user, the powerful software offers the Server edition.
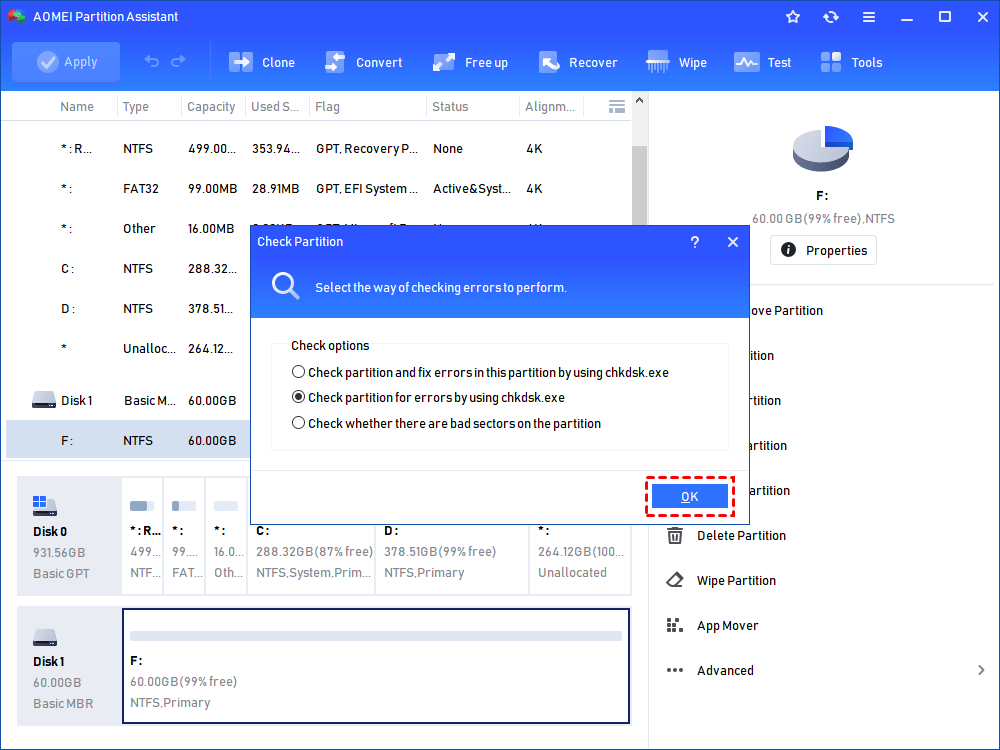
Step 1. Free download the software, install and launch it. It will display to you the basic situation of your hard drives. Select the partition that you want to check for, right-click it, select Advanced -> Check Partition.

Step 2. It will pop up a small window that you can select the way of checking errors to perform. Choose one according to your needs and click OK. It will proceed immediately.
Notes:
①There are 3 ways you can select to perform: check partition and fix errors in this partition by using chkdsk.exe; check the partition for errors by using chkdsk.exe; check whether there are bad sectors on the partition. Select the one as your command.
②If the partition you selected is being used by another process, you cannot continue the operation. A window will pop up to tell that you can continue the operation again if this partition is dismounted. But it will make all the running programs invalid. When asked “would you like to force a dismount on this partition”. click Yes, it will execute the task, click No, it will cancel the operation.
Way 3. Run Check Disk from Partition Properties
Apart from using Command Prompt to check disk, you can also access it from the partition properties. This method can only offer basic information on disk health and status. For errors detecting or repairing, it is advisable to choose the above 2 methods.
Step 1. Double click “My Computer/This PC” -> Right-click Drive ->Properties > Tools tab -> Check or Check Now.
Step 2. Here you will get two options for “Automatically fix file system errors” and “Scan for and attempt recovery of bad sectors”. choose one according to your need, and click Start.

★★★If the drive to be checked is in use, you may have to schedule the chkdsk at reboot.
Conclusion
In this post, we not only tell how to check for disk through cmd prompt, but also share another two ways to access chkdsk.exe tool. Apart from checking partition for bad sectors or errors, AOMEI Partition Assistant has many other features that can help you manage your hard drives on Windows 11/10/8/7 better. For example, you can check the entire hard disk for errors via “Surface Test”, merge two partitions, move partitions, clone partitions, etc.
To unlock and enjoy more advanced features such as allocate free space from one partition to another, convert system disk between MBR and GPT without deleting partitions, recover lost partitions, and more, you can upgrade to AOMEI Partition Assistant Professional.

