This article shows how to create a Windows 11 to Go USB via a handy tool to allow your Windows 11 runs on every device you need.
It’s been a year since Windows 11 first appeared, and many users have confronted some bugs with this new system, now, according to the news, the official Windows 11 22H2 update will be released in the second half of 2022. This update will fix some bugs and add many new things to the system, so some users are inspired to try this upgrade.

We can see more information from many overviews of Windows 11 22H2. Although there will have new features added, the original traits of Win 11 are still kept: the rounded corners, the application scenarios of the frosted glass effect, and more...the system requirements are all the same as it's released in 2021. The reason you may need a Windows 11 to Go USB are:
Reason 1. According to foreign media XDA reports, Windows 7 and Windows 8.1 product keys can also be registered for Windows 11. This means that Windows 11 will at least allow users of Windows 7 and newer systems to upgrade for free.

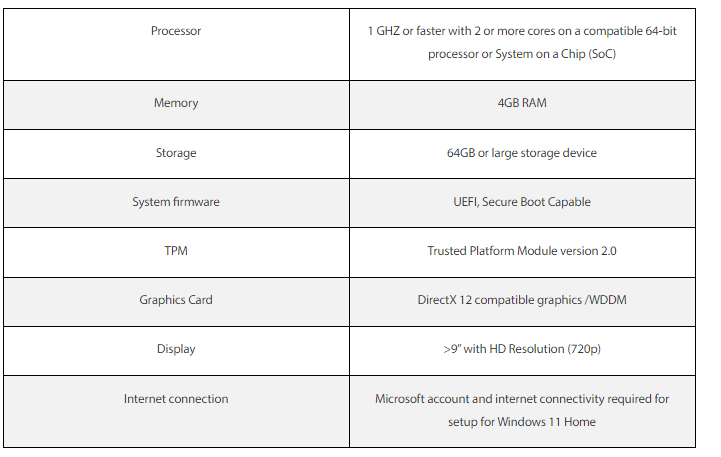
However, not every PC is suitable for the upgrade. Based on the released news, Windows 11 needs UEFI secure boot, TPM 2.0, and 64GB of free space on the C drive. If you’re an MBR user and your C drive doesn’t have enough free space, it’ll be a little difficult to upgrade.
But, if you have a Windows 11 to Go USB, you can use Windows 11 on another device, even if it doesn’t meet the requirements.
Reason 2. For work. You can use Windows 11 via your Windows 11 to Go USB if your company will use Windows 11 in the office while your home PC is Windows 10 system. It’s quite convenient. The created Windows 11 is a complete duplicate of your office Windows 11.
Reason 3. Of course, there must be some Mac users who want to use Windows. You can create a Windows environment to run them on your Mac device.
Since Windows 11 won’t support the “Windows to Go” function, no matter what reason that makes you need a Windows 11 to Go USB, how to create a Windows 11 bootable USB will be the problem you may think about more than once.
Don’t worry, AOMEI Partition Assistant Professional will solve this issue for you. This powerful third-party software has a “Windows To Go Creator” function which is specifically devised for making a bootable device to help users enjoy their OS wherever they go. You can integrate your beautiful life into your PC.
Step 1. Insert the USB in and wait for your computer to detect it. If it failed, you can check solutions here.
Step 2. Install and run AOMEI Partition Assistant Professional. On the top toolbar, click "Tools" > "Windows To Go Creator".
Step 3. Choose “Create Windows To Go” for personal computer and click “Next”.
Step 4. Choose the suitable option "Create Windows To Go with system disc/ISO" or “Create Windows To Go with the current system”. If Windows 11 ISO file isn’t detected automatically, click the folder icon to select manually. Then, click “Next”.
Step 5. Select a USB drive as target and click “Proceed”
Step 6. You’ll receive the message that all data on this USB drive will be erased. Click “Yes” to continue.
After that, you can disconnect the USB, and try to boot it on another PC.
Note: If you choose “Create Windows To Go with the current system”, there will be 2 more steps after steps 3 and 4.
1. After you choose the creating way, you’ll see current system info.
2. After you selected a USB, the program will restart into the Windows PE environment to create Windows To Go. Wait until the progress reaches 100%.
If you don’t know how to boot Windows 11 from your Windows 11 To Go USB, here we have a step-by-step tutorial.
Step 1. Connect the Windows 11 To Go USB drive to your device. Boot the computer and press a certain key to enter BIOS/UEFI.
Step 2. Select USB Device and hit the “Enter” key to boot from the Windows 11 bootable USB.
Microsoft has always been committed to creating a familiar platform where you can freely create, learn, play, and most importantly, connect with the world and others in a new way.
With the help of the AOMEI Partition Assistant, you can manage your disks more flexibly. It allows users to migrate OS to another disk, clone the entire disk, secure erase your SSD… What’s more, it also has Server edition for Windows Server users, which supports not only 10/8/7/XP/Vista but also Windows Server 2019/2016/2012R2/2008R2/SBS 2003, 2008, 2011.