In this post, I will tell you what is Windows To Go and how to create Windows To Go workplace with Windows 8/8.1. In addition, another way to create bootable Windows 7/10/11 USB will be introduced too.
What is Windows To Go? It means you can use Windows wherever you go, just like a portable Windows, but Windows 8/10 only. According to Microsoft official states, only Windows 8 or Windows 8.1 Enterprise Edition enables you to build wintogo workplace. To make a Windows 8 bootable flash drive, the first thing we should do is choosing a Windows To Go certified USB drive as the destination drive. What is Windows To Go USB? The USB storage must be larger than 32GB. Also, for better result, USB 3.0 is strongly recommended. USB 2.0 that is used to run Windows 8 can meet the basic demands. However, USB 3.0 is promoted.
What is Windows To Go workplace? Its operates are similar to any other installation of Windows, but there are a few exceptions:
Notes:
Since Windows To Go drives can be booted on multiple computers. When a Windows To Go USB is first booted on a host computer it will detect all hardware on the computer but install any needed drivers. When the Windows To Go USB is subsequently booted on that host computer it will be able to identify the host computer and load the correct set of drivers automatically. The applications that you want to use from the Windows To Go workspace should be tested to make sure they also support roaming. Because some applications bind to the computer hardware which will cause difficulties if the workspace is being used with multiple host computers.
Above answered what is Windows To Go, next are how to create Windows To GO.
Step1: Insert the USB drive(USB3.0 is preferable). Open Windows To Go Creator Center in the Control Panel.
Step2: In Windows To Go Creation Center, we will see the system is searching for the USB drive. After the USB drive has been recognized, it’ll be listed as the following picture. Click the "Next" button to go to next step.
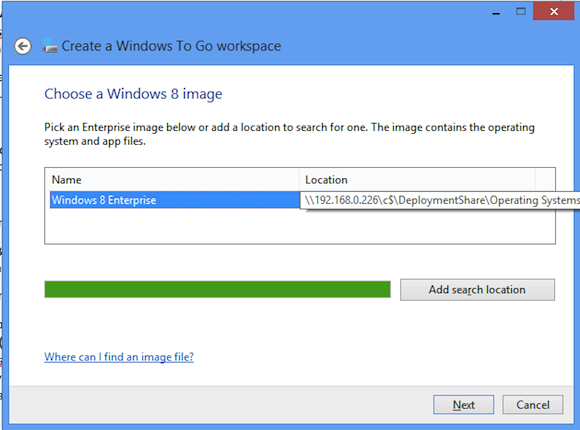
Step3: This step will ask you to pick a Windows 8 image. Either the plain Windows 8 installation disc or the one that you are currently using is OK. Choose one then click "Next".

Step4: This is optional, whether to use BitLocker to set password for the Windows To Go workspace or not. We can also decide later and add password after we have booted into the WTG device.

Step5: Last step, click the "Create" button to start the process. The process may take about 10-25 minutes depends on the hardware. Once the process is done, choose “Save and Close” to finalize the operation.
Now, you can enjoy Windows 8 where you go with this created Windows 8 bootable USB disk.
First, let me clarify why we need to use third party software to move Windows 8/8.1 to USB sometimes. There are some reasons: first of all, Windows 8 creating Windows To Go requirements are strict: On the hardware side, the storage of external hard disk should be at least 32 GB. It only supports certified USB, but certified USB is very expensive and the type of it is limited. Software side: only Windows 8/8.1 Enterprise Edition has this function. It is very complex to create Windows 8 to go certified USB drive by Windows 8 system itself, so, why don't we use a shortcut: move Windows to non-certified USB with third party software?
No sooner said than done. Since the release of AOMEI Partition Assistant, it added a new function named “Windows To Go Creator”. This feature helps you make a full corporate environment that will boot from a USB or external USB drive. The point is you can create Windows 8 to go boot disk even your system is not Windows 8 Enterprise Edition. Except that, AOMEI Partition Assistant has many other widely used disk optimization functions such as merge partition, resize partition, move partition, split partition, migrate OS to SSD, etc.
Before you do, you need a 13 GB or larger USB drive. Also, it could be an external USB hard drive. Another thing is Windows 8 installation disc or ISO file.
Step 1: Plug the USB drive into a USB 3.0 or USB 2.0 port on the PC. Make sure that it is detected by your machine.
Step 2: Download, install, and launch AOMEI Partition Assistant Standard Edition. Click “Tools” in the top toolbar, and choose “Windows To Go Creator”.
Step 3: Choose the first option "Create Windows To Go with system disc/ISO". Click the folder icon to select ISO manually. After that, click "Next" to continue.
Step 4: Please select the location of the Windows 11 ISO file and click “Next”.
Step 5. Select the target USB drive here and click “Proceed”.
When the task is completed, you can plug the Windows 8/10/11 bootable USB drive into any computer, enter BIOS setting, and change the firmware boot order to USB first. AOMEI Windows To Go Creator also supports installing Windows 7 on USB drive.
With AOMEI Partition Assistant Standard, you neither have to buy Windows 8 Enterprise nor have to use command line to make a Windows 8/10/11 to go boot disk.
This article not only tells what is Windows To Go and how to create it. But also recommend you a Windows To Go creator - AOMEI Partition Assistant. I wish you benefit a lot.