Preparing automatic repair stuck on screen may appear abruptly. If you meet this issue on your Windows PC, this post will give some ideas to assist your fix the problem.

Automatic Repair is a function introduced in Windows 10/8 that can resolve several PC problems when the machine fails to boot correctly. The "preparing automated repair windows 10 stuck" prompt occurs on your computer when a mistake leads the system to shut down abruptly. The issue frequently results in a blue or black screen of death. According to internet research, HP, Lenovo, Asus, Dell, and Acer customers are the most prevalent sufferers of this issue.
When your system encounters an issue that causes it to crash, Windows 10 will attempt to automatically restore the damaged files at the next boot.
This fix is just not possible in some circumstances. When your computer is unable to enter automatic repair mode, it remains on the screen with no progress or repairs being performed on the system. You can restart the computer, but it never gets past the "Preparing automated repair" page.
Despite its gravity, this is a typical Windows problem that can occur. Some of the probable reasons for this mistake are as follows:
• The hard drive has been corrupted, is missing, or has a loose connection.
• Windows drive or the firmware has been corrupted
• Windows Boot Manager corruption
• Changes in BIOS settings or a lack of Boot Configuration Data (BCD)
• The bootloader missing or important booting files missing.
• Missing or corrupted system files, which are frequently the result of malware infestations
• Issues with the Windows Registry like wrong keys or missing keys
• Other unknown system errors
And the common symptoms are:
1. Computer is stuck on a black loading screen with a "Preparing Automatic Repair" or "Diagnosing your PC" error message.
2. Windows keeps saying "Preparing Automatic Repair" but results in a black screen with nothing on.
3. Automatic Repair is stuck on a blue screen, and shows the message "Your PC did not start correctly", or "Automatic repair couldn't repair your PC". If you click "Restart", your computer will reboot and trap in the Automatic Repair loop.

In this part, you can learn some methods to fix the automatic repair loop issue by referring to the clear steps in all methods.
Before proceeding to more complex troubleshooting, you can force your computer to shut down and power cycle.
Step 1. Shut down your computer completely by clicking the Power button. The screen becomes completely black and the computer fans no longer running are good indicators that it's shut down.
Step 2. Unplug all devices, including USB flash drives, external hard drives, and earphones. Remove your computer's power cable or adapter as well.
Step 3. If you're using a laptop with a detachable battery, remove the battery from the battery compartment.
Step 4. For around 30 seconds, hit and hold the Power button on your computer to drain any leftover charge from the capacitors. Do not connect external devices to your PC now.
Note: If you’re using a laptop, replace the battery in your laptop if you removed it earlier, and reconnect the power cord to your computer.
Step 5. Press the Power button until you see the boot screen. You can now see if the problem with Windows 10 stuck on the “Preparing automatic repair” screen has been resolved.
Safe mode has some options for users when their computers can’t boot normally.
Step 1. Press the power button for 10 seconds to turn off Windows 10.
Step 2. Re-press the power button to start the PC and hold the power button for 10 seconds to turn off it.
Step 3. Press the power button again to turn on the computer, once Windows starts, hold the Power button again for 10 seconds to turn it off.
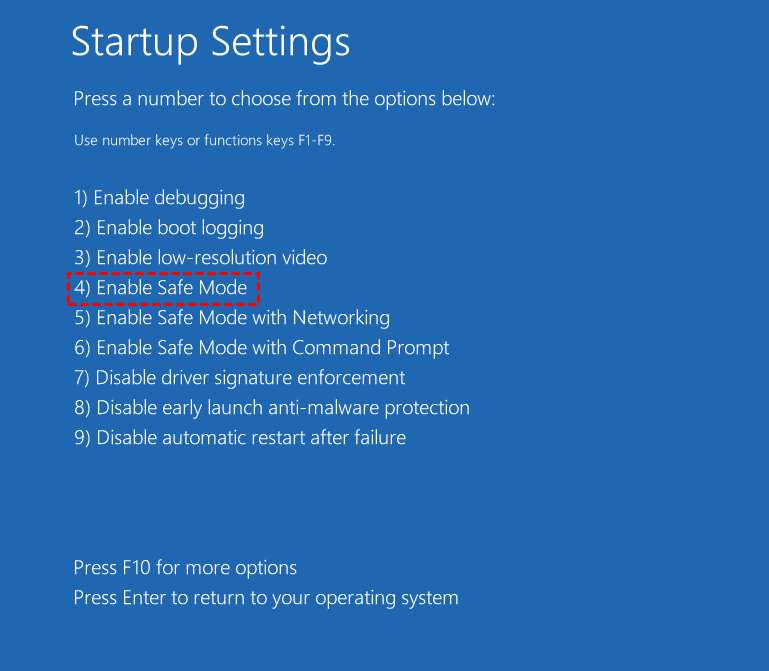
Step 4. Retry to power on your computer until Windows fully restarts and enters WinRE (Windows Recovery Environment). Click "Troubleshoot" > "Advanced options" > "Startup Settings" > "Restart”.
Wait for the process to get completed, when it’s finished, restart your computer.
Now you can scan your computer for malware with the Windows Defender, uninstall suspicious apps, etc.
As we’ve mentioned that one of the common reasons why you may get into the “Preparing automatic repair” loop is that the boot files are missing or damaged. Some users will rebuild key parts of the system.
Step 1. Restart your system and press the BIOS key (like DEL or F2) to enter its BIOS settings. From here, you can change the boot sequence and make the connected recovery media a priority.
Step 2. This will load the windows recovery on the system and will provide the following interface. Instead of installing Windows, choose the option to repair your computer instead.
Step 3. Then click on Troubleshoot from the options. A list of advanced options will be shown on the screen. Simply select Command Prompt from here and wait for it to load. You should see a black pop-up window show up on the screen.
Step 4. Once the Command Prompt is launched, we will use the Bootrec.exe tool to fix the preparing automatic repair Windows 10 stuck on black screen. Type in the following commands one by one, pressing the Enter key on your keyboard to execute each line:
• bootrec /fixmbr • bootrec /fixboot • bootrec /scanos • bootrec /rebuildbcd
When the repair procedure is finished, the notification "Successfully scanned Windows installations" will appear. To exit the Command Prompt, type exit and hit Enter. Restart your computer to see if you can get beyond the repair screen during the boot process.
Some users recommend performing Startup Repair when the laptop is stuck on Preparing Automatic Repair during startup.
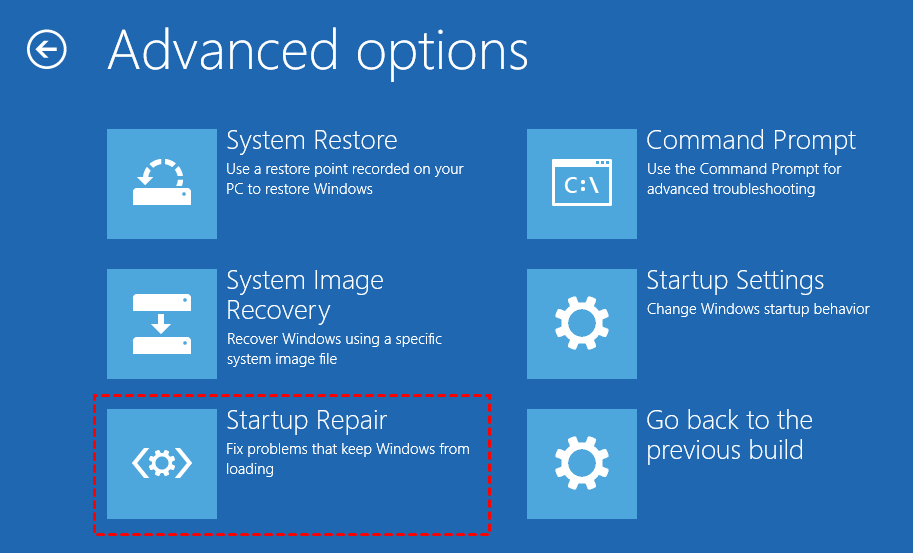
The first 2 steps are the same as method 3. But after clicking on Troubleshoot from the options, in the list of advanced options, please choose “Startup Repair”. Then you can wait for the repair to be complete.
Windows and certain apps require sufficient space to function properly. If the system disk on your computer is almost full, you may find difficulties like "Your PC ran into a problem" or Windows stalled at "Preparing Automatic Repair".
There are 2 cases that you need to know:
1. Extend system drive size 2. Extend system reserved partition size
The system drive is your C drive, if it gets crowded, your OS will crash frequently and meet many other problems. The System Reserved partition contains the necessary files to boot your computer. If the System Reserved partition is too small, you may fail to upgrade to Windows and the error is like stuck on preparing automatic repair.
Since your PC can’t boot normally, if we want to use tools, we need to create a bootable media first. In this situation, you can try AOMEI Partition Assistant Professional to help you.
This tool is a disk and partition manager for Windows 11/10/8/8.1/7/XP systems. To fix preparing automatic repair on Windows 11/10, we can use the “Make Bootable Media” function to create a Partition Assistant USB, then boot from this USB to enter this tool and resize your partitions.
First, we make a bootable media.
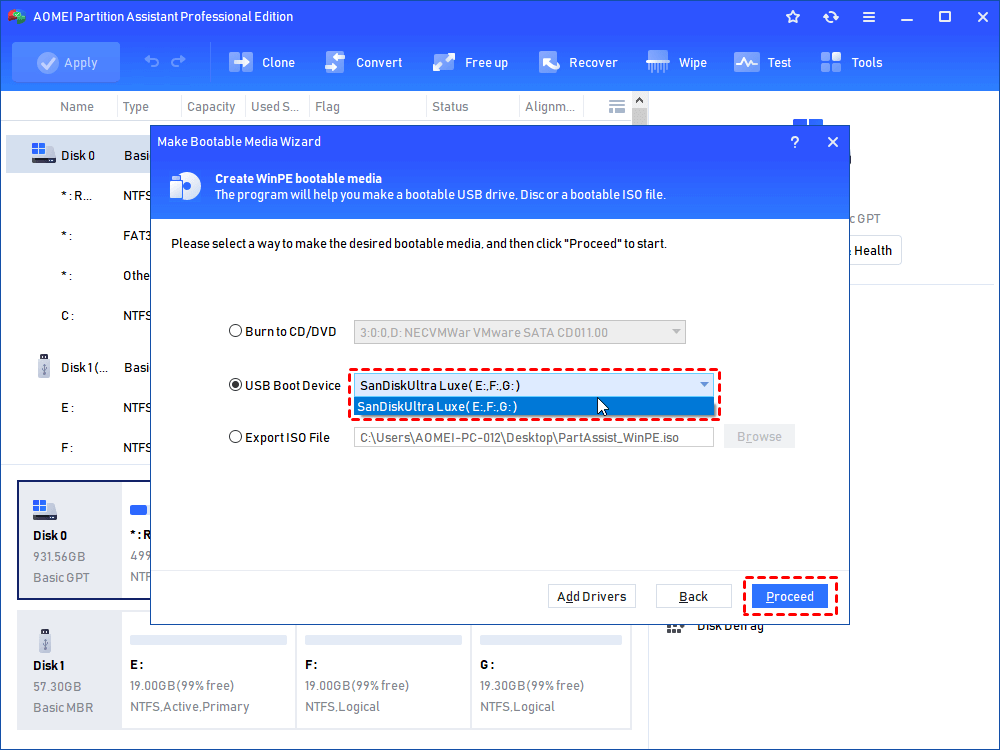
Step 1. Connect the USB drive to a working Windows computer, and install and run AOMEI Partition Assistant Professional. Click “Clone” in the top toolbar, and choose “Migrate OS”.
Step 2. Choose the right USB drive under “USB Boot Device” and click “Proceed”.
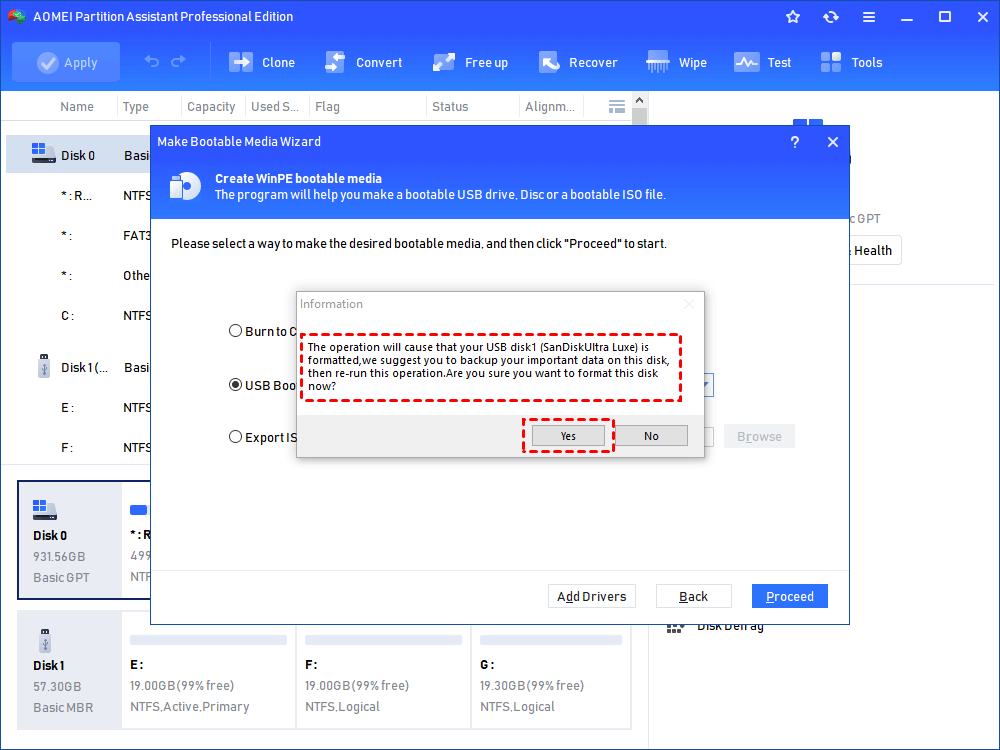
Step 3. Then you will be told the USB will be formatted, please back up important data. If you have done that, click “Yes”.
Step 4. Then wait for the process to be completed.
When the process is done, insert the bootable USB drive into the computer with boot issues, and change the boot order in the Boot menu to make it boot from the bootable USB stick.
Case 1. Extend C drive size
If there’s unallocated space on your disk, you can go to the “Merge Partition” feature to merge this space into your C drive. Or you can merge another partition to your C drive to increase the C drive, the original data on that drive will be stored in a folder named after the drive letter.
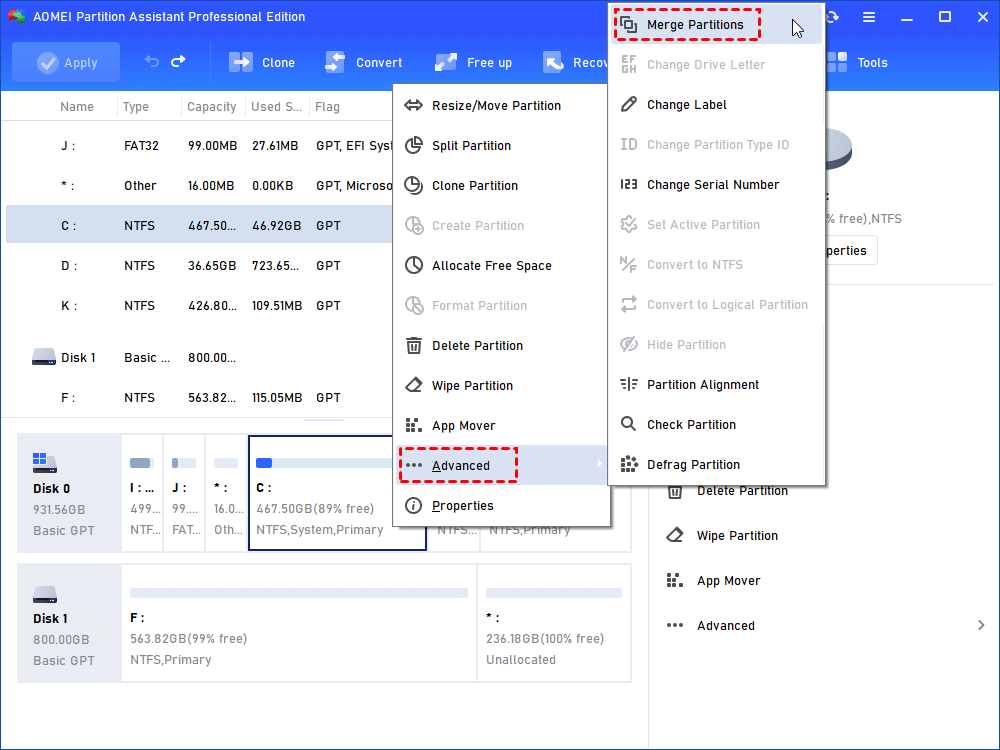
Step 1. In the main window, right-click the partition you need to merge and choose “Advanced” and select “Merge Partition”.
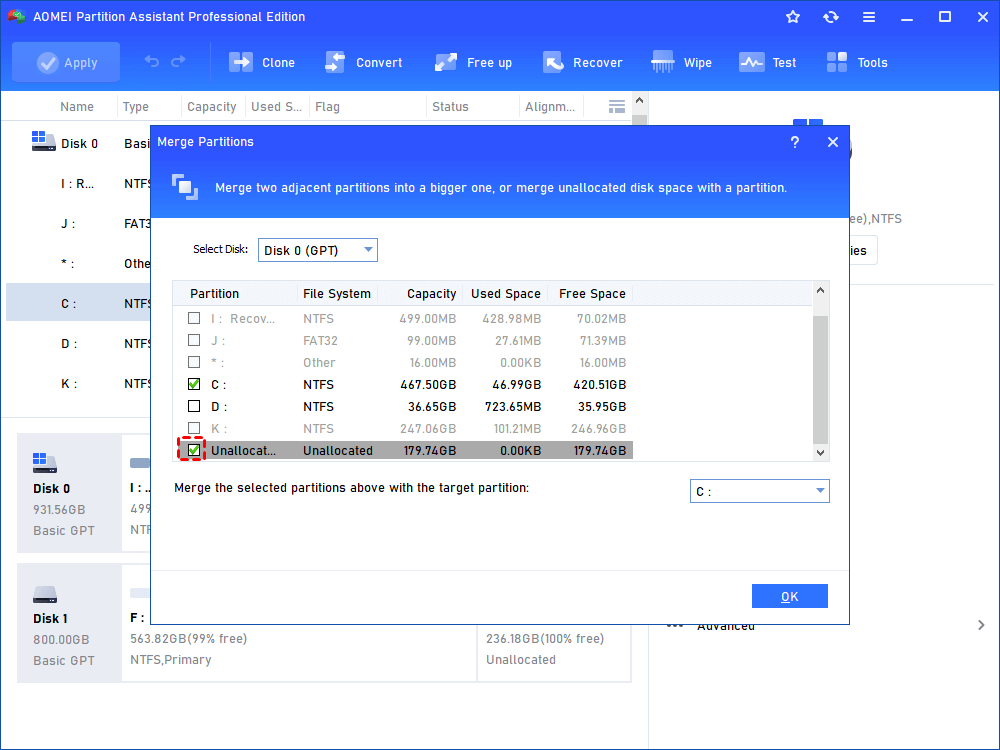
Step 2. Tick the unallocated space or a drive and click OK.
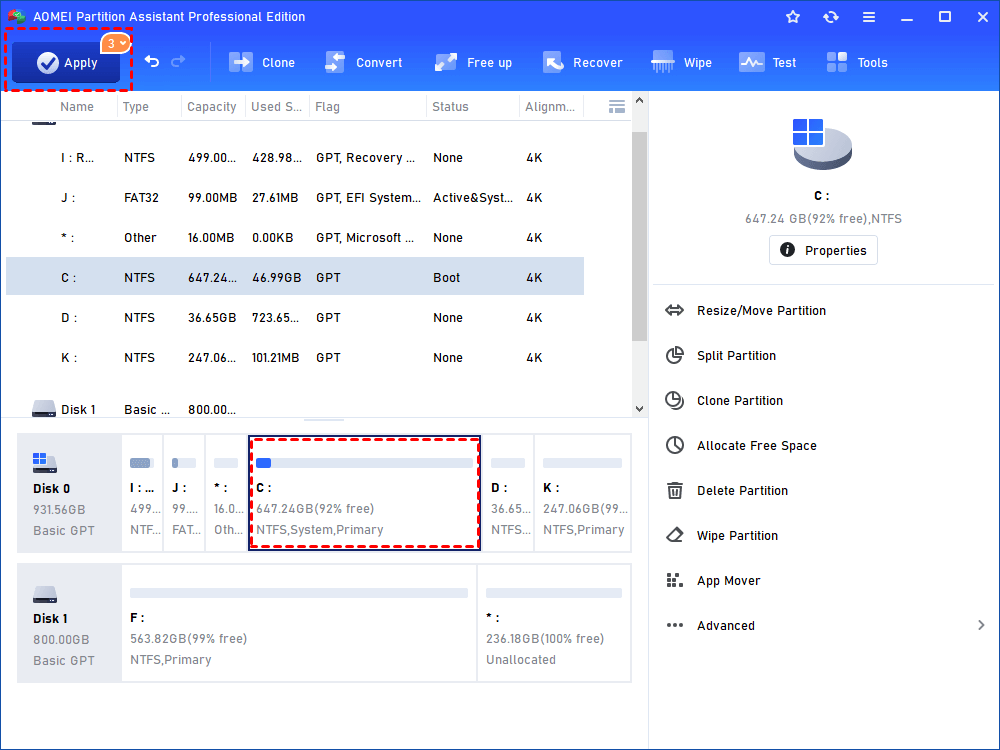
Step 3. In the main interface, after confirming the operation, click Apply and Proceed to commit it.
If you don’t want to merge another drive to your C drive, you can turn to the “Allocate Free Space” function, which can directly add the free space on the target drive.
Step 1. Right-click D drive and select "Allocate Free Space".
Step 2. In the pop-up window, we could specify the free space to be allocated, and the destination partition that the free space will be added.
Step 3. View "Pending Operations" on the sidebar in case of corrections and click "Apply" on the toolbar to execute pending operations.
Now you can reboot your PC normally to check if the error is fixed or not.
Case 2. Extend system reserved partition
If your C drive has enough space, you need to resize your C drive to extend the System Reserved partition.
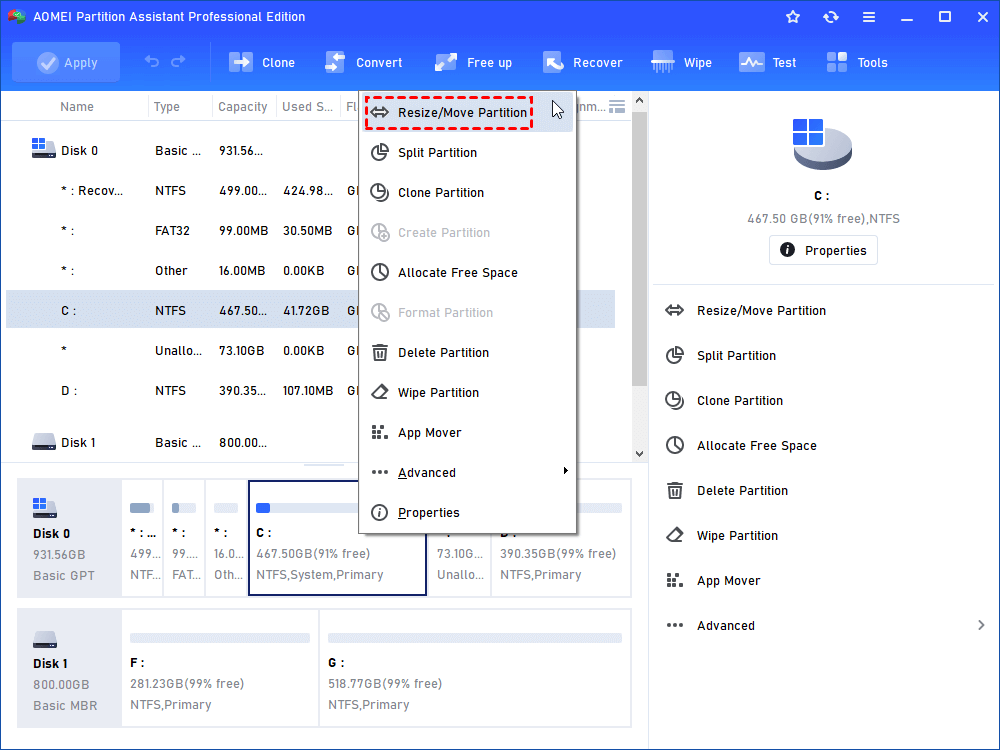
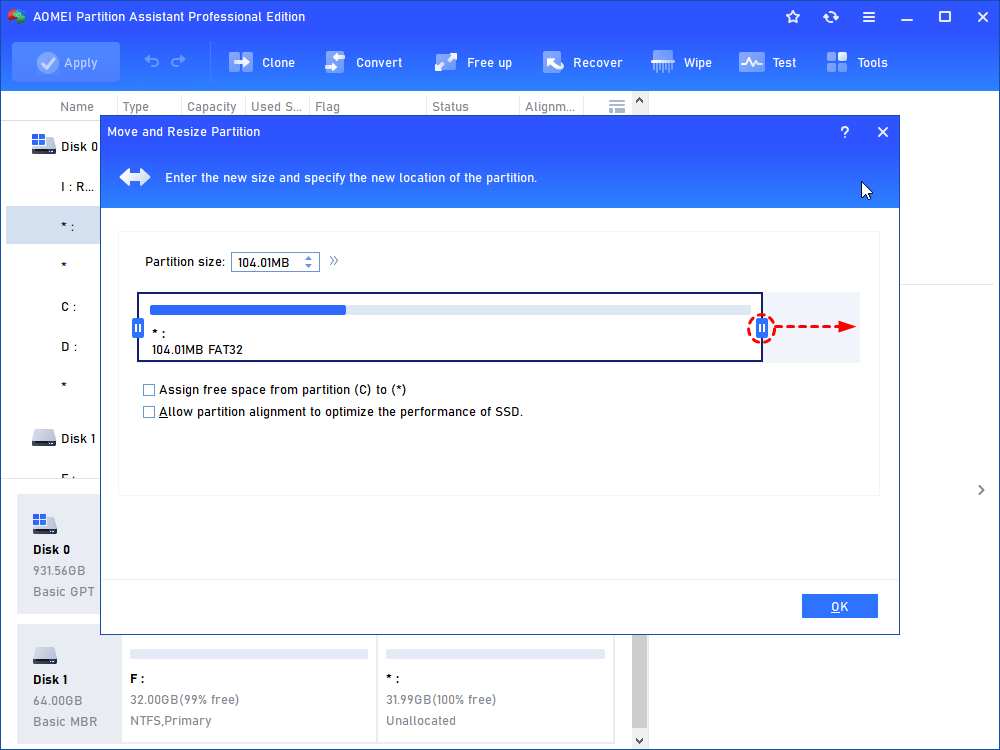
Step 1. Right-click C drive and choose “Resize/Move Partition”.
Step 2. In the new windows, drag the slider from left to the right and click “OK”.
Step 3. Right-click the C drive choose “Resize Partition”, and drag the slider, after you click “OK”, right-click the system reserved partition, select the same function, and drag the slide from right to the left.
Step 7. Click Apply to execute the process. The program will need to restart your computer to complete these operations under PreOS Mode.
Then restart the PC and press the F2/F11/Del key to enter BIOS. On the boot menu, switch and set the original system disk as the boot drive. Save the changes, exit BIOS, and restart the PC.
Tip: This tool also offers the “Rebuild MBR” function, you can rebuild MBR without typing any complex commands to fix the problem.
During starting, Windows 10 uses the Automatic Repair capability to automatically repair booting-related faults. This function is quite beneficial to the typical user. However, it may not always be enough to address starting issues. It may potentially be the source of the starting issues. As a result, deactivating automatic repair may be a solution to certain difficulties with Windows 10 booting up.
Step 1. Reboot your computer and hold the specific key on your keyboard while the boot screen is visible to enter the Windows Recovery Environment (WinRE).
Step 2. Click Repair your computer and then click on Troubleshoot from the options. Select Command Prompt from here and wait for it to load. You should see a black pop-up window show up on the screen.
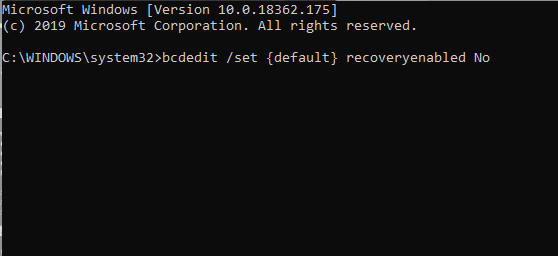
Step 3. Type in the following command and press Enter to execute it:
bcdedit /set {default} recoveryenabled no
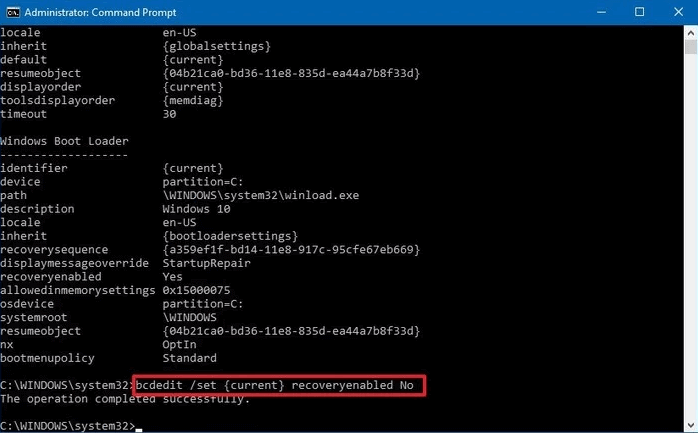
If the command didn’t execute successfully, try the following command and press Enter to execute it:
bcdedit /set {current} recoveryenabled no
Step 1. Boot your computer and go to Repair your computer > Troubleshoot > Advanced Options > Command Prompt. (The same as method 3)
Step 2. Input the following command in the Command Prompt window: C:\Windows\System32\config\regback* C:\Windows\System32\config
Step 3. When prompted which data to restore, type All and press Enter.
Step 4. Wait for the system to finish, and restart your computer.
Step 1. Boot your computer and go to Repair your computer > Troubleshoot > Advanced Options > Command Prompt.
Step 2. From the Choose an option screen, navigate to Troubleshoot > Advanced options > Command Prompt.
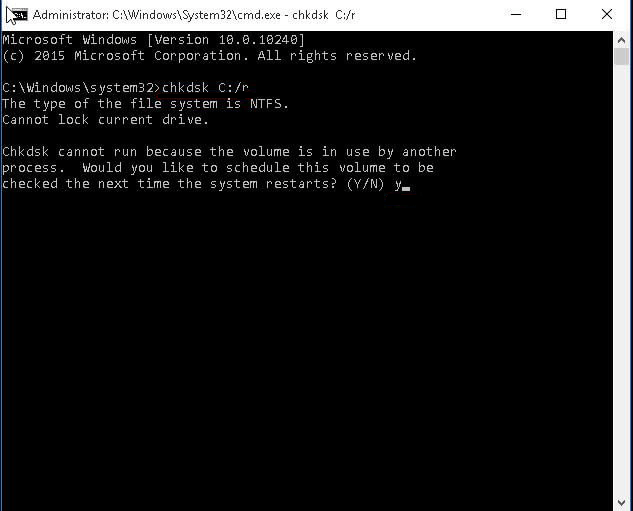
Step 3. Type in the following command and press Enter to execute it: chkdsk C: /r
Step 4. Wait for the scan to finish. If there was an error or the scan is unable to run, try using the following command: fixboot C:
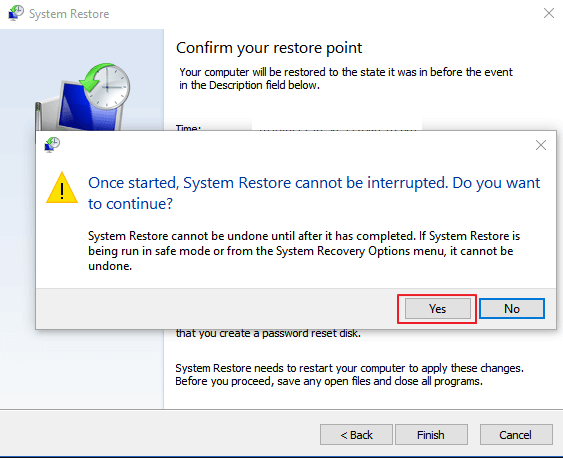
The last way is for users who have created a Windows restore point before the Automatic Repair loop occurs. You can perform a system restore to cope with the issue. But system restore will overwrite your files on the system C drive, make sure you have copied important data.
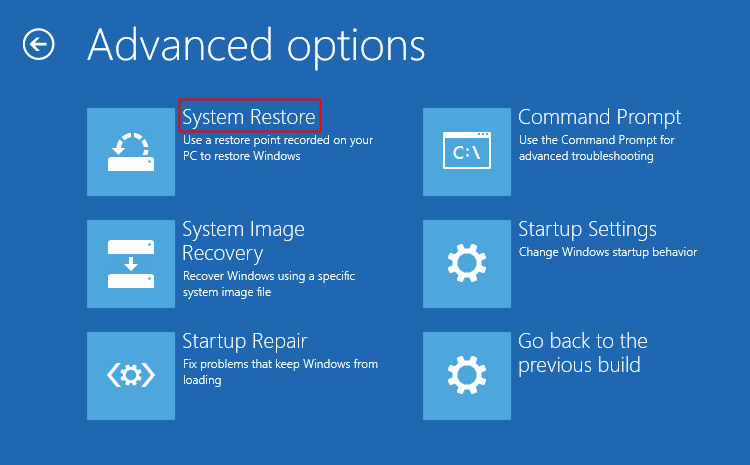
Step 1. On the Automatic Repair blue screen, choose "Advanced options".
Step 2. Navigate to "Troubleshoot" > "Advanced Options" > "System Restore".
Step 3. Choose a restore point, click "Next" to restore your computer to a healthy state.
Step 4. Wait until the restore process finishes and then restart your computer.
Preparing automatic repair won’t last a very long time on your PC, but the automatic repair loop still may also continue for hours. If you meet the problem of being stuck on preparing automatic repair, then hope this post will help you fix the issue successfully.