Have you ever experienced Windows preparing Automatic Repair boot loop of death? This page provides you with a comprehensive guide on resolving Windows 11 Automatic Repair loop.

I've been stuck on the 'Windows Preparing Automatic Repair' screen for hours. My computer (Windows 11) keeps restarting, trying to diagnose the problem, and then fails, sending me back into a loop. I can't access the desktop or any files, and pressing F8 doesn't work. What exactly is causing this? How can I get out of this endless boot loop without losing all my data?
- Question from User
Automatic Repair is a built-in troubleshooting feature in Windows, designed to automatically detect and repair common startup-related issues, such as system file corruption, boot configuration data loss, or disk errors. Although it is an excellent tool, multiple users may be confused by painful issues, such as "Windows preparing Automatic Repair boot loop of death".
Do you know how to fix Automatic Repair loop in Windows 11? Keep reading this page to learn more details and five effective solutions to resolve it.
Before exploring how to fix Automatic Repair loop in Windows 11, it’s essential to know why does the "Windows preparing Automatic Repair boot loop of death" happen. Here are several common reasons for it, including:
◆ Issues with Windows Registry
◆ Loss or Corruption of Boot Configuration Data Files
◆ System Update Failure
◆ Software Conflicts
◆ Virus Attacks
"What can I do when experiencing Windows 11 preparing Automatic Repair boot loop of death?" Take it easy. This section lists five practical solutions to fix this issue. Feel free to select the option that meets your requirements best.
If your PC is trapped in the "Windows preparing Automatic Repair boot loop of death", it is recommended to restart it first. Sometimes, the simplest solution can yield results.
Shut down your computer by pressing the power button directly and turn it on again. After rebooting, check if your PC still shows Windows Automatic Repair loop. If this way doesn’t work, go to the next method.
Safe Mode is a startup mode provided by Windows that starts the computer with the minimum set of drivers and services necessary. When your PC boots into Safe Mode, you can attempt to find and fix the issues that prevent your computer from booting successfully.
Follow these steps to boot into Safe Mode and repair your system:
Step 1. Press and hold the power button for about several seconds to force shutting down your computer. Repeat the process three times to enter the Windows Repair Environment screen.
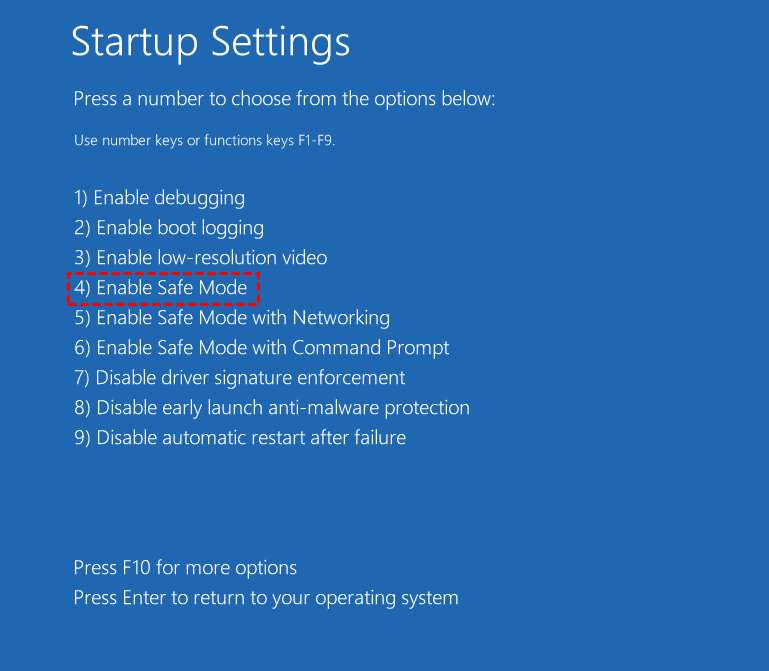
Step 2. Once in WinRE, click Troubleshoot > Advanced options > Startup Settings > Restart in turn.
Step 3. Hit the F4 key to enable Safe Mode.
Step 4. After entering Safe Mode, open Command Prompt by typing cmd in the Start menu search bar, right-clicking, and selecting Run as Administrator.
Step 5. Type the command sfc /scannow and press Enter to scan and repair corrupt system files. Alternatively, use the command chkdsk /f /r to check errors on your disk and repair bad sectors.
Another effective way is to disable the anti-malware protection that you launched early. This action may help restore your system's normal boot functionality, allowing you to access your files and applications again.
Here are the detailed steps to disabling early launched anti-malware protection:
Step 1. Press and hold the power button for about several seconds to force shutting down your computer. Repeat the process three times to enter the Windows Repair Environment screen.
Step 2. Click Troubleshoot > Advanced options > Startup Settings in turn.
Step 3. Click the Restart button on the startup settings page. And then your computer will restart and then present you with a list of options.
Step 4. Choose the Disable early launch anti-malware protection option by pressing F8.
In addition to the methods above, you can also fix the issue that Windows preparing Automatic Repair boot loop of death by performing System Restore, provided you have created a Windows restore point beforehand. This way can help you revert your computer to an earlier state but undo any changes made after the restore point. Therefore, it is suggested to back up essential data to a safe location as soon as possible.
Here are the detailed steps of performing System Restore:
Step 1. Enter the Windows Repair Environment screen first.
Step 2. Select Troubleshoot > Advanced options > System Restore in turn.
Step 3. Choose a restore point that you have created in advance, and then click Next to restore your computer to that state.
Step 4. Wait until the process is complete, and then restart your computer.
Is there any easier way to fix Windows preparing Automatic Repair boot loop of death?
Sure! AOMEI Partition Assistant includes a feature called Boot Repair, designed to easily and effectively fix the various system boot issues and restore your computer’s normal boot function. With this robust tool, you can easily create a bootable disk to load the system into the WinPE, allowing you to access diagnostic and repair tools without booting into the malfunctioning Windows installation.
Here’s how to fix Automatic Repair loop in Windows 11 using AOMEI Partition Assistant:
Step 1. Install and launch AOMEI Partition Assistant on a working PC and then choose the Boot Repair option below the Recover section.
Step 2. Click the create a bootable disk option to create a WinPE Boot Repair disk.
Step 3. Connect the disk to the PC that cannot boot into WinPE normally. It will automatically load the Boot Repair tool and scan the boot entries.
Step 4. You can see all boot entries on the interface once the scan completes. Select the repairable boot entries you want to repair and click the Repair button.
Step 5. Once the process completes, remove the bootable disk and boot the PC from the original system drive.
Here are some useful suggestions on how to prevent the Windows Automatic Repair loop from happening again. You can take these measures to ensure your system functions smoothly.
◆ Create system restore points regularly to help you recover your system in case of any issues or errors.
◆ Employ a reliable antivirus tool to conduct routine system scans, identifying and eliminating any harmful issues that may compromise your computer’s integrity.
◆ Manage your disk space properly to protect your disk from crashes due to low storage.
◆ Adhere to the proper procedures for powering your computer on and off to mitigate the risk of data corruption and maintain system stability.
While Automatic Repair is an excellent tool to detect and repair common startup issues, experiencing Windows Automatic Repair loop can be frustrating. This page covers common reasons for this issue and demonstrates how to resolve "Windows preparing Automatic Repair boot loop of death" step-by-step.
If you are seeking an easier solution, AOMEI Partition Assistant stands as a viable option, offering assistance in resolving a range of boot-related problems. Additionally, this tool can also help you address other disk issues, such as resizing partitions, cloning disks and recovering partitions.


