This comprehensive guide covers how to create a bootable USB drive and perform a Windows 10 repair boot from USB. AOMEI Partition Assistant provides you with an easier way to repair Windows 10 via USB boot.

Windows includes many built-in repair tools that can help users fix various boot issues, such as Startup Repair, Command Prompt, and System Restore. However, missing boot configuration data, corrupted system files, system failures, or other terrible issues may prevent your computer from booting successfully, restricting access to these tools.
In such situations, you can attempt to repair Windows using a bootable USB drive. By booting from the USB, the computer enters the Windows Preinstallation Environment, where you can regain various repair options to troubleshoot critical issues affecting the system’s functionality.
This page will focus on Windows 10, providing a comprehensive guide on how to perform a Windows 10 repair boot from USB.
Before discussing how to perform a Windows 10 repair boot from USB, it’s essential to learn how to create a bootable USB drive first. In this section, you will discover the process of manually creating a Windows 10 boot repair USB.
◆ A USB drive (minimum 16 GB free space) ◆ A computer that functions normally ◆ Download the Windows 10 IOS files from the official site.
Step 1. Press Win + R to open the Run dialogue. Then input cmd and press Enter to open the Command Prompt window.
Step 2. Type the diskpart command into the window and hit the Enter key to launch the DiskPart.exe tool.
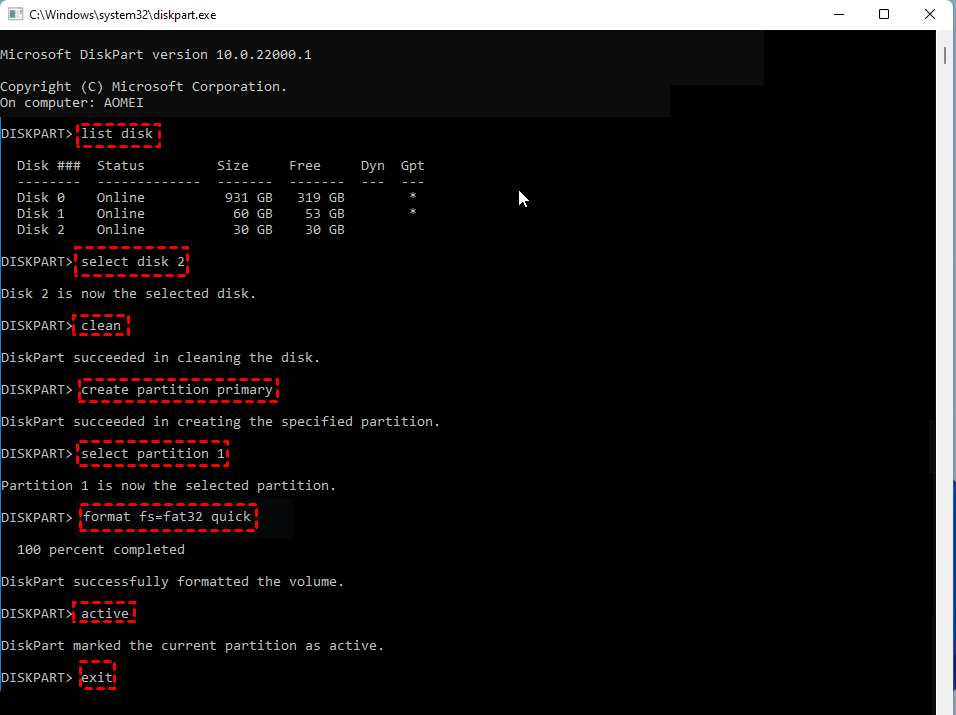
Step 3. After launching it, execute the following command in order and press Enter every time you type a command.
► list disk: Displays all the disks on the computer.
► select disk : Replace X with the letter of your USB drive.
► clean: Deletes all data from the USB drive.
► create partition primary: Creates a new primary partition on the drive.
► select partition 1: Selects the created partition.
► format fs=fat32 quick: Formats partition to store previously downloaded files, and only fat32 can be used in this command.
► active: Marks the current partition as active.
► exit: Closes the diskpart.exe.
Step 4. Find the Windows 10 IOS files you have downloaded in advance, and manually copy them to the formatted USB drive.
After creating a Windows 10 boot repair USB, what’s the next step to use it for repairing Windows 10? In this section, you will learn how to perform a Windows 10 repair boot from USB step-by-step.
Step 1. Connect the USB drive to the computer that you want to repair.
Step 2. Start your computer into BIOS and set it to boot using the connected USB drive.
Step 3. After successfully booting, you will see the Windows Setup interface. Set languages, time, and keyboard according to your needs, and then click Next to continue.
Step 4. Choose Repair your computer on the next interface.
Step 5. Then you can see Advanced Options by clicking the Troubleshoot option. These options can assist you in repairing various Windows issues. You can choose the suitable one as needed.
Now, you have known how to create a Windows 10 boot repair USB and employ it to fix common boot issues. It seems quite complex, right? Is there an easier way to execute a Windows 10 repair boot from USB?
Fortunately, AOMEI Partition Assistant, a powerful partition software and disk management expert, can help you resolve this issue effortlessly. When your computer can't boot normally, this software allows you to create a bootable USB drive with ease. By simply connecting, your computer can reboot, automatically detecting and repairing boot issues. No tedious steps are needed—you can fix a corrupt Windows 10 system in just a few clicks.
Here’s how to repair Windows 10 from USB boot using AOMEI Partition Assistant:
Step 1. Install and launch AOMEI Partition Assistant on a working PC, and then choose the Boot Repair option below the Recover section.
Step 2. Click the create a bootable disk option to create a WinPE Boot Repair USB drive.
Step 3. Connect the USB drive to the computer that cannot function normally. It will automatically load the Boot Repair tool and perform a scan of boot entries.
Step 4. Once the process completes, you can see all boot entries on the interface. Select the repairable boot entries you want to repair and click the Repair button.
Step 5. Once the process completes, remove the bootable USB drive and boot the PC from the original system drive.
Wondering how to perform a Windows 10 repair boot from USB? This guide provides you with detailed instructions on everything from creating a bootable USB drive to repairing Windows 10 via USB boot. A straightforward way is to use the Boot Repair feature in AOMEI Partition Assistant , which can easily recover the system and fix various boot issues. If you need to create bootable media to repair a failed system, why not choose this tool to streamline the process.


