When Windows 10 can’t boot on your computer, you may need to repair Windows 10 boot drive immediately. In this post, you can learn how to repair inaccessible boot device on Windows 10.

The boot drive in Windows 10 is the primary disk where the operating system is installed, and it’s critical for starting your computer. If your PC cannot boot, the issue could stem from a damaged boot sector, missing boot configuration data (BCD), or corrupt system files. Here are some common scenarios where boot drive repair is necessary:
1. Boot Failure with Blue Screen of Death (BSOD) If you encounter the Blue Screen of Death during startup, it could mean that important system files have been damaged, or there is a hardware conflict preventing Windows from booting normally.
2. "Operating System Not Found" Error This error occurs when your computer cannot locate a valid operating system on the boot drive, often caused by a damaged master boot record (MBR) or corrupted BCD files.
3. Corrupted Boot Sector The boot sector contains code essential for loading the operating system. If it gets corrupted, your system won't be able to boot correctly.
4. Inaccessible Boot Device This error indicates that Windows cannot access the boot device, possibly due to misconfigured BIOS settings, faulty drivers, or drive failures.
5. Computer stuck in Boot Loop A boot loop occurs when the computer continuously restarts during bootup. This can happen due to a failed update, incorrect boot settings, or corrupted system files.
In all these cases, repairing the Windows 10 boot drive can restore normal functionality to your system.
If your computer can't boot as expected, several built-in tools and techniques are available to repair the boot drive and fix startup issues. Here are the three most effective methods:
One of the quickest ways to fix boot issues in Windows 10 is by utilizing the Startup Repair feature from the Advanced Startup Options menu.
Step 1. Power off your computer and then turn it back on. During the boot process, press the F11 or Shift + F8 key repeatedly to access the Advanced Startup Options menu.
Step2. Navigate to Troubleshoot > Advanced options > Startup Repair.
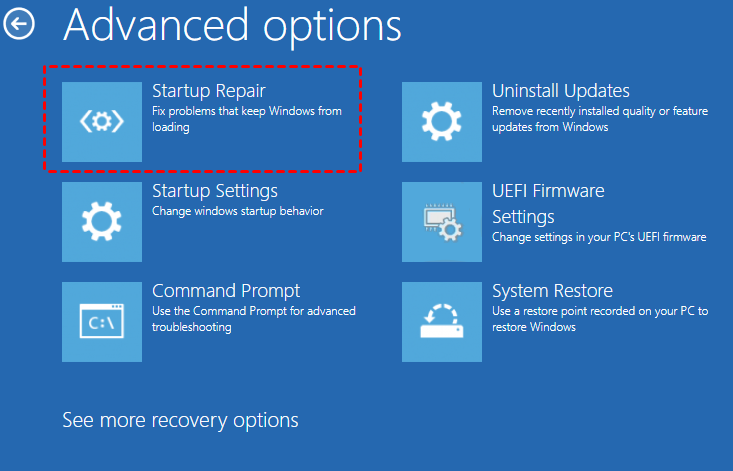
Step 3. Windows will start diagnosing your system and attempt to fix any boot issues automatically.
This is a user-friendly method that can resolve a wide range of boot-related issues, including missing system files and incorrect configuration settings.
If the automatic repair does not work, you can manually repair the boot files using the Command Prompt from the Windows recovery environment.
Step 1. Boot your system into the Advanced Startup Options menu. Select Troubleshoot > Advanced options > Command Prompt.
Step 2. Once the Command Prompt window appears, type the following commands one by one and press. Enter after each:
This method is highly effective for fixing serious boot issues, but it requires familiarity with command-line tools.
Corrupted system files can prevent Windows from booting properly. To repair these files, you can run the System File Checker (SFC) and the Deployment Imaging Service and Management Tool (DISM).
Step 1. Boot into Advanced Startup Options and open the Command Prompt.
Step 2. Run the SFC command to check for and repair corrupted system files:
sfc /scannow
Step 3. If the SFC tool is unable to repair some files, use the DISM tool to repair the Windows image: dism /online /cleanup-image /restorehealth
These tools help ensure that Windows system files are intact and can fix a range of corruption issues preventing your system from booting.
If the built-in methods do not resolve your boot issue, or you’re not familiar with complex commands, a more advanced and powerful tool like AOMEI Partition Assistant Professional can help. It is an all-in-one disk and partition management software for Windows. It offers a range of features, including partition resizing, data migration, SSD optimization, and more. One of its most powerful features for fixing boot-related issues is the Boot Repair function.
The Boot Repair function is designed to fix various boot issues, such as corrupted BCD, missing system files, and improper boot configurations. It works efficiently to help users restore their system without losing any data.
Step 1. Install and launch AOMEI Partition Assistant. In the Main Tab, please click the "Recover" tab and select "Boot Repair".
Step 2. The Boot Repair tool will pop up. Please click "Next" to start the system’s boot entries scan process.
Step 3. After the process is completed, it will display the scan result: system paths, system versions, and boot status. And, all repairable boot entries will be available to select.
Step 4. Select one/multiple repairable boot entries you want to repair and click the "Repair" button to start the boot repair.
Step 5. Wait for the repair process to finish. Once it is finished, you can check the repair result. If it succeeds, you will get a "Repair Successfully" result.
Step 1. Install and launch AOMEI Partition Assistant on a working PC, click "Recovr"-"Boot Repair" and then click the "create a bootable disk" option to create a WinPE "Boot Repair" disk.
Step 2. Plug the bootable disk you created into the target computer you wish to repair the boot issue.
Step 3. Enter BIOS in your computer, and choose the bootable disk as the boot drive to access AOMEI Partition Assistant.
Step 4. The PC that cannot boot into WinPE will automatically load the Boot Repair tool and start the boot entries scan process. All boot entries will be displayed. Then you can follow the same operations as the above shows.
Also, you can choose "Rebuild MBR" and "Check Disk" functions to help you. These two functions are often used to repair boot issues for Windows systems.
Repairing a Windows 10 boot drive can seem daunting, but with the right tools and methods, you can get your system back up and running. Whether it's using the built-in Startup Repair tool, manually fixing the boot files with Command Prompt, or leveraging powerful tool like AOMEI Partition Assistant, there’s a solution for every type of boot failure.
AOMEI Partition Assistant stands out as a reliable tool, offering a user-friendly interface and advanced options such as the Boot Repair feature. With its help, even complex boot issues can be resolved without data loss or the need for a complete system reinstall.


