You’ll learn how to use PowerShell to find duplicate files and how to remove them. In addition, you can see a more user-friendly tool to scan and delete duplicate files without difficult operation and totally safe.

As a command-line shell and scripting language created, PowerShell is intended to automate administrative activities, maintain system configurations, and handle different system-related procedures effectively. It is built on the.NET framework, which grants it access to a large variety of system functions and libraries, making it an indispensable tool for a wide range of users.
One of PowerShell's standout features is its ability to interact with the Windows operating system, services, and applications through commands. These commands are designed to be easy to use and follow a consistent naming convention, making it easier to discover and use them effectively.
PowerShell's versatility and extensibility make it an invaluable tool for locating and eliminating duplicate files on a Windows PC. You may search your system, discover duplicate files based on numerous criteria, such as content, name, or size, and securely delete them to free up critical disk space with a few particular commands and scripts.
In this part, we’ll provide a step-by-step guide on how to use PowerShell to find and remove duplicate files, demonstrating the script to achieve this goal. But, before we start, you need to know that there is the risk that you may lose data or meet some other irreversible consequences if you type the wrong commands, please make sure you understand and input the right commands.
The Get-FileHash cmdlet in PowerShell is for file checksum. This hash can be used to identify a file uniquely. We will utilize the hash value to identify duplicate files in this post. The command's syntax is as follows:
Get-FileHash -Path file_path -Algorithm hashing_algorithm
You need to type a specific storage path of the files you want to search. E.g: Get-FileHash -Path 'D:\ISO\WinPE.iso' -Algorithm SHA512
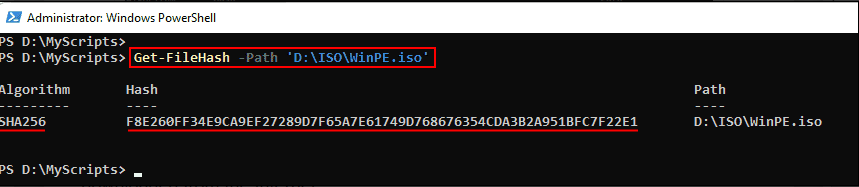
When no hashing method is given, the default is SHA256, which is enough in most circumstances. The hash is used to validate file integrity, particularly when downloading data from the Internet.
Get-FileHash supports pipeline input allowing us to use it in conjunction with the Get-ChildItem cmdlet to compute the hash of each item provided by Get-ChildItem.
Now, we can find duplicate files.
▶ Option 1. Find duplicate files based on the hash
The command below recursively obtains all the files in a folder, gives them to Get-FileHash to generate their hash, and then groups them based on matching hash values. You need to replace the path based on your Get-FileHash cmdlet result according to your situation.
$srcDir = "D:\MyScripts" (Here, change the path based on your case)
Get-ChildItem $srcDir -File -Recurse `
| Get-FileHash | Group -Property Hash `
| where {$_.Count -gt 1} | foreach { $_.Group | select Path, Hash}

You should keep in mind that this command works best with small files. You may encounter difficulties if the source directory contains a significant number of huge files to delete.
The hash computation is a time-consuming procedure, and the aforementioned program does it for every file, regardless of size. When used against a directory with a huge number of files, the program will take forever to discover duplicates.
▶ Option 2. Find duplicate files based on length and hash
Compared with the above command, searching duplicate files according to length and hash is more optimized.
The size of the files must match for them to be duplicates, which means that files of different sizes cannot be duplicates. You're undoubtedly familiar with the Get-ChildItem PowerShell cmdlet's Length property. No computation is necessary because the Length value is taken from the directory.
The secret is to only compute hashes for files of the same length because we already know that files of various lengths cannot be duplicates. The overall time of the command is greatly decreased in this manner. You need to replace the path based on your Get-FileHash cmdlet result according to your situation.
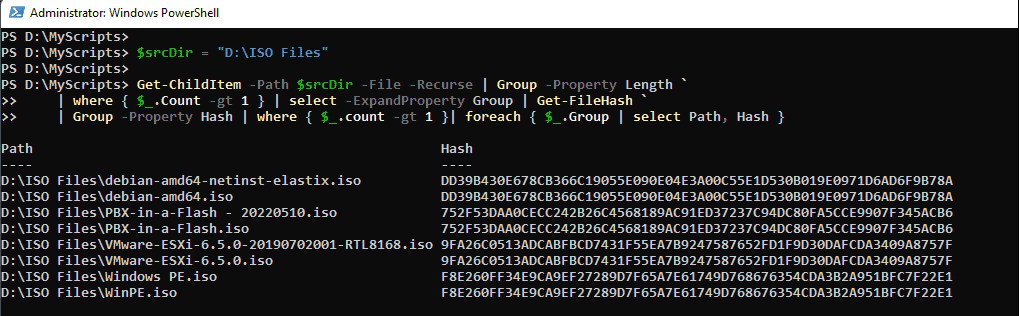
$srcDir = "D:\ISO Files" (Here, change the path based on your case)
Get-ChildItem -Path $srcDir -File -Recurse | Group -Property Length `
| where { $_.Count -gt 1 } | select -ExpandProperty Group | Get-FileHash `
| Group -Property Hash | where { $_.count -gt 1 }| foreach { $_.Group | select Path, Hash }
You can see this command that groups files that are the same size and then send those files to Get-FileHash to determine their hash.
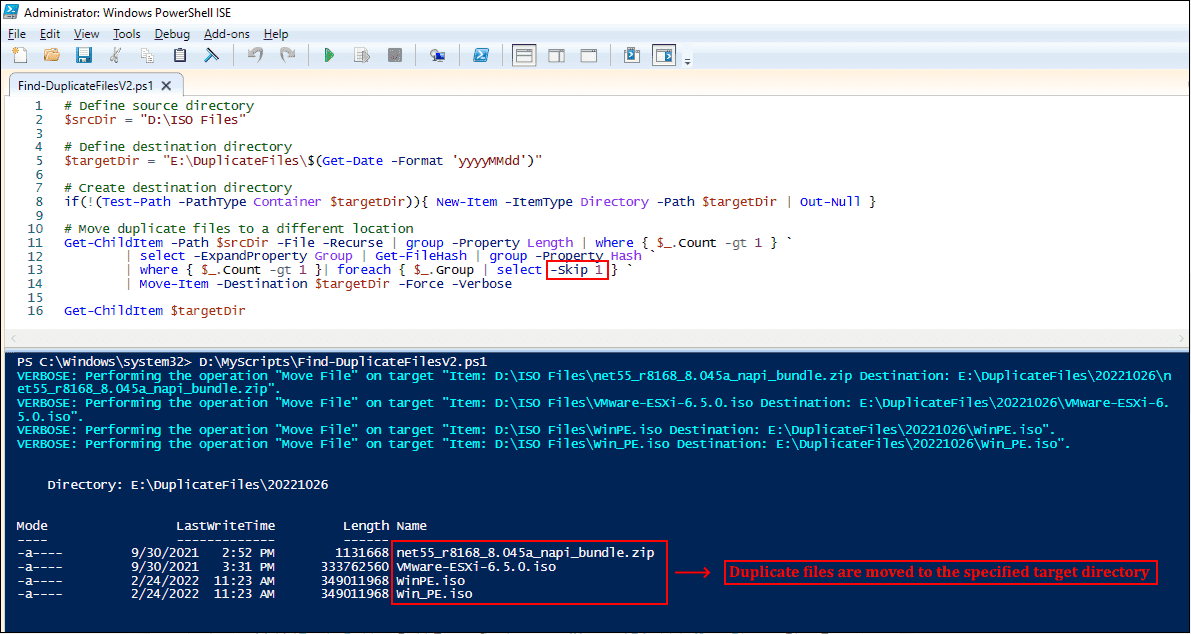
After we find duplicate files with PowerShell, we should deal with them appropriately. It is not advisable to eliminate duplicates immediately while working with essential files. You can instead relocate them to another directory, most likely on a separate disc with adequate free space. With our new command, this is simple. Simply feed the output of the above operation to the Move-Item cmdlet.
# Define source directory
$srcDir = "D:\ISO Files" (Here, change the path based on your case)
# Define destination directory
$targetDir = "E:\DuplicateFiles\$(Get-Date -Format 'yyyyMMdd')" (This is where those target files will be stored )
# Create destination directory
if(!(Test-Path -PathType Container $targetDir)){ New-Item -ItemType Directory -Path $targetDir | Out-Null }
# Move duplicate files to a different location
Get-ChildItem -Path $srcDir -File -Recurse | group -Property Length | where { $_.Count -gt 1 } `
| select -ExpandProperty Group | Get-FileHash | group -Property Hash `
| where { $_.Count -gt 1 }| foreach { $_.Group | select -Skip 1 } `
| Move-Item -Destination $targetDir -Force -Verbose
The point you need to notice is that we used -Skip 1 to leave one file in the source directory while moving other duplicates to the specified target directory. Once moved, you can manually review them later on and remove them, if necessary. If you're working on a huge source directory with millions of files, it is a good idea to avoid using the -verbose parameter with Move-Item.
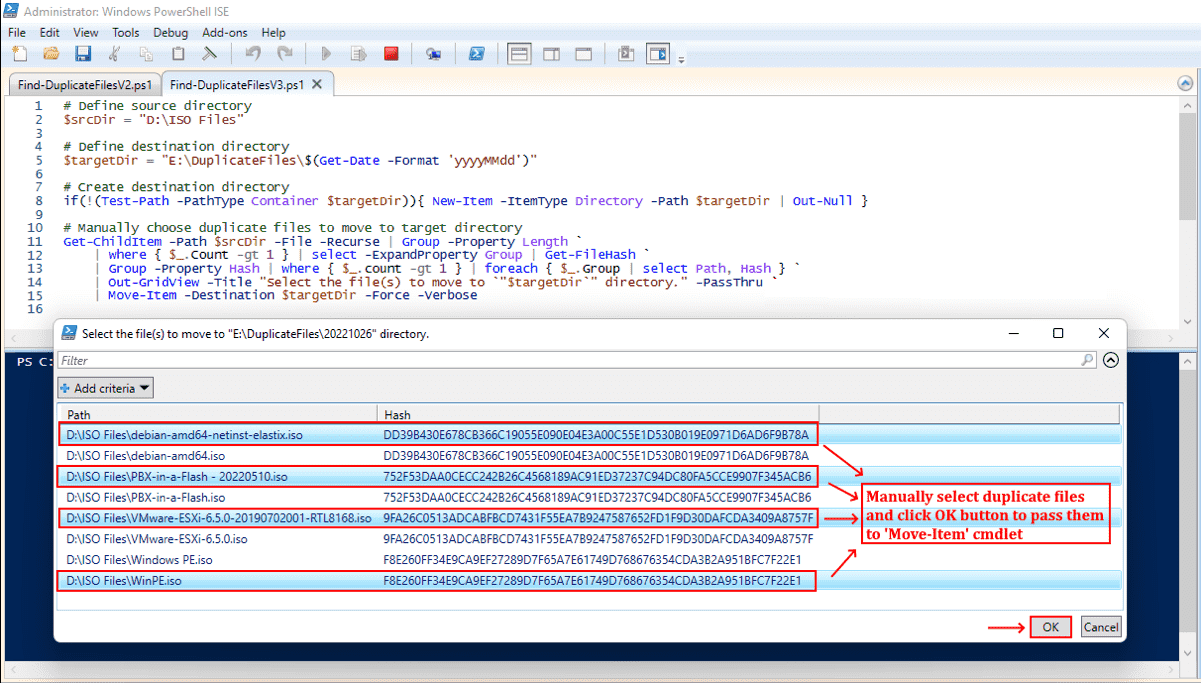
If your directory contains a few files, you may wish to choose which to relocate and which to leave in the source directory manually:
# Define source directory
$srcDir = "D:\ISO Files"
# Define destination directory
$targetDir = "E:\DuplicateFiles\$(Get-Date -Format 'yyyyMMdd')"
# Create destination directory
if(!(Test-Path -PathType Container $targetDir)){ New-Item -ItemType Directory -Path $targetDir | Out-Null }
# Manually choose duplicate files to move to target directory
Get-ChildItem -Path $srcDir -File -Recurse | Group -Property Length `
| where { $_.Count -gt 1 } | select -ExpandProperty Group | Get-FileHash `
| Group -Property Hash | where { $_.count -gt 1 } | foreach { $_.Group | select Path, Hash } `
| Out-GridView -Title "Select the file(s) to move to `"$targetDir`" directory." -PassThru `
| Move-Item -Destination $targetDir -Force -Verbose
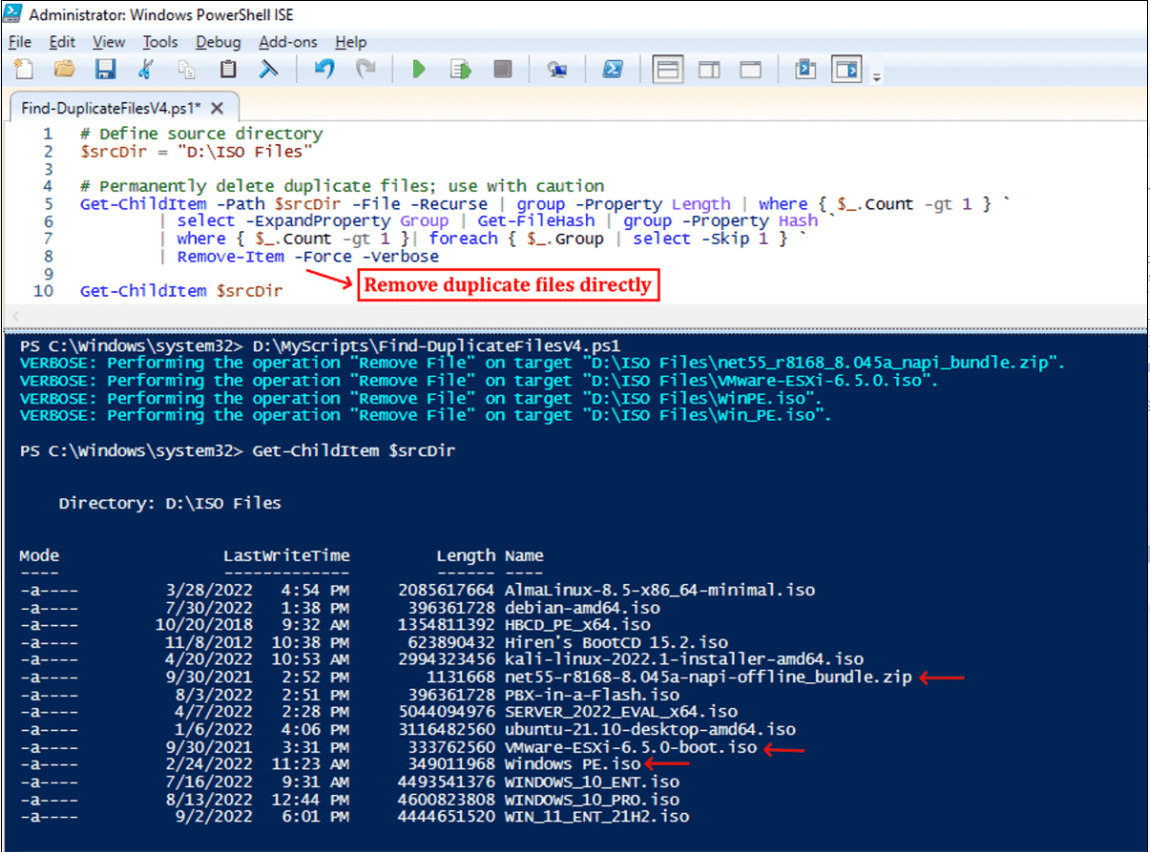
If you have backed up your files, you can also directly move the duplicate files with PowerShell:
# Define source directory
$srcDir = "D:\ISO Files"
# Permanently delete duplicate files; use with caution
Get-ChildItem -Path $srcDir -File -Recurse | group -Property Length | where { $_.Count -gt 1 } `
| select -ExpandProperty Group | Get-FileHash | group -Property Hash `
| where { $_.Count -gt 1 }| foreach { $_.Group | select -Skip 1 } `
| Remove-Item -Force -Verbose
While PowerShell can be used for locating and erasing duplicate files, its commands can be quite complex and risky to employ. A single mistake during the process could potentially harm your file directory. In such instances, a user-friendly duplicate file finder becomes an essential tool. That's where we recommend using AOMEI Partition Assistant Professional, a versatile disk and partition management utility compatible with all Windows PCs.
Its "Duplicate File Finder" functionality offers users a swift and efficient solution. It performs speedy scans to pinpoint duplicate files (including images, videos, audio, documents, and archives), allowing users to establish automated cleaning routines for their devices without using any complex commands.
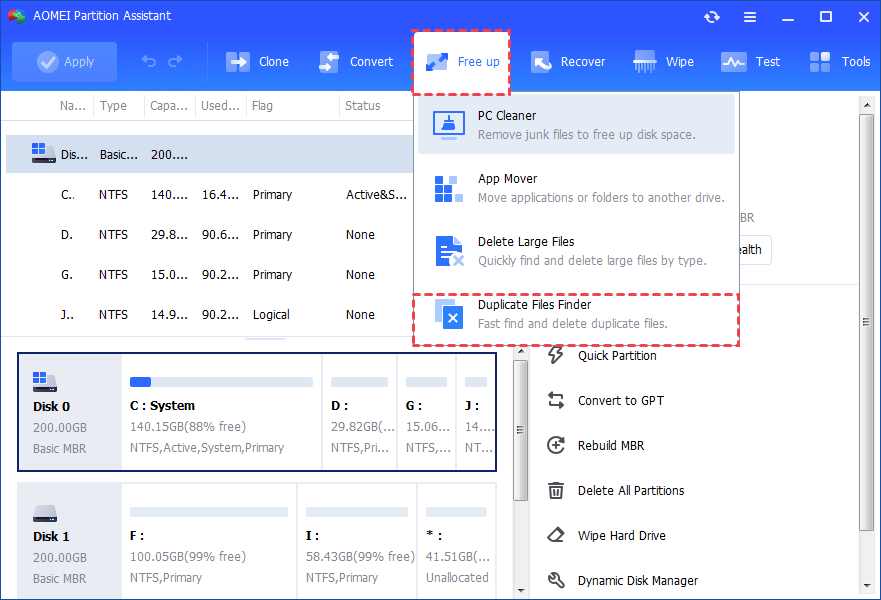
Step 1. Install and launch this tool, choose the “Free up” tab in the top menu, and select “Duplicate File Finder”.
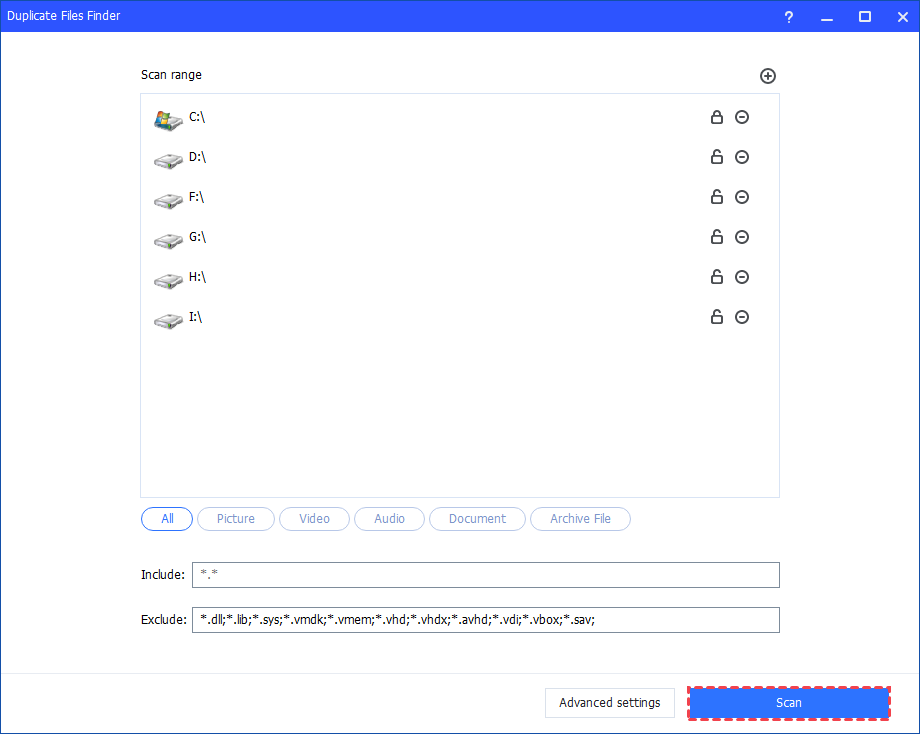
Step 2. In the new window, limit the scan range and file types. Then, you can click “Scan”. If you choose “Advanced”, you can set more details for the files, such as the size, comparison methods, file protection settings, and file data. Once you finish your settings, you can click “OK” to start the scan.
Step 3. During the scan, you can see the file numbers, spent time, and remaining time, if you want to stop the process, you can click “Stop Scan”.
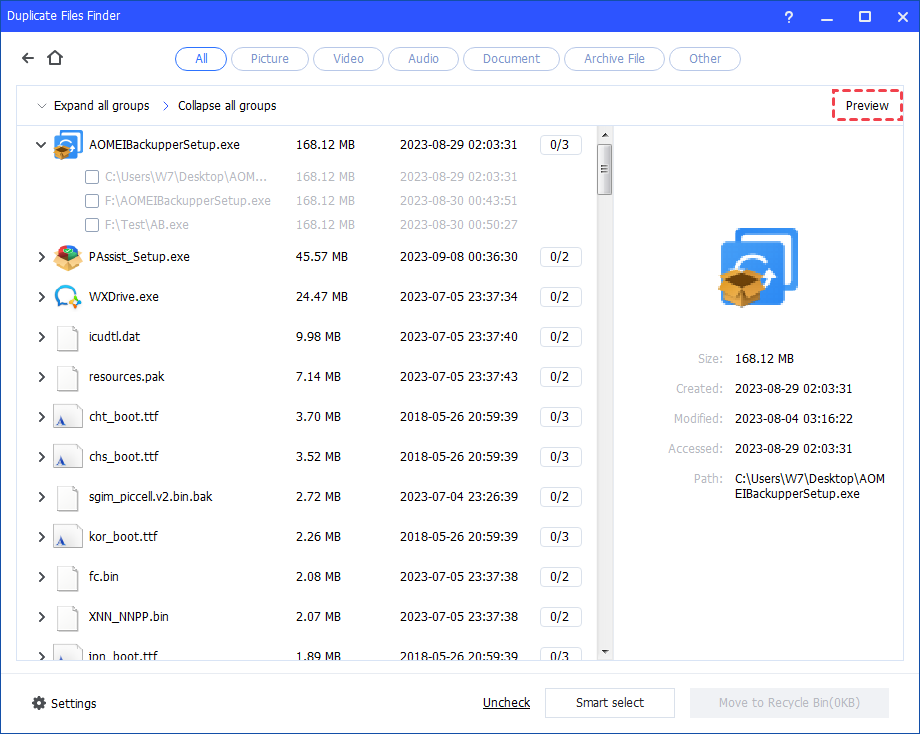
Step 4. When the scan is over, you can see the results. All duplicate files will show in the window, and you can check the size, and time by clicking “Preview”. Click “Smart Selection”, and the program will choose the proper files to remove. And you can click “Settings” to set your preferences settings.
Step 5. After you confirm the deletion, the tool will start the removal process.
Step 6. Click “Close” to finish the task.
PowerShell is a very practical tool for Windows users to modify system settings. However, it requires high computer knowledge for normal users. So, if you just want to clean duplicate files, a duplicate file remover is a highly safe tool. AOMEI Partition Assistant also has a data recover function to save you just in case. And it can clean junk files, move installed apps, and you can find many useful features to improve your computer performance.