Your SanDisk drive or USB privacy can be safeguarded by SanDisk BitLocker encryption. You will learn how to encrypt your SanDisk drive in this guide.
“I carry movie files on a SanDisk Extreme portable SSD. How best or most conveniently could one password guard the data or the password itself? After looking at a lot of blogs and YouTube videos, none of them seem convenient; many involve outside programs. I appreciate your direction.”
--From Reddit
SanDisk is a renowned brand specializing in flash memory products, including USB flash drives, memory cards, and SSDs. SanDisk was a pioneer in the development and commercialization of flash memory technology. The company has been instrumental in advancing storage solutions, catering to both consumer and industrial markets. Its products are known for their reliability, performance, and innovation, making them a popular choice for data storage needs worldwide.
To help users protect privacy, SanDisk developed SanDisk Secure Access. It is an example of such software. It is the official software that is included with the SanDisk USB flash device. Its capabilities encompass online data backup and U disk data encryption.
SanDisk Secure Access software, which is available in both Mac and Windows versions, employs 128-bit AES encryption to establish a password-protected folder, SanDisk Secure Access Vault, on the flash drive. Any files that are sealed are transferred to the SanDisk Secure Access Vault and can only be accessed with a password.
Furthermore, SanDisk Secure Access includes an online backup capability that can store up to 2 GB of data. The online backup facility can be utilized to securely share personal photographs, documents, confidential business secrets, or banking details through secure media. However, to utilize this feature, SanDisk Secure Access users must undergo a brief registration process with the service provider.
Users are guaranteed that critical data is secure and accessible with Secure Access, regardless of the pen drive's theft or loss.
SanDisk Secure Access is not an essential component of the SanDisk flash drive and can be effortlessly eliminated. It is effortless to reinstall and download.
Note: The SanDisk Secure Access software can’t run on computer hard drives. It must be moved to SanDisk USB flash drive and then be installed on that flash drive.
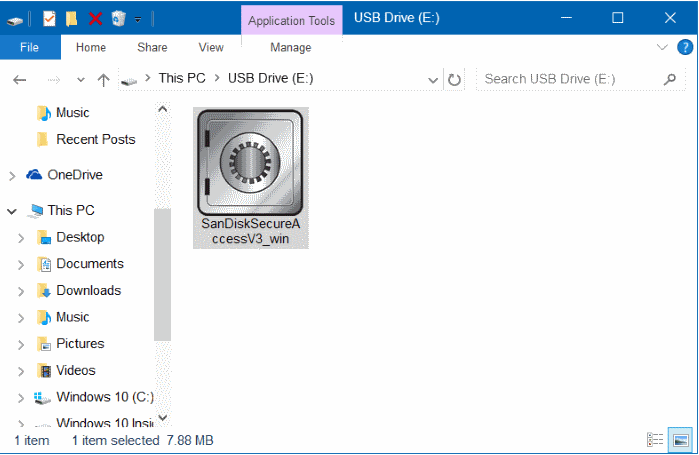
Step 1. Download SanDisk Secure Access from its official download page. Connect your SanDisk USB flash drive to your computer. Then, copy the previously downloaded Secure Access setup file into the USB drive.

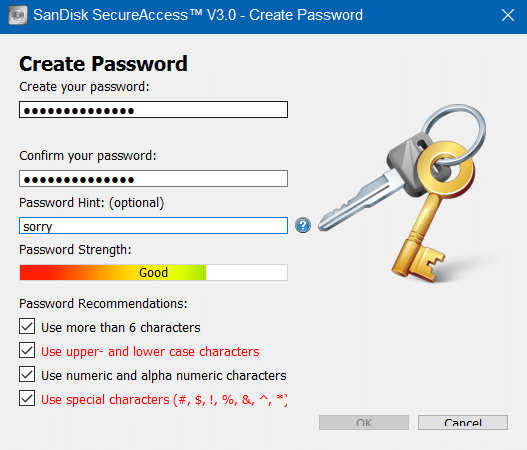
Step 2: Begin the installation of Secure Access by double-clicking on the configuration file. Accept the license terms and establish a robust password by following the wizard. SanDisk suggests that the password be strong and should include a minimum of six characters.
This password should include both upper and lower case letters, numeric and alphanumeric digits, and special characters.

Step 3: Click the OK icon to establish a new vault on your USB drive after setting the password. Subsequently, a window appears, providing instructions on how to operate SanDisk SecureAccess. Please select the "Next" icon after reviewing the "How to" guide.
Step 4: The subsequent window will appear upon the opening of SanDisk Secure Access. To secure a file or folder with a password, simply drag or copy it to the "My Vault" section.
SanDisk SecureAccess is an exclusive tool for SanDisk drive users, you can’t use it for drives from other brands. What’s more, the SecureAccess system simplifies the process of password-protecting files; however, it is effortless for anyone with access to your USB drive to erase the password-protected SecureAccess vault. Thus, while your sensitive files are not visible to others, they are capable of being deleted.
If you want to exclude other people from your SanDisk drive, you can perform SanDisk BitLocker encryption. BitLocker is a full disk encryption feature included with Microsoft Windows versions starting from Windows Vista. It is designed to protect data by providing encryption for entire volumes. BitLocker helps prevent unauthorized access to the data on your drive by encrypting it, which means that it can only be read if the proper decryption key is provided.
The problem is that BitLocker is not carried on all Windows PC. If you are a Windows Home user, your Windows only allows you to do Device Encryption because BitLocker feature is for Windows Professional and advanced versions. However, you can turn to third-party tool to use BitLocker on Windows Home PC to encrypt SanDisk flash drive, SSD, and HDD.
AOMEI Partition Assistant Professional is compatible with a wide range of operating systems including all Windows 11, 10, 8, and 7 OS, and is available for all disks and drives’ BitLocker encryption. Not only does it allow you to enable or disable BitLocker, but it also offers a range of other useful features for efficiently managing BitLocker drives. These include the ability to back up recovery keys, change passwords, and lock or unlock encrypted drives.
Step 1. Install and launch AOMEI Partition Assistant. Click the "Tools" main tab and select "BitLocker".
Or, right-click the partition you want to encrypt and click the "BitLocker"->"Turn on BitLocker" option in the Context Menu.
Step 2. All drives on the system will be displayed, including operating system drives, fixed data drives, and removable drives. Please find the partition you would like to encrypt BitLocker and click the "Turn on BitLocker" option. (Here, we take the drive D: as an example.)
Step 3. Please set and confirm a password to encrypt the drive and click "Next".
1. Encrypt used disk space only (faster and best for new PCs and Drives): If you are setting up BitLocker on a new PC or a new drive, you only need to encrypt the part currently being used. And, BitLocker will automatically encrypt the newly-added data.
2. Disk encryption compatible mode (suitable for removable data drives): Windows 10 (version 1511) introduces a new disk encryption mode (XTS-AES). This mode provides heavy integrity support but is not compatible with earlier versions of Windows.
If this is a removable drive to be used on an earlier version of Windows, you should select Compatible mode.
If this is a fixed drive, or if this drive will only be used on devices running at least Windows 10 (version 1511) or later, select the new encryption mode.
Step 4. Select a way to back up your recovery key. Select "Save to a file" or "Print the recovery key".
If you select "Save to a file", please choose a location on your PC to save the recovery key.
It will generate a TXT file with the name: Bitlocker Recovery Key + 45-bit Key. The recovery file will be saved in the TXT file. You can open the file to view the recovery key. Please keep the file. Then, please click the "Next" button to start the encryption process.
If you would like to encrypt your current system drive, you will be asked to restart your PC into Windows PE mode to execute the operation because it is the current system drive. The program will first create Windows PE and then boot the PC into Windows PE mode to encrypt the drive. After the encryption is finished, you can restart your PC.
Step 5. The encryption process might take time to encrypt the drive. Before the process is finished, please do not terminate the program, remove the drive, or turn off the power.
Once the encryption process is finished, please click "Completed". Finally, the drive is BitLocker encrypted.
Compared with SanDisk SecureAccess system, SanDisk BitLocker encryption can give your data more protection. And you don't need to worry that Windows Home users can't employ BitLocker encryption, because AOMEI Partition Assistant Professional can help you. It will offer you reliable data encryption the same as the Windows built-in BitLocker feature. What's more, this handy tool can clone disk and partitions, if you have backup disk, you can create a duplicate disk to prevent data loss against PC crash or disk failure.