Learn to speed up HDD performance in Windows 10 and improve the HDD performance to faster your PC.
The performance of the old HDD inevitably intends to get slower and slower, for the high read and write frequency means the disadvantage of high loss Once the hard drive has the bad condition, the computer will be greatly affected—PC will become slow, randomly freeze, or even meet BSOD.
| 📃 A huge amount of temporary files | The temporary files are built for saving information temporarily. The issue is that they might accumulate and devour the hard drive space. |
| 🔎 Bad sectors | This is one of the prime reasons for the slow hard drives. If the bad sector takes up your hard drive, your computer will confront other serious problems. |
| 🧩 Fragmentation | Because the fragments of files will spread around the HDD, they will definitely waste more resources of the HDD to visit them. |
| 🕷 Menace applications | Malicious applications will attack your computer with illegal tasks or insert viruses to cause damage. |
Various reasons may let your hard drive slow down, but we can still protect our hard drives in our daily use. We list 4 simple and practical methods about how to make HDD faster.
The browsers you use, like Chrome, Firefox, Edge… will store lots of temporary files which can occupy the space and also slow the speed of the hard drive. You can delete them manually to clean up the hard drive.
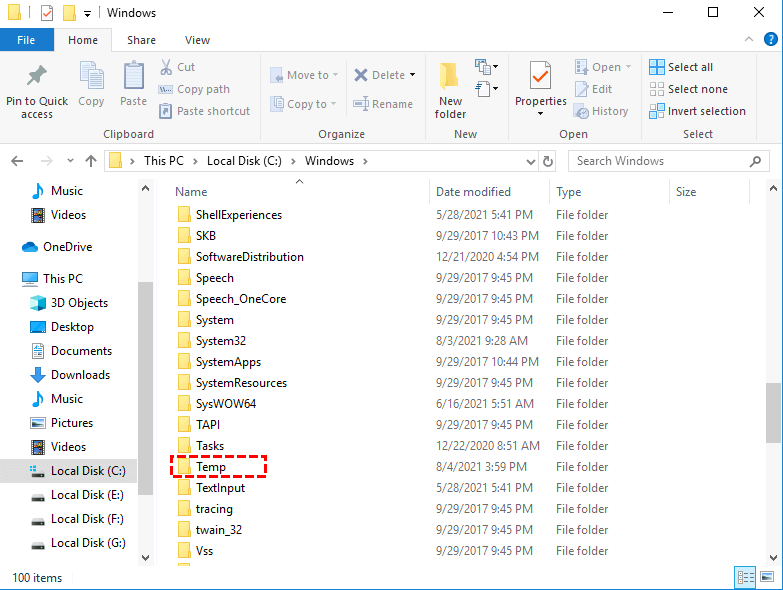
Step 1. Open “This Computer”, and click C drive.
Step 2. The temporary files usually have two locations: C:\Windows\Temp”, or “C:\Documents and Settings\username\Local Settings\Temp”.

Step 3. After you find the folders, you can delete both two directly.
Before the write cache data is recorded, it’s stored in a NAND chip on the hard drive, so you can enable it to improve the performance.
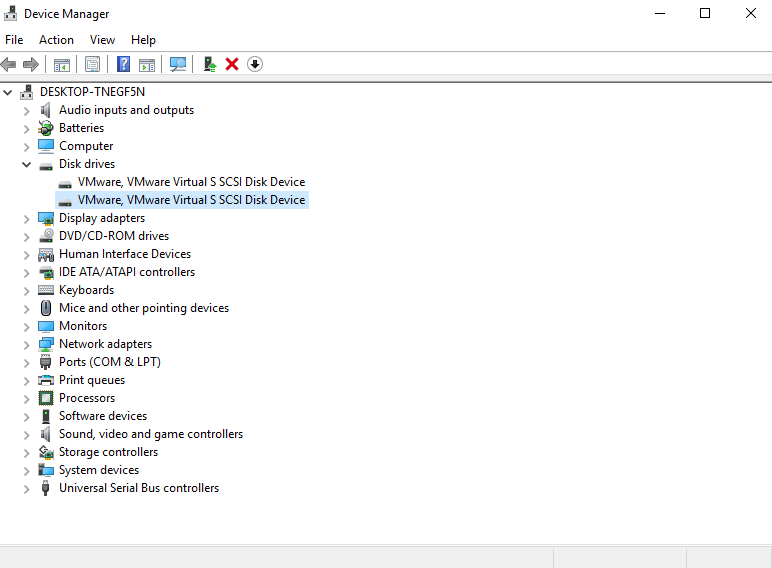
Step 1. Press “Windows” + “R” to open a “Run” window. Type devmgmt.msc, and then click “OK.” to open “Device Manager”.
Step 2. Choose your hard drive from the “Disk Drives” option in the left menu.

Step 3. Right-click on the hard drive and then click the “Properties”.
Step 4. In the Properties menu, click the “Policies”.
Step 5. Check “Better performance (default)” and click OK.
Because of the different working rules from SSD, HDD will get fragmentation with the age. The files may split into one more section after you delete them or visit them. These sections will scatter around, so we can reorder these sections via defragmentation.
A powerful hard drive manager, AOMEI Partition Assistant Professional will help you defragment your HDD and faster it to improve your experience of your PC. It can analyze the whole disk and show information of the HDD to let you know your HDD, thereby, you can choose the best plan to improve the slow HDD.
Step 1. Install and launch AOMEI Partition Assistant, just right-click on the disk and select the "Disk Defrag" function.
Step 2. Check the partition needed to be analyzed, and click "Analyze". You need to check the partition, not select it. Because this function currently only supports NTFS partitions, so it will only list NTFS partitions on SSD, HDD, and USB drives.
Tip: You can click "Pause" to halt the process and resume later, or click "Stop" to end the analysis process completely.
Step 3: The program will score the partition based on the fragmentation rate when the analysis is over.
There are 3 statuses according to the score:
Normal: Score≥90. The partition is in good condition, with no need for defragmentation.
Suggest defragmenting: 60≤Score<90. The current partition has some fragments, which suggest running defragmentation.
Defragment now: Score<60. There are many fragments in the current partition, suggest running the defragmentation immediately.
You can check the distribution of fragments through the Tetris view.
Step 4. After the analysis is finished, you can click on "Details" to see more information about the analysis results:
•Total files and directories •Fragmented files •Fragments •Fragmentation Rate
Step 5. Click the "Defrag" button to start the defragmentation.
Tip: You could click "Pause" to halt the procedure and resume later, or click "Stop" to terminate the process completely.
After the defragmentation is completed, the partition will be scored according to the defragmentation result.
Note: If the fragment files are in use, they cannot be defragmented.
Further tips: Schedule defrag HDD
Schedule defrag your HDD is convenient for users who are busy and can't remember to defrag regularly.
Step 1. After you enter the "Disk Defrag" function, click the button “Schedule”.
Step 2. In the schedule settings, you can select drives, the specific date and time to defrag the target drives, then click “OK” to save the settings.
Step 3. Click “Conditions”, you can set the degree of fragmentation to trigger the schedule to defrag your disk. And there are other options to help you make a detailed schedule.
Click "OK" to save your settings and close windows, then the defrag program will automatically run based on your schedule conditions.
If defragment cannot improve the slow HDD, maybe you should think about the problem of bad sectors. Running a scan on the slow HDD and repairing them is also a nice choice to speed up an HDD. AOMEI Partition Assistant offers you a full scan and repair service to save your old HDD.
Step 1. After downloading and running Partition Assistant, right-click the partition that you want to check and select “Advanced”, then select “Check Partition” in the main window.
Step 2. Select the way of checking errors to perform. there are three choices, choose the first one “Check partition and fix errors in the partition by using chkdsk.exe”. And click “OK”.
Step 3. Click “Start” to check.
Step 4. You can see the process in the new window.
Step 5. When it’s finished, you can see a warning message, click “Yes” to complete the procedure.
After the restart, try if the HDD has been improved.
Write caching is a feature that allows you to store information in a cache before writing it to the hard disc. This improves hard drive performance since the cache is quicker and information can be written on it much faster than on the hard disc itself.
However, there is a disadvantage to this measure. If the computer shuts down unexpectedly, the data in this temporary cache may be lost. These procedures will assist you in activating write caching.
Step 1. Click the Start button. In the Windows Search bar, type Device Manager.
Step 2. Select your hard drive from the Disk Drives option in the Device Manager. Right-click on the hard drive and then click the Properties button.
Step 3. In the Properties menu, click on the Policies tab.
Step 4. Check the box enabling write caching on the device and click OK.
Hope this article can speed up the HDD performance and improve the speed of your PC. AOMEI Partition Assistant is a versatile tool and it has the Server Edition for Windows Server users and the Unlimited Edition for users who need to manage multiple devices. If you need a handy tool to clone disk, convert to GPT/MBR without data loss, and move installed programs, this tool is your best choice.