Experiencing 99% disk usage can slow down your computer significantly. In this article, we’ll explore why this happens and how you can resolve it quickly and efficiently.

If you notice that your Windows 10 or 11 computer is lagging or unresponsive, you may be experiencing a common problem: high disk usage, which usually hovers around 99%. This problem can stem from a variety of causes, including background processes and system settings.
Understanding the root causes and how to fix them can restore your computer's performance and ensure a smoother experience. In this article, we will discuss the causes of high disk usage and provide a comprehensive guide on how to fix it.
There are many reasons why disk usage may reach 99%. Understanding these factors is the first step in correcting the problem.
Prolonged disk usage at 99% can have serious consequences such as system sluggishness, frequent freezes or crashes, and potential data loss.
If you are facing 99% disk usage, here are a few strategies that can help you solve the problem effectively:
Open Task Manager and check the Processes tab to identify any applications that consume too much disk resources. Close or disable any unnecessary applications.
Malware can severely affect disk performance. Use trusted antivirus software to scan your system for malware and remove any threats that may be causing high disk usage.
Use the built-in disk cleanup tool to remove temporary files, system cache, and other unnecessary data. This can free up disk space and improve performance.
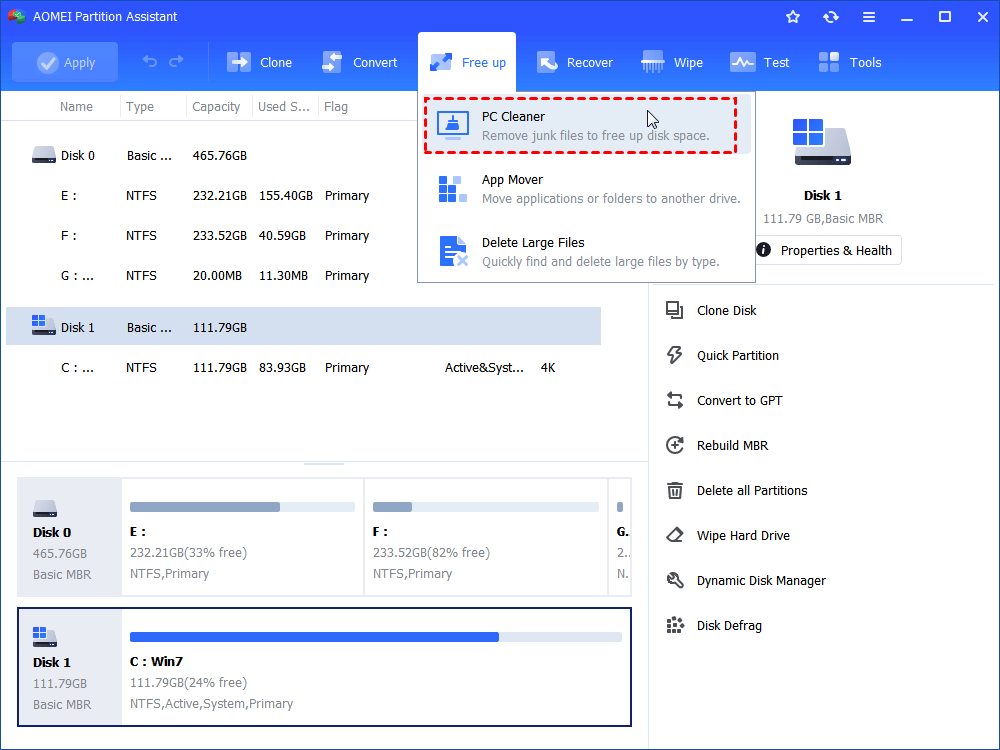
In addition, AOMEI Partition Assistant provides a free system junk file cleaner. It can comprehensively scan junk files in your computer, including system junk files and registry junk files. After scanning, all junk files will be automatically classified. You can just click "Clear All" to delete them.
Step 1. In the main interface, click "Free Up" > "PC Cleaner".

Step 2. Then, click "Start Scan" to find junk files on your PC.
Step 3. Select the junk files that need to be cleaned and click "Clear All".
If you often encounter high disk usage, it may be time to upgrade your hard drive. Consider switching from a traditional HDD to an SSD, which offers faster read/write speeds and better overall performance. AOMEI Partition Assistant Professional provides a "Clone Disk" feature. You can easily transfer all your data from an existing disk to a new or larger disk.
Tip: The tool also provides a Sector-by-Sector feature that can clone hard disks with bad sectors. And it supports 4K-aligned SSDs during the cloning process to maintain SSD performance.
Step 1. Click the "Clone" main tab and select "Clone Disk".
Step 2. Select the hard disk you want to clone as the source disk and the destination disk where you want to place the source disk data, and then click "Next".
Step 3. Check the source and destination disks, and click the "Set" button to adjust the partition size on the destination disk. Click the "Confirm" button to continue.
In addition, you can also use the tool to extend C drive without losing data, format/wipe partitions and clear all data.
If your primary disk is full, consider migrating some apps to a secondary disk or partition. This can help relieve pressure on your primary drive and reduce overall disk usage. AOMEI Partition Assistant offers an "App Mover" feature that allows you to transfer apps from one partition to another and ensure they can load as usual.
Step 1. Click "Free up" in the top toolbar and select "App Mover".
Step 2. Select the target disk in the list and click "Next".
Step 3. Tick the apps you want to move, select the destination path below, and click "Move".
Note: When prompted that running apps will be forced to close, click "OK" to start migrating apps.
Windows Search and Superfetch are designed to improve system performance, but sometimes they can cause high disk usage. Disabling these services may improve disk performance.
Corrupted files or disk errors can also cause high disk usage. Run the built-in Windows error-checking tool by right-clicking the disk in File Explorer, selecting Properties, then selecting the Tools tab, and then clicking Check.
A clean boot starts Windows with minimal drivers and startup programs. This can help you determine if background programs are causing high disk usage. To perform a clean boot, enter "msconfig" in the search bar and adjust your startup settings.
Experiencing 99% disk usage can be frustrating, but with the right approach, it’s possible to diagnose and fix the underlying issues. By checking background processes, scanning for malware, and performing disk cleanup, you can restore your computer's performance and enjoy a smoother user experience.
In the process, AOMEI Partition Assistant can help you delete large files, upgrade your hard disk, check hard disk errors, and free up disk space. If you need it quickly download the tool and improve the performance of your computer!
1. Is 100% disk usage harmful?
Yes, prolonged periods of 100% disk usage can lead to slower performance, increased wear on your hard drive, and may even result in data loss if not addressed promptly.
2. Why do I have 100% disk usage on my hard drive?
Factors like running resource-intensive applications, malware infections, or system settings can contribute to 100% disk usage.
3. Why is my disk at 100% when nothing is running?
Background processes, system updates, or services such as Windows Search and Superfetch can still be active even when no applications are visibly running.